Bicycle Frame Serial Number Photography: A Field Guide for Searchable Ownership Records
Learn how to photograph faint bicycle frame serial numbers, preserve the original evidence, improve legibility, and build searchable records for ownership, service, and recovery.
Bicycle Frame Serial Number Photography: A Field Guide for Searchable Ownership Records
A bicycle serial number can be surprisingly difficult to document. It may be stamped into curved metal, hidden beneath the bottom bracket, covered by grime, softened by layers of paint, or surrounded by casting marks that resemble real characters. A quick phone snapshot often records the general location but not enough detail to distinguish a shallow 8 from a B, or a 1 from a scratch.
That matters when a bicycle changes owners, enters a repair shop, travels with a touring group, or must be identified after loss. A useful ownership record should preserve more than a typed serial number. It should connect the transcription to clear photographs of the bicycle, the serial-number location, and the unaltered close-up from which the characters were read.
This guide presents a careful method for photographing hard-to-read frame numbers and turning the results into a compact, searchable record. It is intended for individual owners, community bicycle projects, small rental fleets, repair shops, and volunteer registration events. It does not replace local registration rules or an official theft report, but it can make the information you retain substantially easier to verify and use.
Why Serial-Number Photographs Fail
Most failures come from capture conditions rather than camera quality. A modern phone has enough resolution for the task, but only if the stamp occupies a meaningful portion of the image and light reaches it at a revealing angle.
Common problems include:
- The camera focuses on a cable, chainring, or frame edge instead of the stamp.
- Direct flash fills shallow impressions with flat light.
- Workshop lights create bright reflections on glossy paint.
- Digital zoom enlarges blur without adding detail.
- Dirt inside the stamped grooves hides character shapes.
- Heavy enhancement produces edges that were not visible in the source.
- The close-up is separated from the wider photograph that proves its location.
- A typed transcription is saved without recording uncertain characters.
One perfect-looking image is not the objective. A small sequence of complementary photographs is more dependable because each frame answers a different question: Which bicycle is this? Where is the number located? What physical marks are actually present?
Find the Number Before Setting Up the Camera
Serial-number placement varies by frame maker, model, age, and construction method. Begin with a visual inspection rather than assuming that every bicycle is marked beneath the crank area.
Likely locations include:
- The underside of the bottom-bracket shell
- The rear face or side of the seat tube
- A rear dropout near the axle
- The head tube
- The underside of the down tube
- A plate or label attached to an electric bicycle frame
An e-bike may also display model, compliance, motor, or battery identifiers. Do not automatically treat these as the frame serial number. Photograph each identifier in context and label its role separately in the final record.
Use a repair stand if one is available. Otherwise, stabilize the bicycle so it cannot roll or fall while you work. Avoid balancing an expensive bicycle upside down on sensitive controls, a display, a saddle, or brake components. Remove loose accessories only when doing so is safe and reversible.
Before cleaning anything, take one initial photograph of the marking as found. That image preserves its original condition and may show accumulated paint, corrosion, or dirt that is relevant to later interpretation.
Clean Conservatively
The goal is to remove loose contamination, not to restore the frame or deepen the stamp. Begin with the least aggressive method:
- Brush away dry grit with a clean, soft brush.
- Wipe the area gently with a slightly damp microfiber cloth.
- Use a small amount of bicycle-safe cleaner if grease remains.
- Dry the surface fully before photographing it.
Do not scrape paint, sand the metal, chase the characters with a sharp tool, or apply an unknown solvent. Those actions can damage the finish and alter the evidence you are attempting to preserve. They can also make an ambiguous character look more certain than it really is.
Powders, chalk, marker, and rubbing techniques are sometimes suggested for revealing impressions. They can contaminate porous finishes or remain in cracks. For ordinary ownership documentation, varied lighting and careful photography should come first. If the bicycle may be involved in a theft investigation, leave invasive examination to the relevant authority.
Capture Three Levels of Context
A dependable image set contains at least three views. Keep all three even if only the close-up will be used for transcription.
1. Bicycle identification view
Photograph the complete bicycle from the drivetrain side against an uncluttered background. Include the whole frame, both wheels, and visible distinguishing components. Take a second view from the opposite side when practical.
This image connects the record to the bicycle's color, frame design, fork, racks, fenders, and other recognizable features. Accessories can change, so do not rely on them as the only identifiers.
2. Location view
Move closer and show the relevant frame area together with nearby landmarks. For a number beneath the bottom bracket, include part of the crank, chainstay, or cable guide. For a dropout marking, include the axle area and adjacent stay.
A location view prevents a detached macro photograph from becoming contextless. It also helps another person find the mark later.
3. Detail view
Fill much of the frame with the stamped area, but leave a small border around it. That border preserves character spacing, surface texture, and nearby reference marks. Tap the stamp on the phone screen to set focus, hold the camera square to the local surface, and capture several frames.
Use the main camera rather than digital zoom whenever physical access allows. If the phone is too close to focus, move back slightly and crop later. A sharp, moderately sized stamp is more useful than a large blurred one.
Use Light to Reveal the Stamp
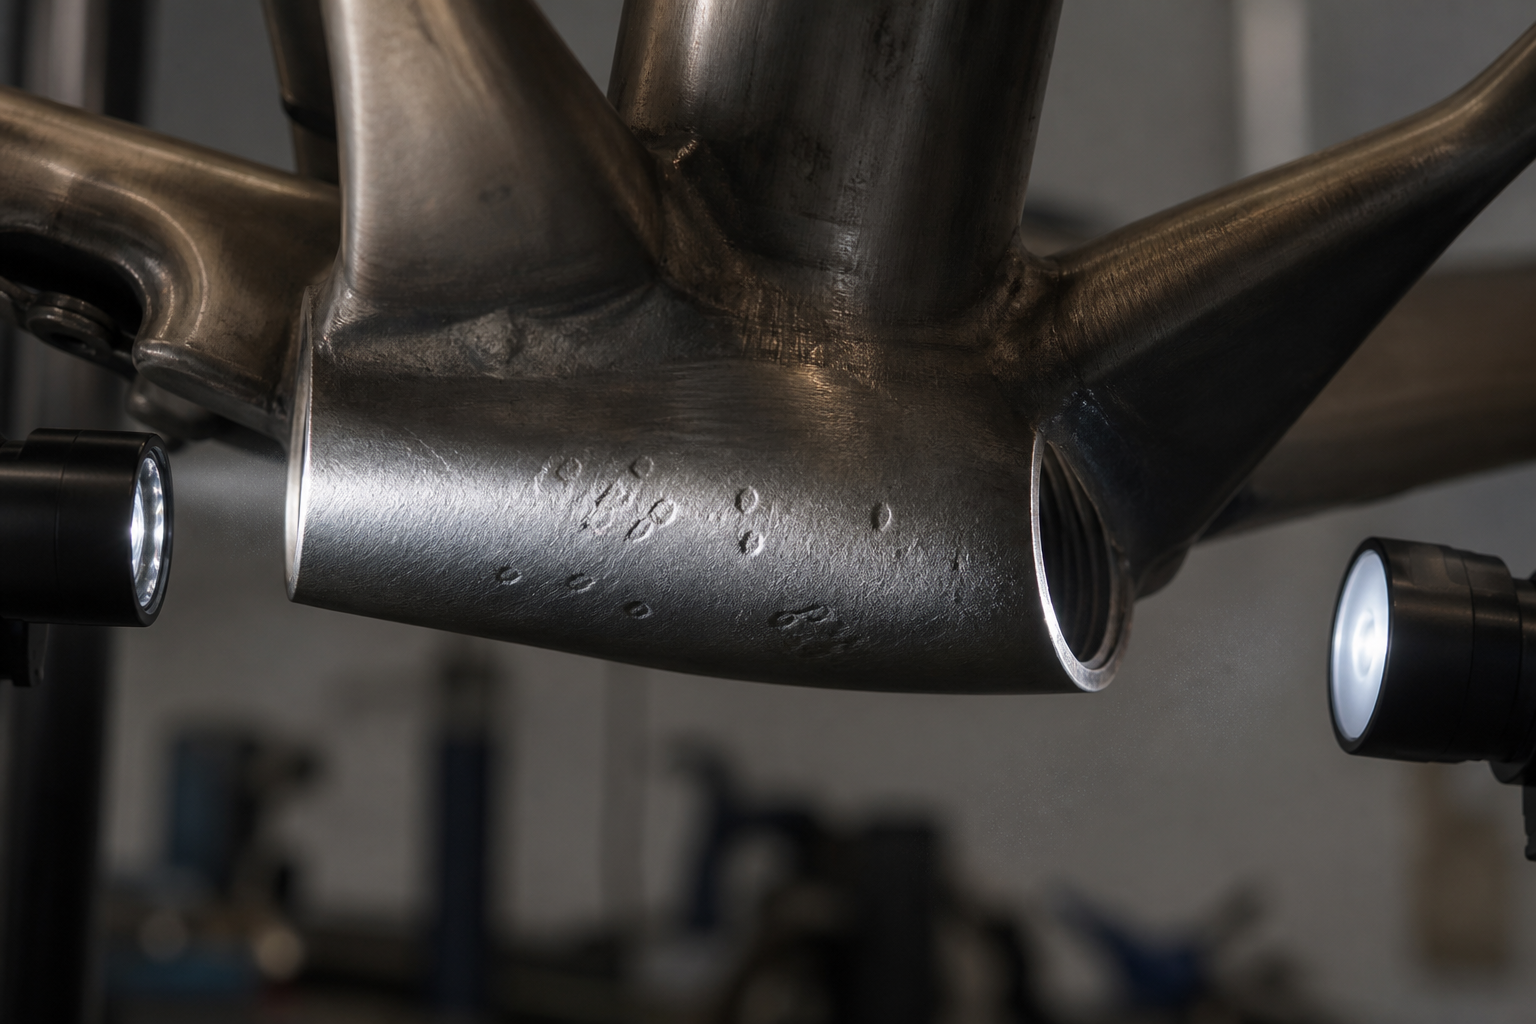
Shallow stamped characters become visible because their edges create highlights and shadows. A light placed near the camera can flatten those features. Instead, use grazing light: position a small lamp or flashlight close to the frame surface and aim it across the characters.
Capture a deliberate lighting series:
- Light from the left
- Light from the right
- Light from above
- Light from below
- Soft, diffuse light for a neutral reference
A character obscured in one image may become obvious when the shadow direction reverses. Keep the camera position as consistent as possible so the images are easy to compare.
For glossy paint, move the light rather than tilting the camera excessively. A sheet of white paper or thin white fabric can diffuse a harsh lamp, provided it is kept safely away from heat. A small piece of white card opposite the lamp can return a little light into deep shadows.
Turn off automatic flash unless it genuinely improves the result. Also wipe the phone lens; grease on the lens produces halos that are especially damaging around bright metal reflections.
Stabilize the camera in awkward positions
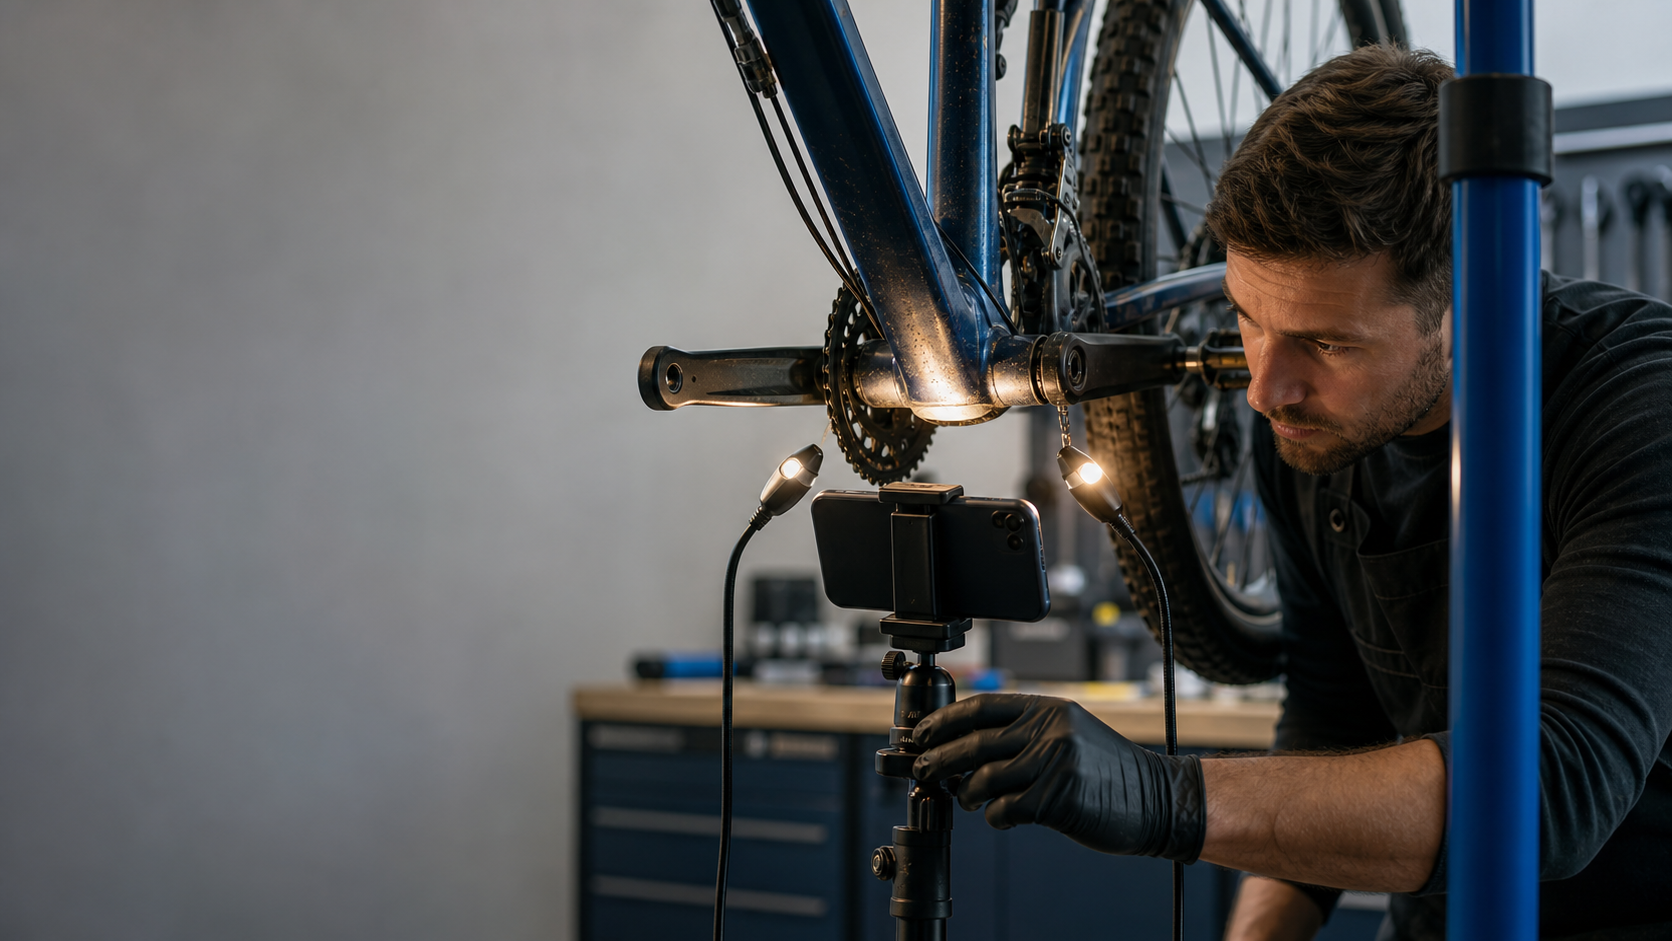
Serial numbers beneath a bottom bracket force the camera into an uncomfortable position. Shaky one-handed capture is a common source of failure. A phone clamp, compact tripod, beanbag, or folded cloth can provide support. Use a short timer or remote shutter so pressing the screen does not move the camera.
If stabilization is impossible, take a short burst of photographs while holding your breath briefly and bracing your hands against a fixed object. Review the images at full size before moving the bicycle. The sharpest frame is not always the last one captured.
Preserve an Untouched Original
Before cropping or enhancing anything, retain the original files. Do not repeatedly save over the same JPEG because each edit can discard information and make it difficult to separate genuine marks from processing artifacts.
A simple file set might contain:
bike-serial-context-original.jpgbike-serial-location-original.jpgbike-serial-left-light-original.jpgbike-serial-right-light-original.jpgbike-serial-crop-reference.pngbike-serial-crop-enhanced.png
The precise naming convention matters less than consistency. Include the bicycle's internal record ID rather than a person's full name if the files will be shared among staff or volunteers.
If the photographs are extremely large, create separate delivery copies with the image compressor. Keep enough resolution for character edges to remain visible, and compare the compressed result at 100 percent magnification before discarding any transfer copy. Retain the original separately.
Make a Reference Crop Before Enhancing
Create a tight crop around the entire serial-number line, including the first and last character and a modest margin. Do not crop each character into an isolated tile for the primary record; spacing and alignment can help with interpretation.
Use the image resizing tool only when a standard output size is needed for a database, form, or report. Enlarging an image does not recover missing detail, although a carefully enlarged viewing copy can make comparison more comfortable. Preserve the native-resolution crop as the reference.
For long-term compatibility, an ordinary JPEG or PNG is usually easier to hand between systems than a phone-specific capture format. The image converter can create a practical copy while the original remains untouched. PNG is useful for edited crops and diagrams; JPEG is often smaller for full-frame photographs.
Apply restrained corrections
An enhanced copy can help reveal a faint stamp, but every correction should remain reversible and traceable to the original. Useful adjustments include:
- Slight exposure correction
- Moderate contrast increase
- Highlight reduction on reflective paint
- Gentle shadow adjustment
- Neutral white-balance correction
- Mild sharpening after resizing
- Grayscale conversion for a comparison copy
Avoid extreme clarity, aggressive sharpening, edge filters, or repeated generative reconstruction. These can turn scratches, paint cracks, and compression blocks into character-like forms. If an editor offers object replacement or reconstruction, do not use it on the serial-number region.
The AI photo editor may be useful for non-evidentiary tasks such as simplifying a distracting background in a presentation copy. Keep the serial-number area and identifying frame details unchanged, and never substitute an edited presentation image for the untouched evidence photograph.
Transcribe Without Hiding Uncertainty
Read the number by comparing the differently lit originals and the restrained enhanced copy. Do not let optical character recognition make the final decision. Serial numbers are short, lack normal language context, and often mix letters with digits—all conditions that make automated recognition less reliable.
Record the characters exactly as observed. Preserve leading zeros, hyphens, spaces, and letter case when they appear meaningful. If one position remains uncertain, document the alternatives rather than silently choosing one.
For example:
- Observed transcription:
K7B04?21 - Uncertain position: character 6
- Possible readings:
5,S - Best supporting image: right-side grazing light
- Review status: second reader required
The image OCR tool can provide a candidate transcription for comparison. Run it on the clean reference crop and, if useful, on one restrained high-contrast copy. Treat disagreement as a prompt for human review, not as evidence that either result is automatically correct.
Use a two-pass review for shared registers
For a community project, rental fleet, or repair shop, ask one person to enter the serial number and another to compare it with the photographs. The second reviewer should not merely compare two typed strings; they should inspect the source images.
A compact decision table keeps handling consistent:
| Image condition | Recommended action | Record status |
|---|---|---|
| Every character is sharp in multiple views | Transcribe and verify once | Confirmed |
| One character changes appearance with light direction | Compare all originals and request a second reading | Provisional |
| Glare covers part of the stamp | Recapture with grazing light | Incomplete |
| Paint or corrosion obscures multiple positions | Preserve images and seek specialist inspection | Unresolved |
| Typed entry conflicts with the photograph | Correct only after visual review; retain an edit note | Review required |
Do not normalize a number merely because a database expects a certain length. Manufacturer conventions vary, and an older or repainted frame may not match a modern pattern.
Build a Small but Searchable Record

A serial-number photograph becomes more useful when it sits inside a structured ownership record. Keep the record focused on identification and avoid collecting personal details that the intended use does not require.
Useful fields include:
- Internal bicycle record ID
- Manufacturer and model as observed
- Frame color and type
- Wheel size when known
- Serial number exactly as transcribed
- Alternate reading for uncertain characters
- Physical location of the marking
- Capture date
- Photographer or staff identifier
- Review status
- Distinguishing permanent features
- Original image filenames
- Registration reference, if applicable
Distinguish permanent or semi-permanent features from easily replaced accessories. A welded rack mount, unusual frame repair, or distinctive paint damage may be more useful than a removable light.
Package photographs and documents together
For an individual owner, a compact PDF can combine the full-bicycle view, location view, serial-number close-up, purchase document, and registration confirmation. Use image to PDF to arrange selected copies into a portable record, but retain the original image files separately.
Place a short caption beside each image describing what it shows. Avoid shrinking the serial crop until the characters become unreadable on a phone screen or ordinary office printout. If the PDF contains an invoice or personal address, create a redacted sharing copy while keeping the private master in secure storage.
A practical folder structure is:
originals/for untouched camera filesreference-crops/for lossless cropsdelivery/for compressed images and a PDFrecord/for the structured entry and edit notes
Store at least one backup somewhere other than the device used to take the photographs. Access should be limited to people who need the record, particularly when the files include proof of purchase, location information, or owner contact details.
Registration Event Checklist
A volunteer event can document many bicycles consistently with a simple capture station. Prepare a neutral background, two small movable lights, a soft brush, microfiber cloths, a phone support, and a visible record-ID card. The ID card belongs in the context photograph, not over the serial number.
For each bicycle:
- Assign an internal record ID.
- Photograph the complete bicycle from both sides.
- Locate every plausible identifier.
- Capture the marking before cleaning.
- Clean conservatively if necessary.
- Take a location view.
- Take detail photographs with at least two lighting directions.
- Review sharpness while the bicycle is still present.
- Record the transcription and any uncertainty.
- Have a second person verify difficult entries.
- Return originals and the final record according to the event's privacy policy.
Do not display completed forms where other attendees can photograph them. Avoid calling serial numbers aloud in crowded spaces. If volunteers use personal phones, decide in advance how files will be transferred and removed after the organizer confirms receipt. Deletion should follow the event's stated policy rather than an improvised promise.
Common Mistakes to Avoid
Recording only the typed number
A transcription without a photograph cannot show whether a character was misread. Preserve the visual source.
Capturing only an extreme close-up
The number may be legible, but its relationship to the bicycle is unclear. Add a location view and a complete-bicycle view.
Trusting one lighting direction
A scratch can resemble part of a character under one light. Reverse the light and compare the resulting shadow structure.
Editing the only copy
Cropping, contrast correction, and sharpening can be helpful, but they should produce derivatives. Keep the untouched capture.
Treating OCR output as confirmation
OCR is a candidate reader. Short alphanumeric identifiers require visual verification, especially where 0/O, 1/I, 2/Z, 5/S, and 8/B may be confused.
Publishing the complete record unnecessarily
A public sale listing may need a partial identifier and clear bicycle photographs, not the owner's invoice, address, registration document, and every full-resolution source file. Share the minimum appropriate package for the situation.
A Better Record Comes From Better Evidence
Documenting a bicycle serial number is a small task with an outsized opportunity for error. The strongest result does not depend on dramatic image enhancement. It comes from stable capture, varied grazing light, multiple levels of context, restrained editing, explicit uncertainty, and organized storage.
Before considering the record complete, confirm that another person can identify the bicycle, locate the marking, inspect the original character shapes, understand any ambiguous positions, and find the supporting files. If all five are possible without relying on memory, the record is ready to support ownership administration, servicing, registration, or recovery efforts.