Control Panel Label Photo OCR: A Maintenance Guide for Mixed Text and Symbols
Turn difficult control panel photos into searchable maintenance records with better capture, selective cleanup, OCR verification, and structured naming for every asset.
Control Panel Label Photo OCR: A Maintenance Guide for Mixed Text and Symbols
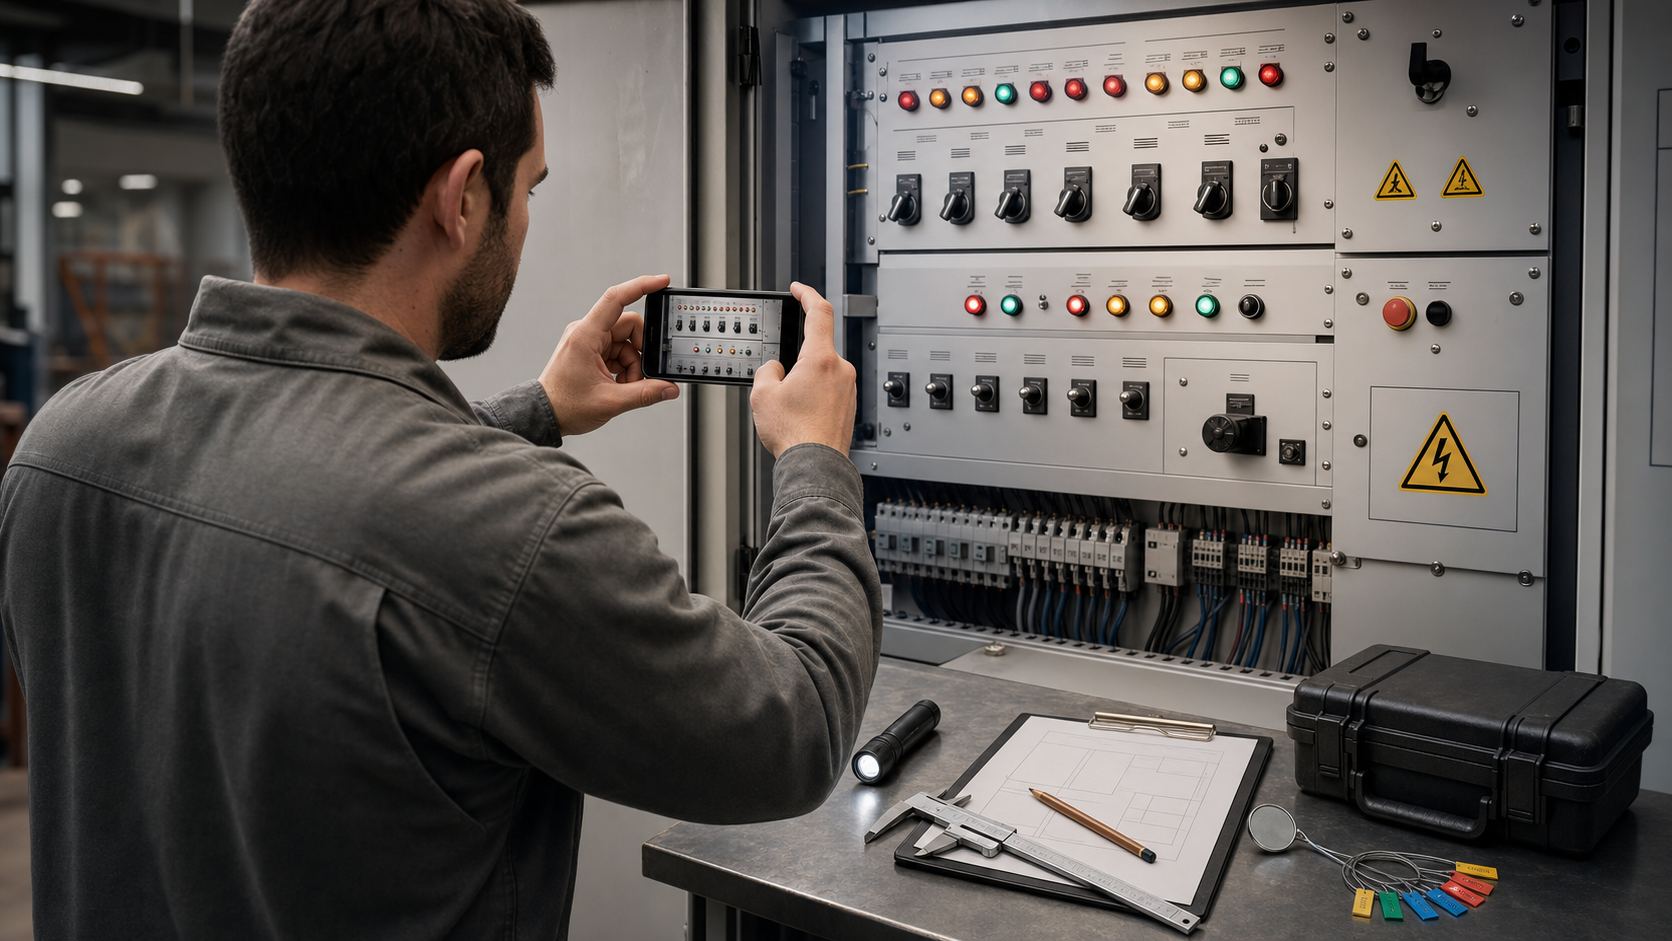
Photographing an equipment control panel seems easy until someone tries to search the resulting record. A single image may contain engraved legends, printed stickers, faded marker notes, warning icons, shiny selector switches, LED windows, and manufacturer branding. The human eye can interpret that mixture quickly. Optical character recognition often cannot.
This matters in small factories, building maintenance teams, teaching workshops, repair depots, and community facilities where documentation is incomplete or distributed across binders. A searchable record of panel labels can help technicians compare similar machines, prepare inspection sheets, identify inconsistent labeling, and find the correct photograph without opening dozens of files.
The goal is not to extract every visible mark automatically. A more reliable objective is to produce a compact set of photographs, cleaned image regions, verified text, and contextual notes that remain useful even when OCR misses a symbol or misreads a worn label.
This guide explains how to create that record without specialized inspection equipment. It also shows where image conversion, cropping, OCR, and PDF assembly fit into the process.
Why Control Panels Are Difficult OCR Subjects
Control panels combine several conditions that are individually unfriendly to text recognition.
Text may be curved around a rotary control, printed vertically beside a meter, or interrupted by a screw head. Engraved lettering can depend entirely on shallow shadows. Plastic label tape may reflect the photographer or an overhead lamp. Older panels often mix condensed type, handwriting, abbreviations, and symbols. A large manufacturer logo can also attract recognition attention while the small operational labels remain unreadable.
The layout introduces another problem. OCR software generally benefits from clear lines of text, but a panel is a spatial interface. The relationship between a label and the adjacent switch is often more important than the words alone. Cropping too tightly may improve recognition while destroying that relationship.
Treat the task as documentation with OCR assistance, not as a one-click transcription exercise. Preserve both the full visual context and the smaller regions optimized for reading.
Decide What the Record Must Answer
Before taking photographs, identify the questions the archive should support. This prevents unnecessary transcription and determines how much context each image needs.
A maintenance record might need to answer:
- Which asset contains a control labeled with a particular abbreviation?
- What positions were printed around a selector switch?
- Did a replacement label differ from the original engraved legend?
- Which warning markings were visible at the time of inspection?
- Where is a particular indicator located relative to the main disconnect?
- Which labels are too damaged or ambiguous to trust?
Create a small field list before capture. A useful starting set is asset ID, site, panel location, capture date, overall condition, label text, control type, nearby symbol, confidence, and reviewer note.
Do not expect OCR output to supply all of these fields. Asset identity, location, and interpretation normally require human input. OCR is most valuable for accelerating transcription and making repeated terms searchable.
Capture the Panel in Three Deliberate Views
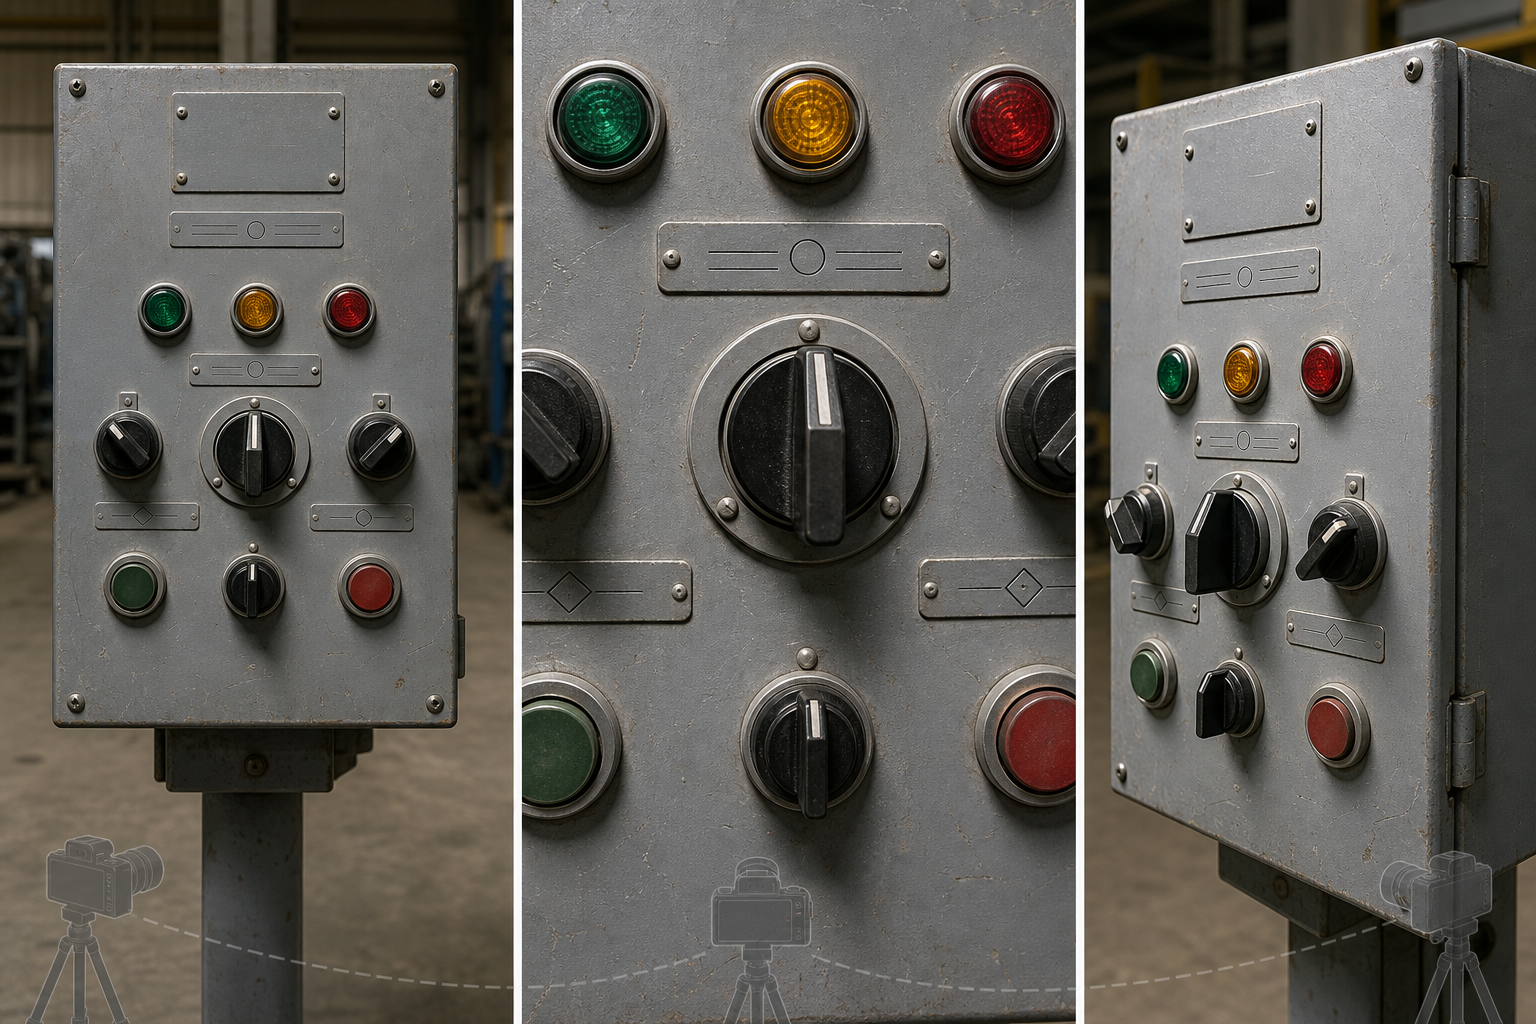
For each panel, take an overview, a set of straight detail photographs, and optional angled evidence photographs.
The overview establishes context. Photograph the entire panel face as squarely as possible, including its edges and any asset identifier. This image should let another person understand where each control is located. It is not necessarily the best OCR source.
Next, capture overlapping detail views. Keep the camera sensor parallel to the surface whenever possible. Each frame should include a manageable group of controls plus enough surrounding space to show which label belongs to which component. Overlap neighboring frames by roughly one control column or row. That overlap helps reviewers reconstruct the layout and guards against a blurred edge.
Finally, use angled views selectively for shallow engraving, embossed characters, or reflective plates. Moving the camera or light slightly to one side can reveal letter edges that disappear in a straight photograph. An angled frame should supplement the square detail view, not replace it, because perspective distortion can reduce OCR accuracy.
Stabilize Before Increasing Resolution
Motion blur destroys narrow character strokes even in a high-resolution file. Brace the phone or camera against a stable surface when safe, use a tripod in controlled environments, or enable a short timer to avoid movement from pressing the shutter.
Check the smallest important label at full magnification before leaving the site. If its edges look soft, retake the frame. Extra megapixels cannot restore detail that was never focused correctly.
Never lean into energized equipment or bypass access rules to obtain a better angle. Follow the site's electrical safety procedures, approach boundaries, and authorization requirements. Photography is secondary to safe access.
Control Reflections Without Hiding Condition
Turn off the camera flash unless it produces a clearly better result. A direct flash often creates a white hotspot on laminated labels, meters, and glossy paint. Diffuse ambient light or a lamp positioned to the side is usually easier to manage.
Take two exposures when glare cannot be eliminated: one optimized for the general panel and another from a slightly shifted position that reveals the obscured label. Do not digitally erase corrosion, scratches, broken indicators, or other condition evidence. Cleanup should improve legibility without rewriting the historical state of the equipment.
Use Zones Instead of Treating the Panel as One Image
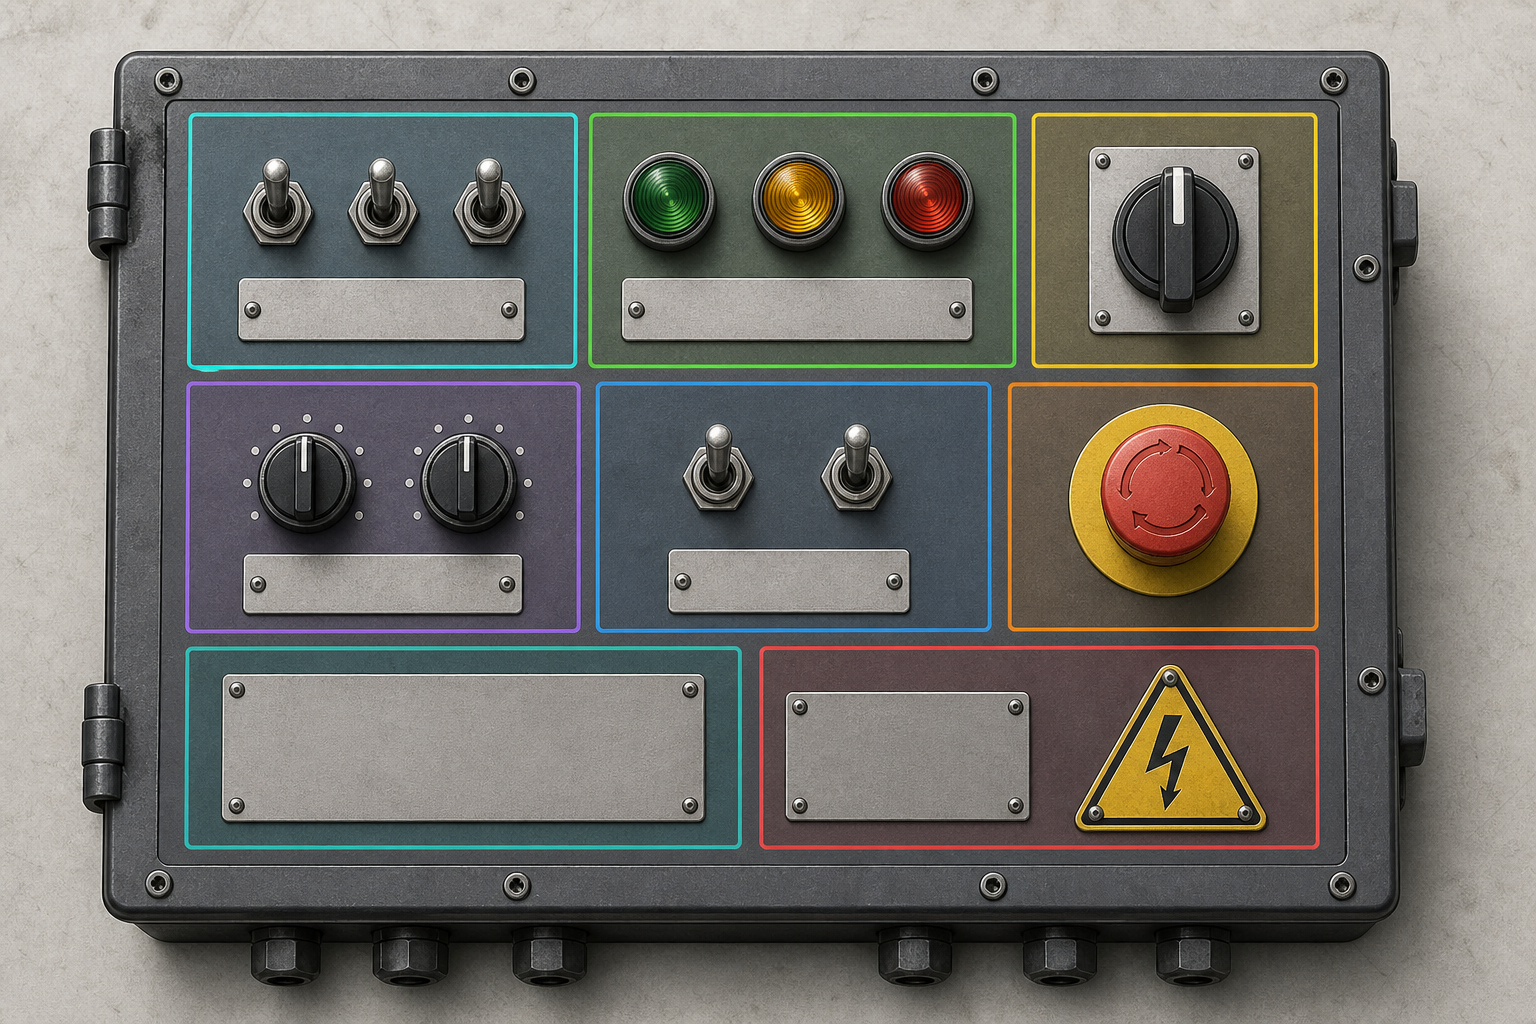
A full panel photograph usually contains too much visual competition for dependable OCR. Divide it into functional zones while retaining the original overview.
Useful zones include a selector switch and its surrounding positions, a row of push buttons, a meter with its title and units, a warning plate, or a cluster of indicator lamps. Avoid arbitrary crops that split a label from its control.
A practical file set might contain:
- One untouched overview
- Three to eight contextual zone images
- A few tight OCR crops for especially difficult labels
- One verified text record
- An optional PDF inspection packet
Start from a copy of the original image. Use the image resizer when the source is unnecessarily large, but retain enough pixels for the smallest lettering. Resizing downward is useful for storage and sharing; it is not a cure for poor focus.
For each zone, preserve two versions when necessary. The contextual crop shows the control-label relationship. The tighter crop removes distracting hardware and gives OCR a simpler target. Link both through consistent filenames or a shared record ID.
Prepare Crops for Recognition Without Altering Evidence
OCR preparation is different from cosmetic retouching. The aim is to separate character strokes from their background while keeping the source image available for comparison.
Begin with rotation and perspective. Text lines should be horizontal or vertical, and rectangular plates should look rectangular. Minor geometric correction can provide a larger gain than aggressive sharpening.
Then evaluate brightness and contrast. Pale engraving may benefit from stronger local contrast, while black text on white tape may need only a small exposure adjustment. Inspect the character edges after every change. If narrow letters begin merging or holes inside characters disappear, the adjustment is too strong.
A restrained preparation sequence is:
- Duplicate the source crop.
- Rotate and correct perspective.
- Adjust exposure enough to reveal the full label.
- Increase contrast gently.
- Apply light sharpening only if edges remain natural.
- Export a lossless or high-quality intermediate.
- Run OCR and compare its result with the original.
The AI photo editor can help with localized visual cleanup, but do not use generative replacement on text that will become a maintenance record. A plausible invented letter is more dangerous than an obvious unreadable patch. Record uncertainty instead of asking an editor to reconstruct missing characters.
Choose a Sensible Intermediate Format
Repeated JPEG saving can add halos and block artifacts around small text. For cleaned OCR crops, PNG is often a practical intermediate because it avoids additional lossy compression. JPEG can remain appropriate for photographic overviews when saved at a suitable quality.
If images arrive in HEIC, TIFF, WebP, or another inconvenient format, use the image converter to create a consistent working set. Keep the camera originals separately. Conversion should standardize access, not replace the source archive.
Do not enlarge every crop automatically. Upscaling can make an image easier for a person to view, but it does not create authentic character detail. Test recognition on the original crop and a moderately enlarged copy, then retain whichever gives the more accurate verified result.
Separate Printed Text, Engraving, and Handwriting
Different text classes benefit from different treatment. Running the same preparation settings across every panel region is convenient but unreliable.
Printed label tape generally has strong character shapes. Correct rotation, suppress glare, and avoid excessive contrast that causes adhesive stains to merge with the letters.
Engraved legends depend on lighting direction. Compare the straight and angled photographs before editing. A grayscale conversion may make shallow shadows easier to evaluate, but retain the color source because paint fill and corrosion can provide useful clues.
Handwritten maintenance notes are the least predictable. OCR may confuse dates, initials, and compact technical abbreviations. Transcribe these manually when they affect safety or service history, and mark them as handwritten in the record.
Symbols require their own field. Do not force an icon into a text transcription. Describe it conservatively, such as triangular warning symbol, rotation arrow, or protective earth symbol, and retain the image crop. If the exact symbol has regulatory significance, have a qualified reviewer identify it.
Run OCR as a Draft, Not the Final Record
Submit focused crops to the image OCR tool, then compare the extracted text character by character with the photograph. OCR output is a transcription candidate, not evidence by itself.
Common substitutions include O and 0, I and 1, S and 5, B and 8, or a hyphen and a minus sign. Short control labels are especially vulnerable because there is little linguistic context to help recognition. Abbreviations such as MAN, AUTO, FWD, REV, AUX, and RESET may also be expanded or corrected incorrectly by language-aware software.
Use a confidence system that reflects human review:
| Status | Meaning | Recommended action |
|---|---|---|
| Verified | Every character is clearly visible and checked | Add to the searchable record |
| Probable | Text is mostly clear but one detail remains uncertain | Add a note and retain the crop |
| Ambiguous | Two or more readings are plausible | Record alternatives without choosing silently |
| Unreadable | The source does not support transcription | Retake if possible or escalate for inspection |
Avoid false precision. If the photograph supports P?MP 2, do not silently store PUMP 2 merely because it sounds reasonable. A notes field can contain the probable interpretation while the transcription field preserves uncertainty.
Verify Spatial Relationships
After correcting the words, confirm that each label has been assigned to the right control. Dense panels may place one legend above a switch and another below it. A tight crop can make the association ambiguous.
Review the transcription beside the contextual zone and overview. Record a simple position such as upper-left group, third indicator from left, or selector below meter. If the panel uses reference designators, capture those as separate fields rather than combining everything into one text string.
A second reviewer is particularly useful for short labels, damaged plates, handwritten changes, and safety-related controls. The reviewer should see the image, not only the proposed text.
Name Files for Retrieval, Not Just Storage
Camera filenames do not explain what an image contains. Use a stable pattern that connects the asset, panel, zone, view type, and date.
For example:
asset-042_panel-a_zone-03_context_2026-07-23.jpg
asset-042_panel-a_zone-03_ocr-crop-02_2026-07-23.png
Keep names lowercase, use consistent separators, and avoid renaming the same file differently in separate folders. Store the verified text in a spreadsheet, database, or structured document keyed to the same asset and zone identifiers.
Include the original filename or a source checksum when traceability matters. This makes it easier to prove which camera file produced a cleaned crop without embedding a complicated history in the visible filename.
Build a Review Packet for Field Use
A compact PDF can be more convenient than a folder of unrelated images when technicians need to review a panel away from the archive.
Create one page per zone with the contextual photograph, any critical detail crop, verified transcription, uncertainty notes, and capture date. Begin with the full-panel overview and a simple zone map. Assemble the pages with the image-to-PDF tool.
Keep image resolution high enough for zooming, but compress the delivery copy only after checking the smallest labels. Fine engraved strokes are often the first details lost. Preserve a higher-quality archival set separately from the review PDF.
The packet should identify ambiguous readings rather than conceal them. It should also state when photographs document appearance only and do not confirm the electrical function of a control.
Final Quality-Control Checklist
Before publishing the record internally, perform one last visual and textual audit.
- Confirm the overview shows the entire relevant panel.
- Check that every zone can be located in the overview.
- Verify that detail images are sharp at full magnification.
- Compare OCR text against the original photograph, not only the cleaned crop.
- Check ambiguous letters, digits, punctuation, and abbreviations individually.
- Confirm each label is associated with the correct control.
- Describe symbols separately from text.
- Preserve original files and document derived versions.
- Mark unreadable areas honestly.
- Remove accidental personal information visible in reflections or surrounding paperwork when policy requires it, while retaining an access-controlled original if necessary.
- Test the final PDF or record on the device technicians actually use.
A good control panel archive does more than collect attractive photographs. It preserves spatial context, distinguishes observation from interpretation, and makes uncertainty visible. With careful capture, zone-based crops, conservative image preparation, and human verification, OCR becomes a useful indexing aid instead of an unreliable authority.