Museum Accession Photo Contact Sheets: A Practical Workflow for Small Collections
A practical workflow for small museums and archives that need clean accession photo contact sheets, readable labels, compact PDFs, and consistent review packets.
Museum Accession Photo Contact Sheets: A Practical Workflow for Small Collections
Small museums, campus collections, local history groups, and private archives often have the same documentation problem: the object photos exist, but they are scattered across phones, shared drives, email attachments, and half-finished folders. When someone needs to review a new donation, verify a box inventory, or send a visual summary to a registrar, the team ends up opening image files one by one.
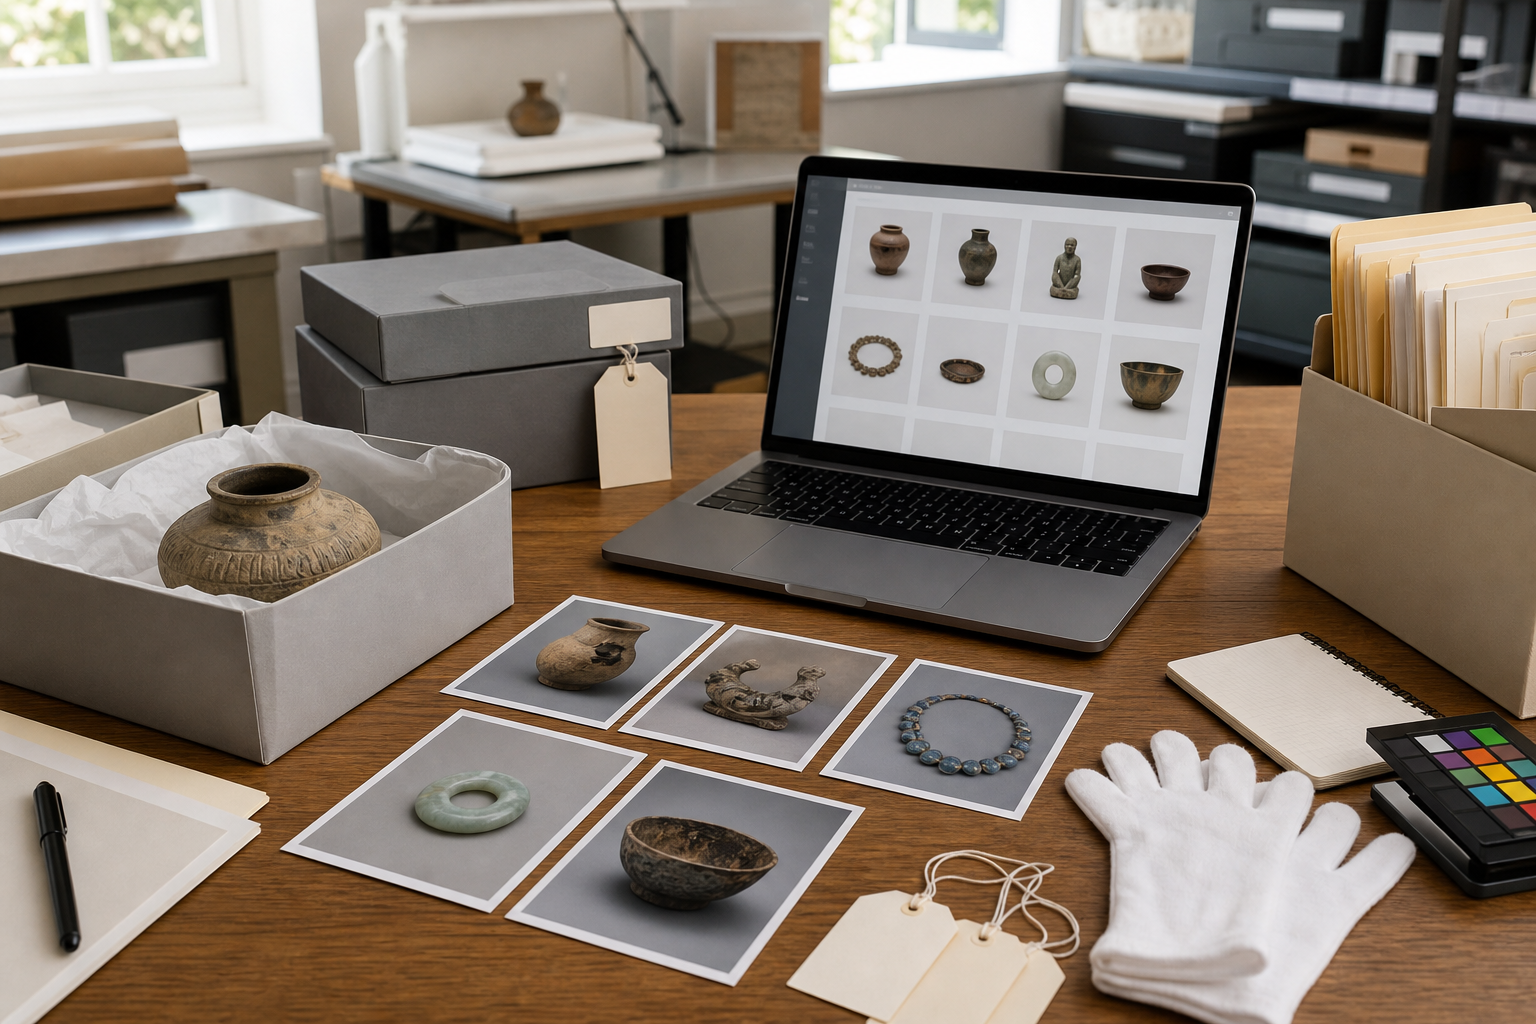
A contact sheet solves that in a humble but powerful way. It gives reviewers a compact visual index of objects, labels, conditions, and missing views. It is not a full collections management system, and it should not pretend to be one. It is a lightweight review packet that helps a small team make better decisions before images disappear into long-term storage.
This workflow is for small collections that need accession photo contact sheets without layout software, scripting, or a dedicated imaging department. The goal is a repeatable process: capture useful images, normalize them, extract visible label text where helpful, build a PDF packet, and keep the file small enough to share internally.
Why Contact Sheets Still Matter
A folder of individual photos is fine for storage, but poor for review. Reviewers need to scan patterns: which objects are missing scale shots, which labels are unreadable, which items have condition issues, and which images were captured under inconsistent lighting. A contact sheet makes those issues visible in minutes.
For accession work, the contact sheet has four jobs:
- Show every object in the group without opening separate files.
- Preserve enough visual detail to support identification and triage.
- Give the reviewer context from filenames, folder names, or label OCR.
- Create a portable PDF record that can be attached to internal notes.
The contact sheet is especially useful before formal cataloging. At that stage, the team may not yet have perfect titles, object numbers, or metadata. A clean visual packet helps bridge the gap between a donation intake table and the permanent catalog record.
It also protects staff time. Instead of asking a curator to inspect a messy upload folder, you send one review file. Instead of asking a volunteer to rename hundreds of files perfectly on the first pass, you create a packet that makes naming problems obvious.
The Minimum Viable Accession Photo Set
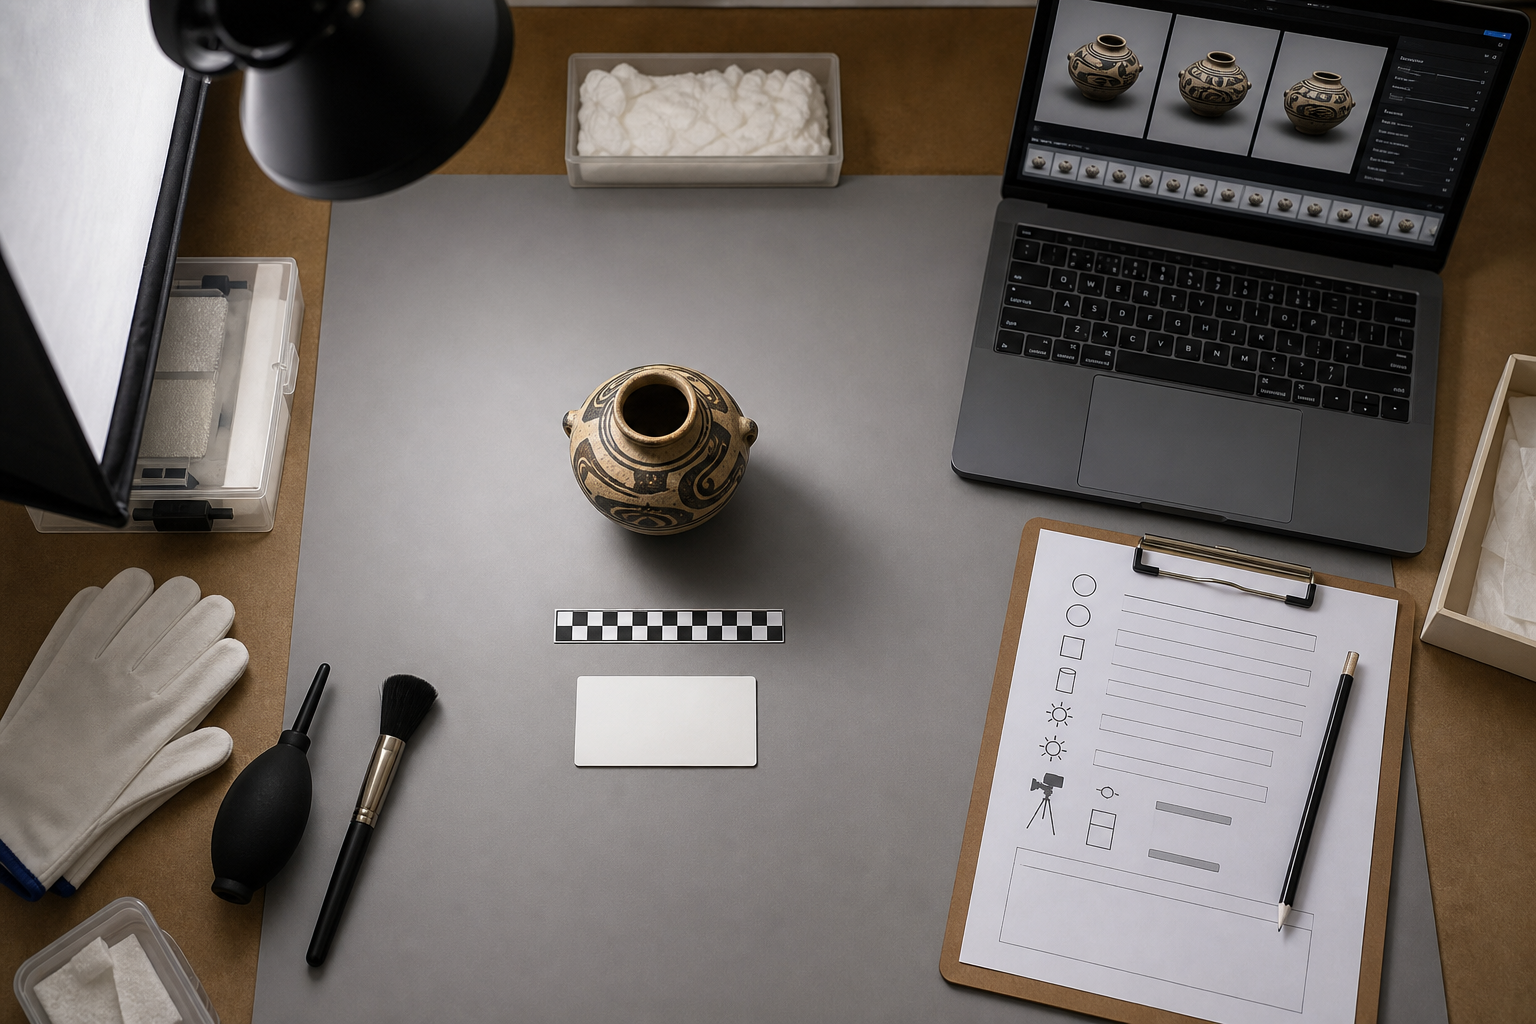
A useful contact sheet begins before conversion. The best PDF layout cannot rescue photos that omit the identifying information reviewers need. For each object, aim for a minimum photo set that is quick to capture but still useful later.
A practical set is:
- One overall front or primary view.
- One secondary view if the object has meaningful back, side, or interior details.
- One close view of markings, inscriptions, labels, maker stamps, or damage.
- One image that includes a scale ruler or size reference.
- One temporary accession label in the frame when appropriate.
This does not mean every object needs five final archive-quality images. For a preliminary contact sheet, consistency matters more than perfection. If you can capture one clear overall view and one label or detail view for every object, the review process becomes much easier.
Use a neutral background, even lighting, and a stable camera position. A phone on a small tripod is often enough. Avoid patterned tables, deep shadows, and reflective plastic sleeves when possible. If the object is fragile, do not rearrange it for the photo; document the condition and let handling rules win over visual neatness.
Label Cards Without Creating Metadata Trouble
Temporary labels are useful, but they can create confusion if they look like final catalog numbers. Use a consistent intake code, box number, or donor group identifier. Keep it visibly temporary. The purpose is to help humans connect the photo to the intake batch, not to replace the official accession record.
A simple label card might include:
- Intake batch code.
- Box or tray number.
- Object sequence number.
- Photographer initials.
- Capture date.
If your team later uses OCR to read visible labels from photos, keep handwriting large and high contrast. Small pencil marks on gray paper are difficult for both people and OCR tools. A black marker on a white card works better for the review stage, even if the final archival label is produced another way.
Triage the Image Folder Before Editing
Before resizing, converting, or building the PDF, do one pass through the folder. This is not a detailed cataloging session. It is a quick quality-control pass that prevents bad inputs from becoming a polished but unreliable review packet.
Create three temporary folders:
| Folder | Use it for | Action |
|---|---|---|
| Ready | Images clear enough for review | Continue to processing |
| Retake | Blurry, cropped, unreadable, or wrong object | Capture again if possible |
| Reference only | Useful but imperfect images | Include only if clearly labeled |
This pass is worth doing even when time is tight. A contact sheet with missing or unclear photos can create false confidence. Reviewers may assume a mark, crack, or label does not exist simply because the image did not show it.
During triage, check for these issues:
- The object is partly outside the frame.
- The photo is too dark to read surface detail.
- A label card blocks part of the object.
- Multiple objects appear in one image without clear separation.
- The filename does not match the object or temporary label.
- Duplicate photos make the set look larger than it is.
If you have many phone images in mixed formats, normalize them early. Convert unusual formats into a more predictable working set with Convert Image. For review packets, JPEG is usually acceptable for ordinary object photos, while PNG may be better for screenshots, diagrams, or images with sharp flat labels.
Normalize Dimensions Without Losing Evidence
Contact sheets become awkward when every image has a different shape and resolution. Large originals slow down review, while tiny derivatives make details unreadable. The aim is not to create final preservation masters. Keep the originals untouched in a master folder, then make a separate working copy for the contact sheet.
A sensible working target for most accession review packets is a long edge between 1600 and 2400 pixels. That is usually enough for reviewers to zoom into labels and condition details without turning the PDF into a massive file. If your images contain very small inscriptions, stay closer to the upper end. If they are simple overall object shots, the lower end may be enough.
Use Resize Image on the working copies, not the originals. Keep the aspect ratio locked so objects do not become distorted. Distortion is a documentation problem, not just a cosmetic issue. A flattened vase, stretched textile, or warped tool silhouette can mislead reviewers.
Decide What Deserves Full Resolution
Not every image should be treated the same way. A primary overview image can often be resized more aggressively than a detail image showing a maker's mark or damage. The contact sheet can include both, but the detail image should remain readable.
Use this decision table before resizing:
| Image type | Resize approach | Reason |
|---|---|---|
| Overall object view | Moderate resize | Shape and identity matter most |
| Label card view | Preserve enough resolution for reading | Label text anchors the batch |
| Damage detail | Preserve higher resolution | Condition decisions may depend on it |
| Scale view | Moderate resize | Relative size matters, not tiny texture |
| Duplicate angle | Remove or downsize heavily | Avoid bloated review packets |
If the team regularly reviews tiny maker marks, serial numbers, or inscriptions, include one enlarged detail page after the main contact sheet grid. A compact grid is excellent for scanning, but it is not always the right place for microscopic evidence.
Clean Label Legibility Before OCR
OCR can be helpful when visible labels are part of the image set, but it is sensitive to blur, contrast, rotation, and clutter. If the label card is crooked or partially hidden, OCR may produce misleading text. Treat OCR as an assistant for review, not as the authority of record.
Before using Image OCR, crop the label area or create a clearer working copy. If the photo includes a large object and a small label card in the corner, OCR may spend attention on texture, shadows, or background objects. A tighter crop around the label can produce cleaner results.
Good OCR preparation includes:
- Rotate images so label text is horizontal.
- Crop away irrelevant background when possible.
- Increase contrast if the label is pale or low light.
- Avoid over-compressing before OCR.
- Keep the original full photo for visual review.
OCR is most useful for catching mismatches. For example, if the visible label says Box 4 Item 12 but the filename says Box 4 Item 21, the packet reviewer can flag the problem before the error enters a catalog spreadsheet.
Do not rely on OCR for handwritten accession notes unless you verify the output manually. Handwriting, abbreviations, and smudged temporary labels can easily produce wrong text. In a collections context, a wrong number is worse than no number because it can send staff searching for the wrong object later.
File Naming That Survives Review
A contact sheet should make sense even when separated from its original folder. The filenames do not need to be beautiful, but they should carry enough information to reconnect images with objects.
A practical naming pattern is:
batch_box_item_view_sequence.ext
For example:
donor2026a_box03_item014_front_01.jpg
donor2026a_box03_item014_label_02.jpg
donor2026a_box03_item014_mark_03.jpg
This structure keeps related images together alphabetically. It also makes later review easier because the role of each image is visible: front, label, mark, damage, scale, back, side, interior, or reference.
Avoid filenames that depend on camera order alone, such as IMG_4821.jpg. Those names are fine in the untouched master folder, but they are weak in a review packet. They do not tell the reviewer what the image shows or which item it belongs to.
If renaming is not feasible before the first review, use folder organization instead. Separate each box or tray into a folder, then build one packet per folder. Smaller packets are easier to correct than one enormous PDF containing every object in a donation.
Build the Review Packet
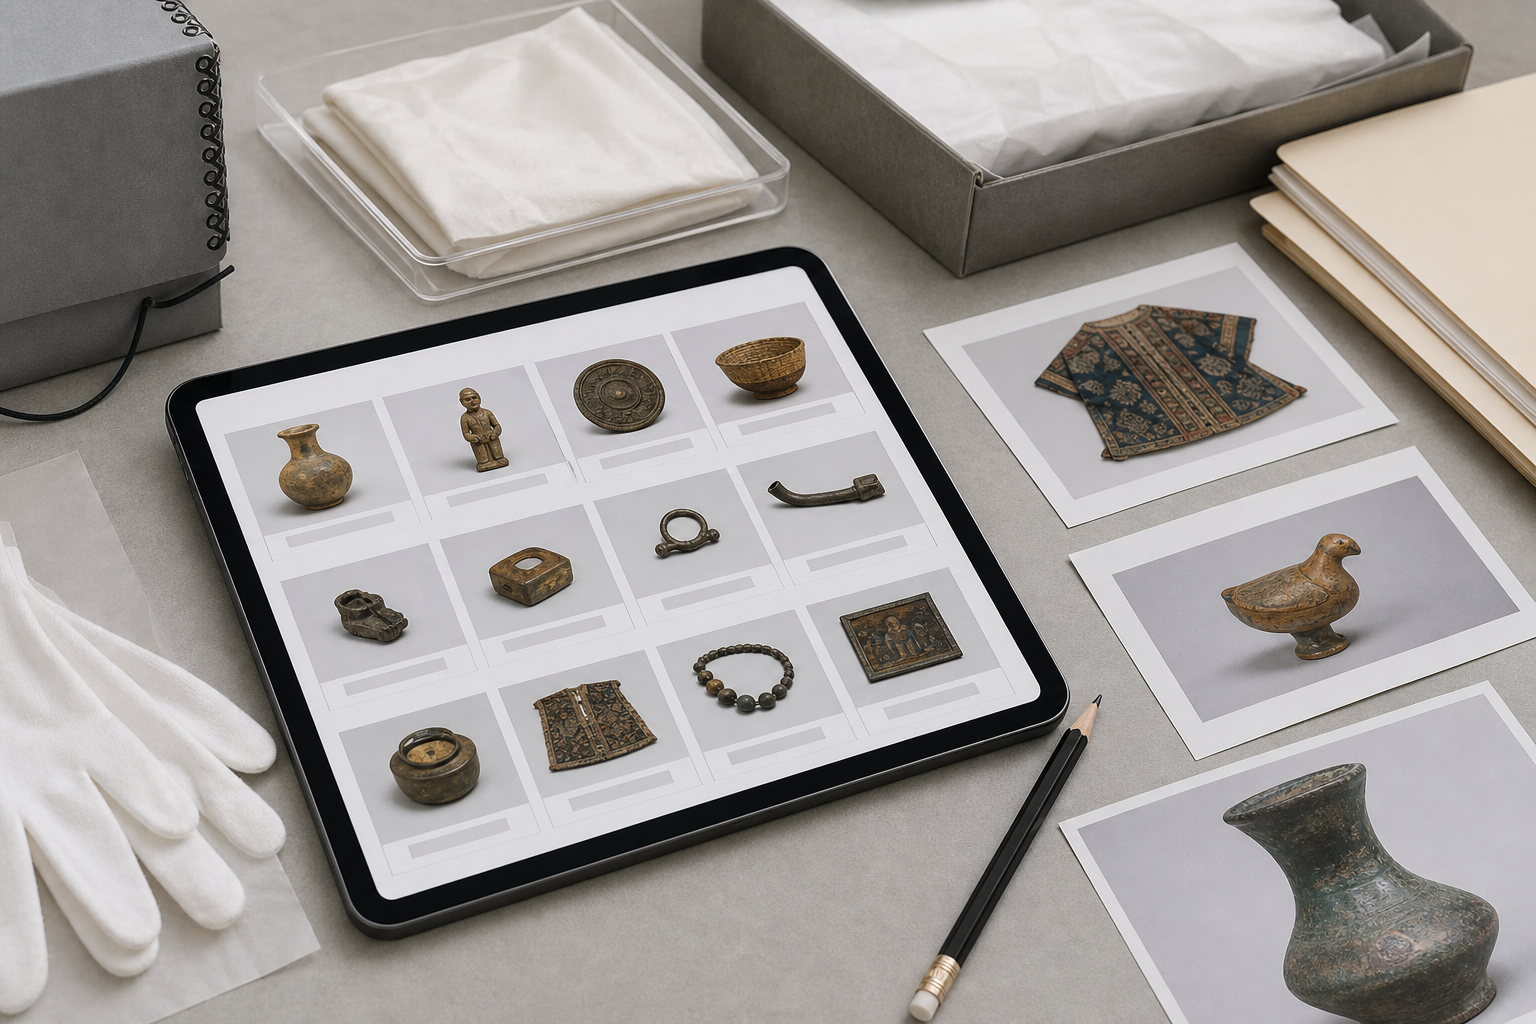
Once the working images are selected, resized, and named, convert them into a PDF review packet. A PDF is convenient because it travels as one file, opens on most devices, and can be attached to internal collection notes.
Use Image to PDF to assemble the working copies. For a contact sheet, the key decision is page density. Too few images per page creates a long document. Too many images per page makes labels and details unreadable.
A useful starting point is:
| Packet purpose | Suggested layout | Notes |
|---|---|---|
| Curator overview | 6 to 12 images per page | Fast scanning across objects |
| Registrar intake check | 4 to 8 images per page | Better for filenames and labels |
| Condition triage | 2 to 4 images per page | Leaves room for visible detail |
| Donor discussion copy | 4 to 6 images per page | Clear but not overwhelming |
If your PDF builder places one image per page, you can still create a review packet, but it will behave more like a slide deck than a contact sheet. That may be fine for detailed condition review, but it is slower for inventory scanning.
Packet Order Matters
The order of images should match the way people review the accession. Most teams do best with object-by-object grouping:
- Object 001 front.
- Object 001 label.
- Object 001 detail.
- Object 002 front.
- Object 002 label.
- Object 002 detail.
This is better than grouping all front views first, all label views second, and all details third. Object-by-object order reduces context switching and makes missing views easier to notice.
For larger accessions, create separate PDFs by box, tray, shelf, donor lot, or intake date. A 20-page packet is easier to review than a 140-page packet, and corrections are easier to track.
Add a Plain Cover Page When Needed
A cover page can be useful, but keep it plain. Include only operational context: collection or donor group, date range, prepared by, and what the packet is for. Avoid turning the cover into a narrative report. The contact sheet is a review tool, not a final publication.
If you already have a one-page intake summary as a PDF, combine it with the image packet using PDF Merge. Place the summary first, followed by the contact sheets. This gives reviewers the administrative context before they start scanning images.
Compress Without Making Labels Useless
PDF contact sheets can become large quickly, especially if they contain dozens of phone photos. Compression is useful, but aggressive compression can destroy the very details that make the packet valuable.
Before sharing the PDF, open it and zoom to the smallest label or mark that matters. If it cannot be read at a reasonable zoom level, the packet is too compressed or the source image is inadequate.
A practical compression checklist:
- Keep the untouched originals separately.
- Compress only the review copy.
- Inspect labels, inscriptions, and condition details after compression.
- Use a descriptive filename that marks the file as a review packet.
- Avoid sending multiple competing versions with vague names.
Use Compress Image before PDF assembly if the source images are extremely large, or compress the PDF through your normal document workflow after assembly. The important point is verification. File size is not the only metric; legibility is the metric that matters.
A good review packet filename might be:
donor2026a_box03_contact-sheet_review-v1.pdf
If you revise it after retakes or renaming corrections, increment the version:
donor2026a_box03_contact-sheet_review-v2.pdf
Do not overwrite the first version if reviewers have already commented on it. Version confusion can create more work than a large file ever would.
Quality Control Before Sharing
Do a final review pass before sending the packet to curators, registrars, volunteers, or external partners. This pass should be quick, structured, and boring. Boring is good here because the same checklist catches the same problems every time.
Check the following:
- The H1 or cover title identifies the batch clearly.
- Every page opens without errors.
- Images appear in the intended order.
- Object labels are not accidentally cropped out.
- No private donor paperwork appears in the background.
- No unrelated personal photos were included from a phone upload.
- Filenames or visible labels are consistent enough for review.
- The PDF size is reasonable for the intended sharing method.
Privacy matters even for small institutions. A quick phone capture may include a donor address, staff note, email printout, or unrelated object in the background. Contact sheets make those accidents easier to spread because many images are packaged into one file.
If you find a privacy problem, fix the source image or remove it from the packet. Do not assume a later reviewer will ignore it.
Handling Retakes and Corrections
Retakes are normal. A contact sheet often reveals problems that were invisible during capture. The workflow should make corrections easy instead of treating them as failure.
When a reviewer requests retakes, ask for specific notes:
- Object number or temporary label.
- Current image filename.
- What is wrong with it.
- What replacement view is needed.
- Whether the old image should remain as reference.
Add replacement images using the same naming pattern. If an image is superseded, mark it clearly or move it out of the ready folder. Avoid keeping both versions with nearly identical names unless the difference is obvious.
For example:
donor2026a_box03_item014_mark_03_blurry.jpg
donor2026a_box03_item014_mark_03_retake.jpg
Before creating a revised packet, scan the folder for old exports. It is common to accidentally include both the rejected image and the retake. That makes the packet longer and can confuse reviewers about which image is current.
When the Contact Sheet Becomes a Record
A review packet is not automatically a permanent collections record. Some teams keep contact sheets as part of accession documentation, while others treat them as temporary working files. Decide this before packets start accumulating.
If you keep them, store the final reviewed PDF near the accession documentation and preserve the source image folder separately. The PDF is a convenient index, but it should not be the only copy of the images. Contact sheets are compressed, arranged, and sometimes cropped. They are not a substitute for master image files.
If you discard review packets after cataloging, still keep a short audit trail. Note when the packet was created, who reviewed it, and where the final images or catalog records live. This helps future staff understand why a PDF may not be present.
For small collections, the best policy is often simple:
| File type | Keep? | Location |
|---|---|---|
| Original camera files | Yes | Master image storage |
| Working resized images | Optional | Temporary processing folder |
| Final reviewed contact sheet | Usually yes | Accession documentation folder |
| Draft contact sheets | Maybe | Remove after review cycle |
| OCR scratch text | Only if verified | Metadata work folder |
The key is consistency. A modest policy that everyone follows is better than an elaborate one that collapses under daily workload.
A Repeatable Small-Team Workflow
Here is the complete workflow in a practical sequence:
- Create a master folder for untouched camera files.
- Copy selected images into a working folder.
- Triage images into ready, retake, and reference-only groups.
- Rename working copies with batch, box, item, view, and sequence.
- Resize working images while preserving aspect ratio.
- Crop or prepare label images for OCR if useful.
- Run OCR only where it supports review or mismatch detection.
- Build the image packet as a PDF.
- Merge an intake summary or cover page if needed.
- Compress carefully and verify label readability.
- Send the packet for review with a clear version name.
- Apply retakes and corrections, then export a revised version.
This workflow is intentionally tool-light. It does not require a designer, a database administrator, or a full digitization lab. It gives small teams a clean path from loose object photos to a reviewable packet.
Common Mistakes to Avoid
The most common mistake is editing the only copy of the image. Always keep an untouched master folder. Review copies can be resized, compressed, renamed, and rearranged, but originals should remain stable.
Another mistake is treating the contact sheet as a final catalog. A contact sheet supports decisions; it does not replace cataloging standards, rights review, conservation notes, or formal accession metadata.
Teams also tend to overfill pages. A dense grid looks efficient until reviewers need to inspect a label. If people must zoom constantly, use fewer images per page or add enlarged detail pages.
Finally, avoid mixing unrelated batches. A single PDF containing three donations, two storage rooms, and a folder of mystery photos may feel convenient at export time, but it becomes hard to cite, correct, or file. Smaller packets create cleaner records.
Final Review Standard
A good accession contact sheet is not fancy. It is clear, complete enough for review, and easy to trace back to the source images. A curator should be able to scan it for identity and significance. A registrar should be able to spot missing views or naming conflicts. A volunteer should be able to understand what needs retaking without decoding a messy folder.
When in doubt, judge the packet by three questions:
- Can a reviewer identify each object without opening separate files?
- Can the team trace each image back to its working folder and original capture?
- Are labels, marks, and condition details readable enough for the packet's purpose?
If the answer is yes, the contact sheet is doing its job. It has turned a loose set of accession photos into a shared review object, which is often the step that small collections need most.