Creased Form Photo OCR Cleanup: A Practical Desk-Capture Guide
A practical guide to photographing wrinkled forms, reducing shadows, preparing clean OCR images, and packaging readable document photos without a scanner.
Creased Form Photo OCR Cleanup: A Practical Desk-Capture Guide
Wrinkled forms are awkward source material for OCR. A scanner can flatten paper, but many teams do not have one near the point where the document appears. Field staff photograph intake sheets on a counter. Office admins capture signed return forms from a shared desk. Volunteers digitize permission slips, library cards, or event registrations after the paper has spent a week in a folder.
The result is predictable: shadows along folds, curled corners, perspective distortion, blue-gray paper instead of white, and characters broken by creases. OCR can still work, but only if the image gives it enough structure. The goal is not to make the form look beautiful. The goal is to make printed labels, handwriting, checkboxes, dates, and IDs easier to separate from paper texture.
This guide focuses on a narrow but common problem: preparing photographed paper forms with creases, wrinkles, shadows, and uneven lighting before running OCR or saving them into a review packet. It is written for small teams that need reliable results without a flatbed scanner, layout software, or a dedicated document imaging station.
When This Guide Is the Right Fit
Use this approach when the paper is still readable to the human eye but the captured image is messy. Good candidates include signed forms, field inspection sheets, school slips, clinic intake pages, HR acknowledgements, workshop registrations, repair notes, and one-page authorization forms.
It is less suitable for severely damaged paper, forms with confidential content that cannot be uploaded to online tools, or archival material where preserving the exact visual appearance matters more than extracting text. In those cases, use a controlled scanning setup, follow your retention policy, and avoid unnecessary image edits.
The method below is practical, not forensic. It helps you create a cleaner document photo for OCR, human review, and PDF packaging. It does not authenticate signatures, recover erased marks, or prove document integrity.
Why Creased Paper Confuses OCR
OCR systems look for contrast, alignment, and repeatable character shapes. Creased paper attacks all three.
A fold creates a highlight on one side and a shadow on the other. To OCR, that shadow can look like an extra stroke, a border, or part of a letter. A wrinkle can interrupt a thin character, making an “I” disappear or turning a checkbox into a dark blob. Curled edges make the form skew away from the camera, so the top line may be sharp while the bottom line is slightly stretched.
Mixed content makes the problem harder. Many forms contain printed labels, small instructions, handwritten fields, stamps, boxes, signatures, and logos. A cleanup setting that helps typed labels may damage handwriting. A contrast boost that clarifies checkboxes may make paper fibers look like punctuation. This is why a good capture is more important than aggressive editing after the fact.
The Capture Setup That Fixes Most OCR Problems
Before editing the image, fix the capture. A careful photo saves more time than trying to rescue a bad one.
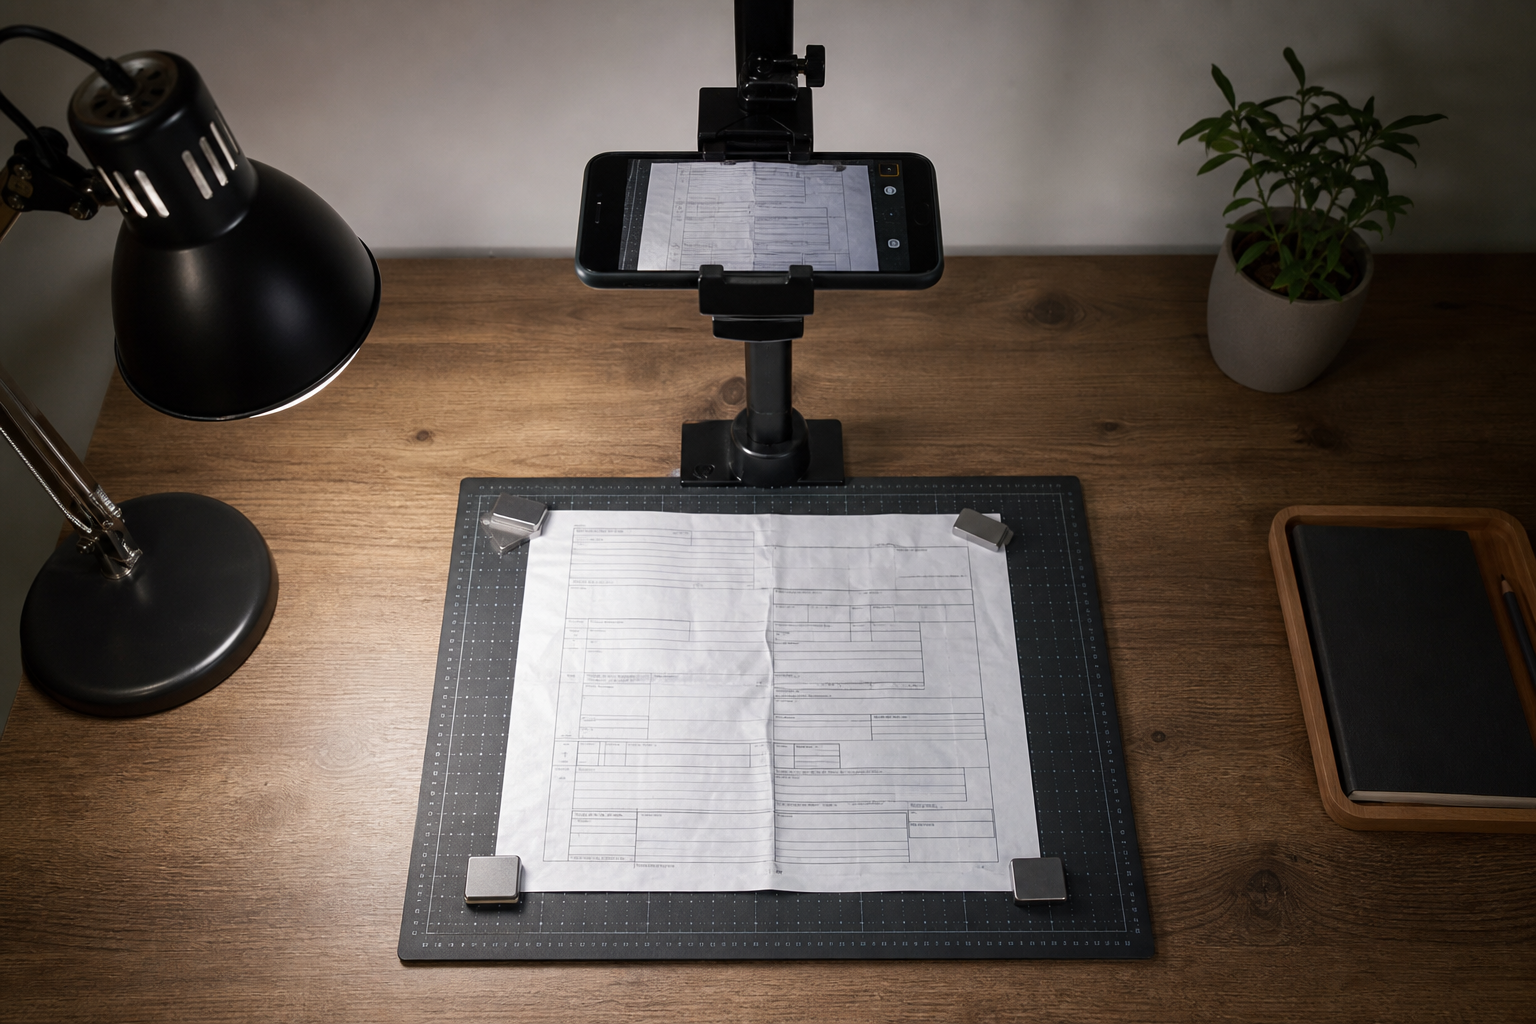
Place the form on a matte, neutral surface. Avoid glossy tables, patterned desks, dark wood grain, or bright colored backgrounds. A plain gray, white, or black backing board gives the page edge a clean boundary for cropping.
Flatten the paper gently. Use small objects at the corners if the form curls, but keep them outside the printed area. Binder clips can cast shadows and hide margins, so use coins, clean erasers, or small flat weights when possible. If the paper has a strong central fold, do not press so hard that the fold becomes shiny. A soft flattening pass is usually enough.
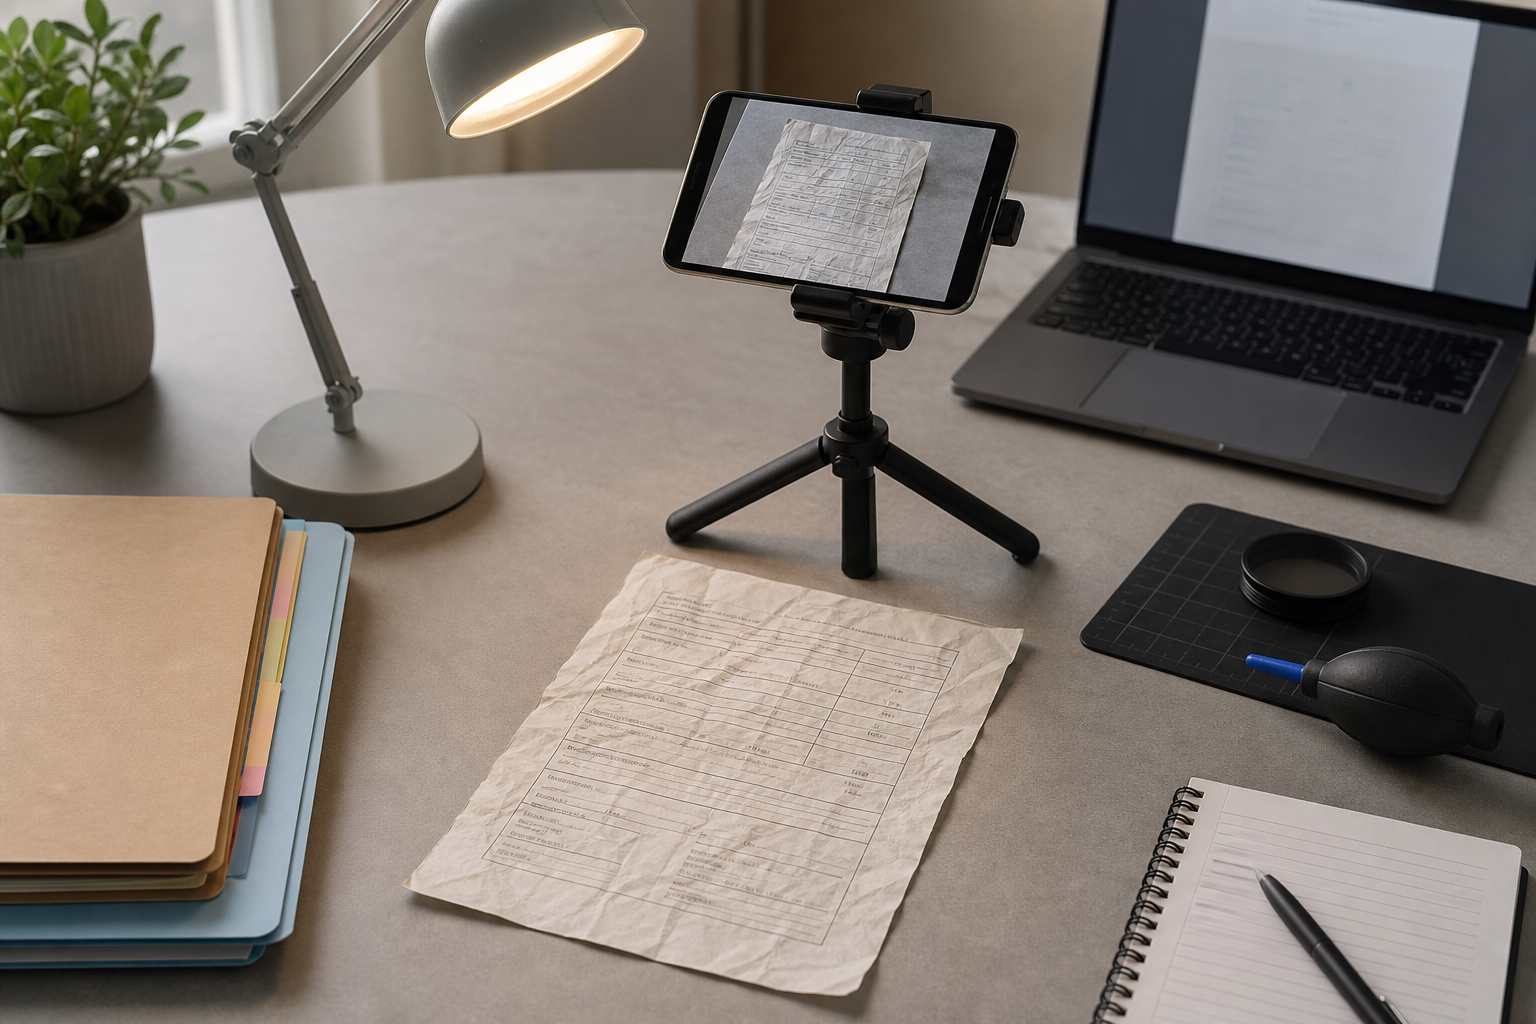
Position the phone directly above the page. The camera should be parallel to the document, not angled from the user’s chair. If you do not have a tripod, place the phone on a stack of books with the camera hanging over the edge, or use a simple overhead stand. Keep all four page corners visible.
Use side lighting, not flash. A phone flash creates a bright center and darker edges. Instead, place a lamp to the left or right of the page at a shallow angle, then rotate the form until fold shadows are minimized. If one crease becomes too dark, move the lamp farther away and add ambient room light.
Take more than one photo. Capture one image in portrait orientation and one with the page rotated 180 degrees. Creases reflect light differently from each direction, and the second image may preserve characters that the first one loses.
Capture Checklist Before You Move the Paper
Use this quick check while the form is still on the desk:
- All four page corners are visible.
- The page fills most of the frame without cutting off margins.
- The camera is parallel to the paper.
- The smallest printed labels are readable when zoomed in.
- Fold shadows do not cross key fields more strongly than the ink itself.
- The image is sharp at both the top and bottom of the page.
- No fingers, clips, cords, mugs, or badges cover the paper.
- The background clearly separates from the page edge.
If any item fails, retake the photo. This is faster than discovering the problem after OCR.
A Pre-OCR Cleanup Pass for Creases, Shadows, and Margins
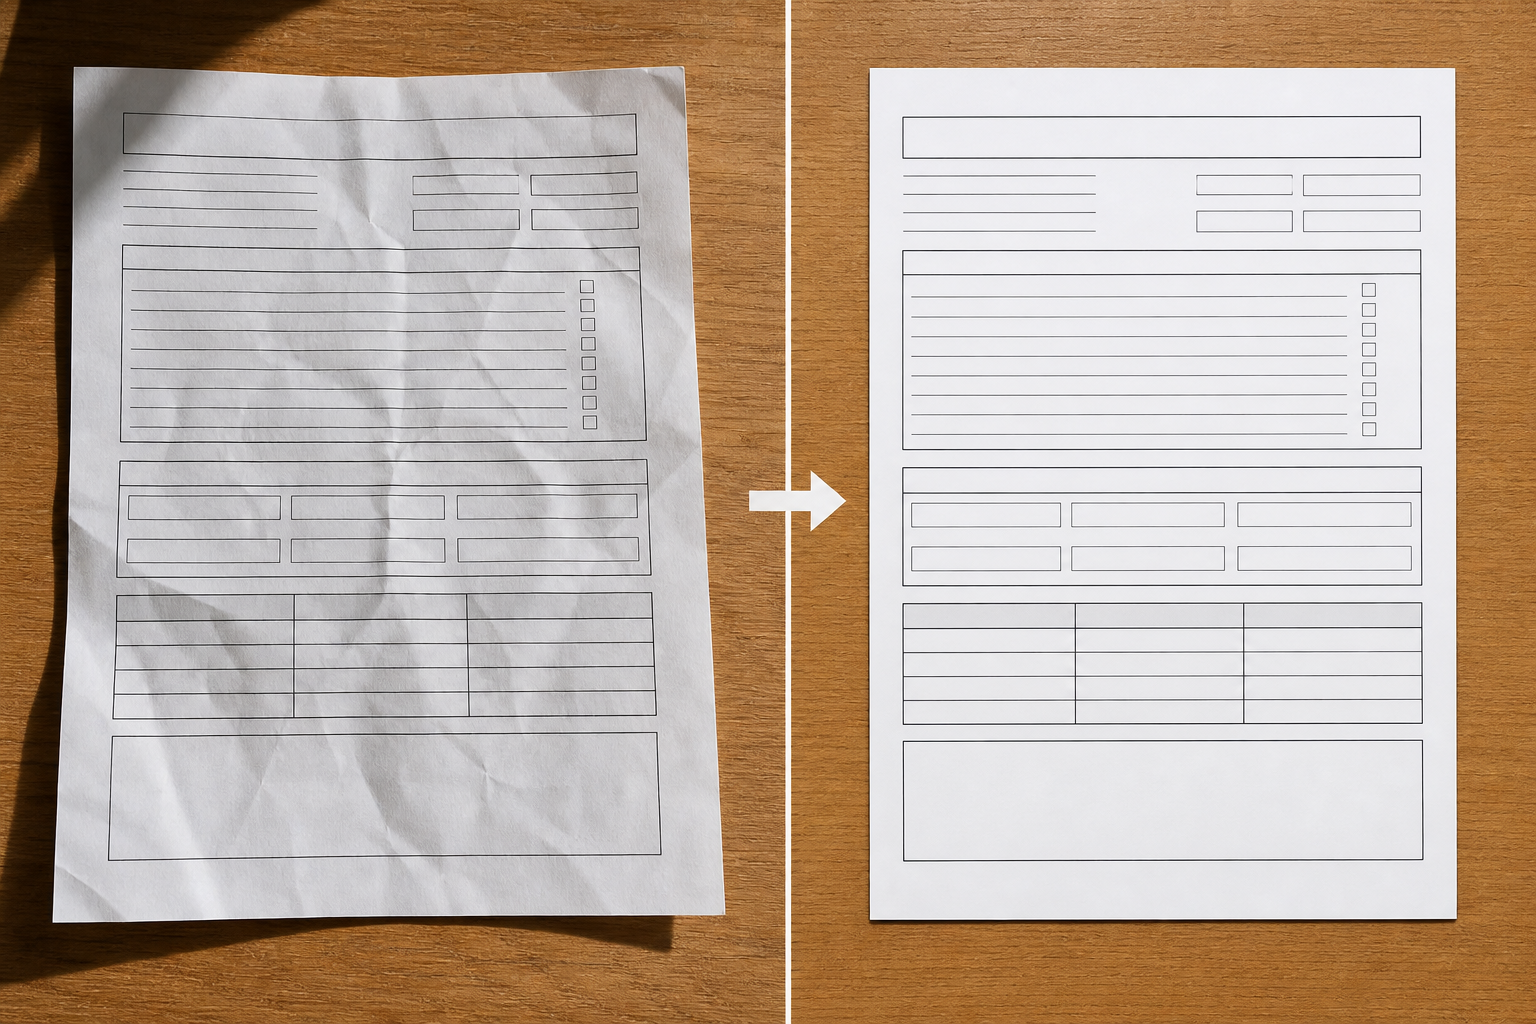
Once you have a strong source photo, prepare the image in stages. The order matters: crop first, correct geometry second, then adjust tone and file size.
Start with cropping. Remove the desk, weights, and extra border while keeping a small margin around the page. Cropping helps OCR ignore background texture and makes later conversion cleaner. If your image is too large for convenient handling, use Resize Image after cropping, but keep enough resolution for small text. For most one-page forms, a long edge in the 1800 to 3000 pixel range is a reasonable working target.
Next, straighten the page. A small tilt can make lines harder to follow, especially when the form has tables or checkboxes. Rotate until horizontal rules and printed baselines feel level. If the camera angle caused trapezoid distortion, use the best correction available before OCR. Even a modest improvement can help table rows and field labels stay aligned.
Then adjust brightness and contrast carefully. The page should become cleaner, but not so bright that pale handwriting disappears. Avoid turning every document into pure black and white unless the form contains only strong printed text. For mixed handwriting and printed labels, a gentle contrast lift is often better than a harsh threshold.
If creases remain visually dominant, try selective cleanup in an editor. The AI Photo Editor can be useful for small cosmetic distractions outside important fields, such as removing a background object near the paper or softening a shadow in a blank margin. Do not use generative editing to alter, fill, reinterpret, or “repair” actual document content. For forms, edits should clarify capture artifacts, not change the record.
Finally, save a clean copy before running OCR. Keep the original photo separately if your team needs an audit trail. Name the cleaned image clearly, such as intake-form-2026-05-22-clean.jpg, so nobody mistakes it for the untouched capture.
Decision Table: What to Fix and What to Leave Alone
| Problem in the photo | Best first action | Avoid |
|---|---|---|
| Dark desk around the paper | Crop tightly with a small page margin | Leaving a large background border |
| Slight page tilt | Rotate until form lines are level | Overcropping after rotation |
| Shadow along a fold | Retake with softer side lighting, then adjust brightness | Heavy contrast that hides handwriting |
| Curled corner outside content | Flatten and retake if possible | Painting over any printed or written area |
| Blue or yellow paper cast | Adjust white balance or brightness | Making the page so white that pencil marks vanish |
| Huge file from phone camera | Resize or compress after cleanup | Compressing before OCR when text is already weak |
| Mixed typed text and handwriting | Use moderate contrast | Pure black-and-white conversion without checking fields |
This table is intentionally conservative. Document cleanup should reduce capture noise, not create a more convenient version of the truth.
OCR Preparation for Mixed Printed and Handwritten Forms
After cleanup, run OCR on the clearest image. If the form contains both typed labels and handwriting, expect different levels of accuracy. Printed labels, dates, IDs, and short field names are usually easier. Handwriting depends heavily on pen quality, spacing, and the writer.
Upload the cleaned image to Image OCR when you need searchable or copyable text from the document photo. Review the output next to the image instead of trusting it blindly. Pay special attention to characters that commonly confuse OCR: 0 and O, 1 and I, 5 and S, 8 and B, hyphens in IDs, and slashes in dates.
For forms with checkboxes, do not rely only on extracted text. A checked box may be interpreted as a symbol, ignored, or mistaken for a mark near the label. Keep the image available for human confirmation.
If OCR performs poorly, do not immediately increase compression or apply stronger filters. Compare the original and cleaned image at 100 percent zoom. If characters are broken by a fold, retake the photo with lighting from the opposite side. If the page is blurry, no cleanup setting will fully recover the missing detail.
Packaging Clean Form Photos Into PDFs
Many teams need a shareable packet, not just extracted text. After OCR review, convert the cleaned image into a PDF for storage, upload, or handoff. Use Image to PDF when the final artifact should behave like a document rather than a loose image.
For multi-page forms, keep page order obvious in the filenames before converting. Use names such as repair-form-page-01.jpg, repair-form-page-02.jpg, and repair-form-page-03.jpg. This avoids accidental reordering when files are dragged into a browser or shared folder.
If several PDFs need to become one packet, combine them with PDF Merge. Keep the packet focused. A single PDF should usually represent one person, one case, one property, one event, or one submission. Mixing unrelated forms into one file makes later retrieval harder.
Before sending the PDF, open it and check each page at normal reading size and at zoom. Thin text should remain legible, margins should not be cut off, and the page should not appear sideways. If the file is too large for upload, compress the images before final packaging with Compress Image, then inspect the smallest text again.
File Size Without Destroying Readability
Phone photos are often much larger than a form needs. A single page can be 5 MB or more, especially if captured in high resolution. Reducing file size is useful for email, CMS uploads, case systems, and shared drives, but compression should happen after the image is readable.
Use this order:
- Capture the sharpest possible photo.
- Crop and straighten the page.
- Adjust brightness and contrast.
- Run OCR or visual review.
- Resize if the image is far larger than needed.
- Compress for sharing or storage.
- Package into PDF if needed.
For text-heavy documents, avoid tiny dimensions. A compressed 900-pixel-tall image might look acceptable as a thumbnail but fail when someone needs to read a handwritten note. If the form includes small fields, keep enough pixels for zooming.
Use JPEG for photographed paper when file size matters and the page has continuous shadows or subtle texture. Use PNG when the image has sharp digital lines, flat graphics, or screenshots. For most desk-captured paper forms, JPEG is practical as long as compression is not pushed too hard.
Naming and Handoff Conventions That Prevent Confusion
A cleaned document image can create confusion if filenames are vague. Avoid names like IMG_8842.jpg, scan-final-final.jpg, or form-new.jpg. Use filenames that describe the source and status without exposing more personal data than necessary.
A simple pattern is:
document-type_date_status_page-number
Examples:
consent-form-2026-05-22-original-p01.jpgconsent-form-2026-05-22-clean-p01.jpgsite-check-2026-05-22-ocr-review.pdfregistration-batch-2026-05-22-merged.pdf
Keep original captures in a separate folder when auditability matters. Use a clean or prepared label for edited images. Use ocr-review for files that need human checking before data entry. This small naming discipline prevents a polished image from being mistaken for an untouched source.
Quality Control: The Two-Minute Review
Before you archive, upload, or send the file, spend two minutes checking the result. Open the cleaned image or PDF and answer these questions:
- Can a new reviewer read the smallest field labels without seeing the original paper?
- Are all handwritten fields visible enough for a human to verify?
- Did any cleanup step remove a mark, checkbox, date, initial, stamp, or signature stroke?
- Are the page edges complete?
- Is the orientation correct?
- Is the file size appropriate for the destination system?
- Does the filename clearly show what the file is?
- If OCR was used, has the extracted text been checked against the image?
If the answer is uncertain, keep the original photo attached to the record or recapture the form if possible. A slightly larger file with readable evidence is usually better than a tiny file that creates follow-up questions.
Common Mistakes to Avoid
The most common mistake is trying to fix everything after capture. If the source photo is blurry, angled, and shadowed, cleanup becomes guesswork. Retake early.
Another mistake is using maximum contrast on every form. It can make printed borders look crisp, but it may erase pencil, pale blue ink, red pen, or faint carbon-copy marks. Always inspect actual filled fields, not just the title area.
Do not crop too tightly. A form with missing edges can look suspicious or incomplete, even if no content is lost. Keep a narrow border so the page feels whole.
Do not overwrite originals unless your retention rules explicitly allow it. Save cleaned copies separately. This is especially important for approvals, signed forms, inspection records, and anything that may be reviewed later.
Finally, do not treat OCR as a decision-maker. OCR is a helper for search, copying, and data entry. The image remains the reference when accuracy matters.
A Practical Form Photo Cleanup System
A reliable desk-capture system is simple: control the light, flatten the page, shoot from directly above, crop away noise, straighten the form, use moderate cleanup, run OCR, review the result, and package the file clearly.
The biggest improvement usually comes before any tool is opened. A sharp, evenly lit photo gives OCR clean character shapes and gives people a trustworthy document image. From there, ConvertAndEdit tools can handle the practical steps: resize the image, clean distractions carefully, extract text, compress the result, and turn the page into a PDF.
For creased forms, restraint is part of quality. The best prepared image still looks like the same document, just easier to read.