OCR-Ready Bug Report Screenshots: A Redaction and Annotation Guide
Turn cluttered bug report screenshots into readable, searchable evidence while protecting sensitive data and preserving the interface details engineers need.
OCR-Ready Bug Report Screenshots: A Redaction and Annotation Guide
A screenshot can make a bug report immediately understandable—or turn it into a privacy risk wrapped in visual clutter. Product teams often capture an error quickly, draw several arrows, blur a customer name, paste the image into a ticket, and move on. Later, an engineer cannot read the tiny message, search cannot index the important text, and someone notices that a browser tab still exposes a confidential project name.
The difficulty is that a useful bug report screenshot must satisfy several competing needs. It should preserve the visual state of the interface, contain readable evidence, exclude sensitive information, survive compression, and remain understandable to somebody who did not witness the problem.
This guide presents a practical system for preparing screenshots that work as both visual evidence and searchable records. It is intended for support teams, QA testers, product managers, technical writers, and small engineering groups that do not have a dedicated media-production process.
Decide whether a screenshot is the right evidence
Screenshots are strongest when the bug depends on a visible state: an overlapping menu, a missing control, a truncated label, an incorrect badge, or a specific error message. They are weaker when the important event is motion, timing, sound, or a long sequence of interactions.
Use a still image when you need to show:
- A layout defect at a known viewport size.
- A complete error message and its position.
- A mismatch between expected and displayed values.
- A disabled, hidden, clipped, or incorrectly styled control.
- A browser or operating-system state that affects the page.
Consider a short recording when the problem involves animation, drag behavior, delayed loading, or multiple steps that cannot be represented honestly in one frame. If spoken narration or application audio matters, generate a searchable text companion with a tool such as Video to Subtitles.
Do not ask one screenshot to prove everything. A focused set of two or three images is usually clearer than a single enormous desktop capture covered in annotations.
Capture the smallest complete context
Cropping should remove irrelevant space without concealing the conditions that caused the defect. That balance is more important than making the image visually attractive.
Start by identifying the evidence region: the error, broken component, surprising value, or missing element. Then determine which neighboring details are necessary to interpret it. A validation message may need its field label and submit button. A misplaced menu may need the viewport edge and the control that opened it. A permissions problem may need the visible role indicator, but not the entire customer list.
A useful capture often contains three layers of context:
- Primary evidence: the exact visual defect or message.
- Local context: the component, panel, or row containing the defect.
- Environmental context: only the browser, device, route, or account-state clues needed to reproduce it.
Avoid capturing a full multi-monitor desktop unless the arrangement itself causes the bug. Full-screen captures shrink interface text when inserted into ticket systems and increase the number of regions that require privacy review.
If you already have an oversized capture, use Resize Image only after making a deliberate crop. Resizing the whole desktop first can make small labels permanently unreadable.
Record details that pixels cannot explain
A screenshot is not a substitute for a written reproduction note. Alongside the image, record:
- Application build or release identifier.
- Browser and operating-system versions when relevant.
- Viewport dimensions or device model.
- Account role and feature-flag state without exposing identity.
- Exact steps immediately before the capture.
- Expected result and actual result.
- Whether the defect is consistent or intermittent.
These fields prevent future readers from trying to infer technical conditions from browser decorations or unrelated screen content.
Separate evidence from explanation
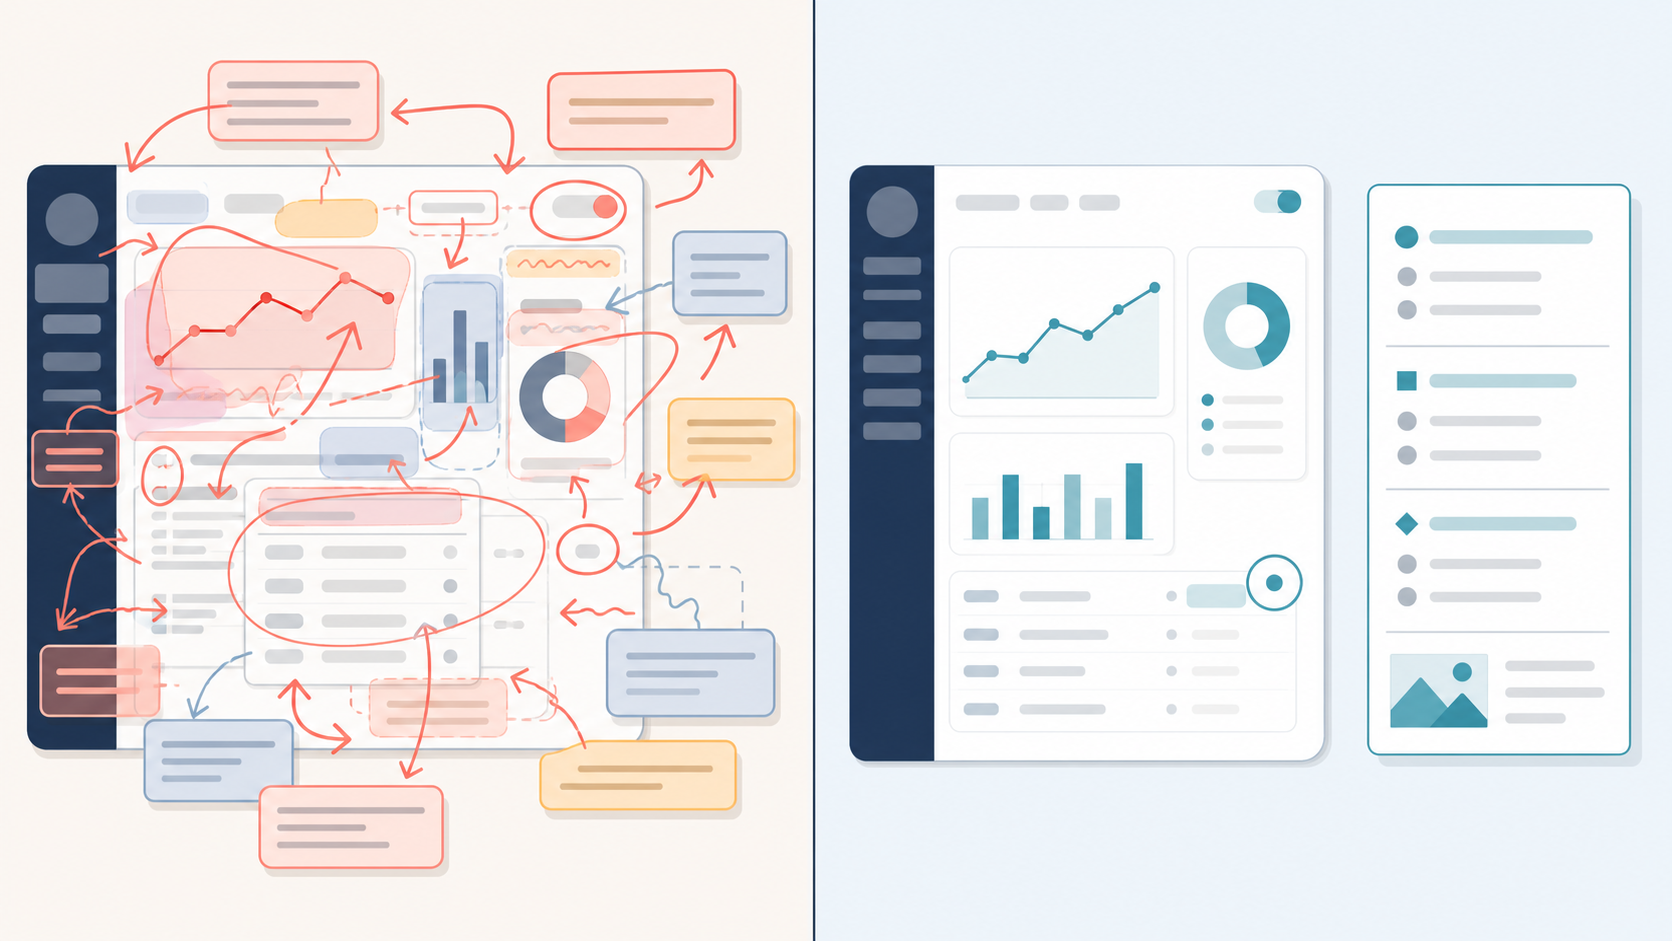
Annotations should guide the eye, not become the evidence themselves. A common failure is to cover a screenshot with long sentences, multiple colored rectangles, freehand circles, and arrows crossing important interface elements. This makes the file harder to read and reduces OCR accuracy because annotation text competes with the original UI text.
Prefer a clean source capture accompanied by a lightly annotated copy. Keep the untouched source as the authoritative record. On the annotated version, use numbered markers such as 1, 2, and 3, then explain those numbers in the ticket body.
This separation has several advantages:
- Original interface text remains unobstructed.
- Reviewers can distinguish captured facts from added commentary.
- The same source image can support a different explanation later.
- OCR can be run against the unannotated image.
- An annotation mistake does not destroy the evidence.
Use one visual language consistently. A thin high-contrast rectangle works for a region. A short arrow works for an exact point. A translucent highlight can show an area, but it should not reduce text contrast. Avoid decorative stickers, drop shadows, or six different colors.
Annotation choice table
| What you need to show | Best annotation | Avoid |
|---|---|---|
| One incorrect control | Thin rectangle | Large filled shape |
| Exact alignment error | Short arrow or guide line | Freehand circle |
| Ordered comparison | Numbered markers | Paragraphs inside image |
| Missing element | Outline of expected region plus ticket note | Drawing a realistic replacement |
| Large affected area | Light translucent tint | Opaque highlight over text |
| Sensitive information | Permanent opaque redaction | Marker, blur, or pixelation |
When describing a missing element, clearly label the outline as an expectation in the written note. Otherwise, a later reviewer might mistake your reconstruction for captured application output.
Build a safe redaction pass
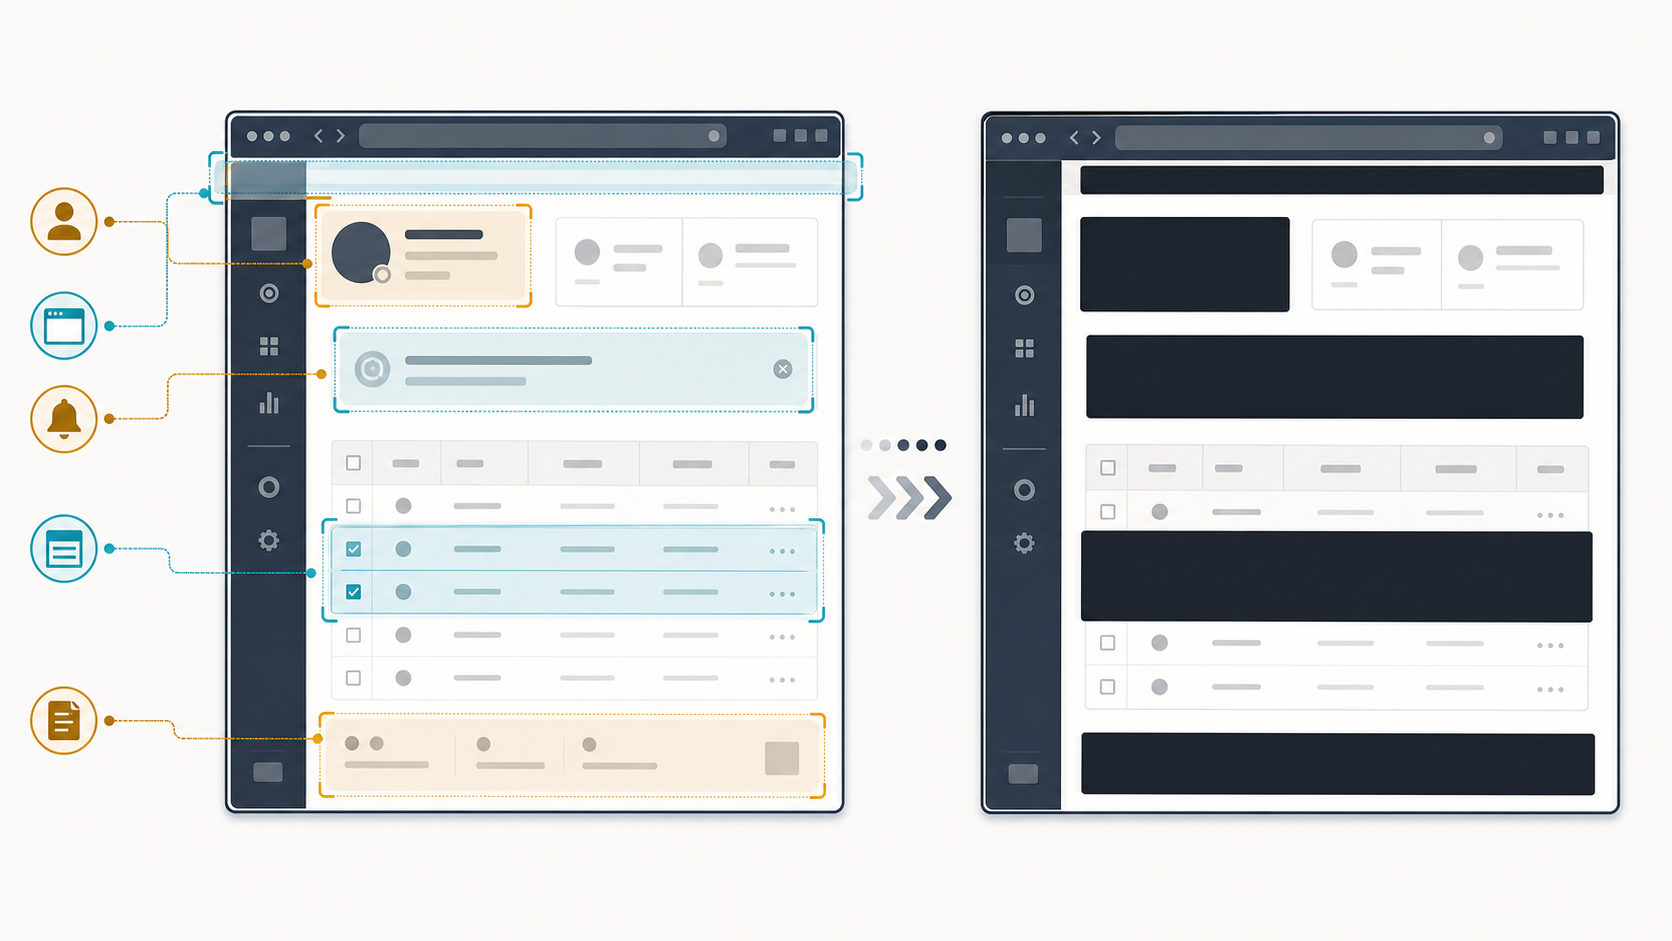
Redaction is not the same as making text inconvenient to read. Blur and pixelation can leave recognizable shapes, and weak effects may be partially reversible or decipherable from context. Cropping may also leave the same information visible elsewhere in the image.
For a screenshot intended to leave a trusted internal group, use solid, fully opaque blocks. Apply them to a duplicate, export the result as a flattened image, and inspect the exported file rather than trusting the editor preview.
Review these regions systematically:
- Names, email addresses, avatars, and account IDs.
- Postal addresses, telephone numbers, and payment details.
- Authentication tokens, API keys, session strings, and QR codes.
- Customer records visible in tables, sidebars, search results, or recent-item lists.
- Browser tabs, bookmarks, address bars, and profile controls.
- Desktop notifications and messaging previews.
- File names, folder paths, terminal prompts, and repository names.
- Internal hostnames, private IP addresses, and query parameters.
- Calendar events or background windows caught at screen edges.
Treat QR codes and barcodes as data, not decoration. A code can remain machine-readable even when a person cannot immediately interpret it.
Prefer staged or synthetic data when possible
The safest redaction is information that was never captured. If the defect can be reproduced in a test account with synthetic records, capture that version instead of editing a production screenshot.
However, do not recreate a screenshot so extensively that it stops representing the original bug. If production-only state is essential, retain the protected original according to your organization’s access rules and distribute only the redacted derivative.
An editor such as the AI Photo Editor can help remove distracting material or prepare a presentation copy, but privacy-critical redaction still requires a deterministic opaque cover and human inspection. Generative filling is not appropriate for concealing secrets because it can produce plausible but misleading interface content around the edited area.
Flatten and verify the delivered file
Some document and design formats preserve hidden layers, comments, crop history, or removable shapes. A black rectangle placed over text may look correct while the underlying content remains present in the source file.
Export the redacted result to a flattened raster format, reopen that exported file, and confirm that:
- Redaction blocks are fully opaque at 100 percent zoom.
- No sensitive fragments remain along their edges.
- The image has no editable layers in the delivered form.
- The file name does not contain a customer or project identifier.
- Required evidence has not been covered accidentally.
If the screenshot will be placed into a PDF, inspect the final PDF too. Do not assume that a safe source image guarantees a safe assembled document.
Prepare interface text for reliable OCR
OCR is useful for extracting error messages, making ticket attachments searchable, and avoiding transcription mistakes. Yet software screenshots are unusually difficult inputs. They combine tiny fonts, anti-aliased edges, icons, code fragments, badges, translucent overlays, and multiple contrast levels.
Before running Image OCR, preserve the original pixel dimensions whenever possible. Enlarging a very small capture may make it easier for a person to view, but it cannot restore letter shapes that were never recorded.
For better results:
- Crop tightly enough that the relevant text occupies a meaningful portion of the image.
- Use the original screenshot rather than a photograph of the screen.
- Keep text upright and avoid perspective distortion.
- Remove annotations that cross letters.
- Prefer a lossless source when the text is small.
- Run OCR before aggressive downscaling or compression.
- Extract separate regions when the screen mixes very small and very large text.
Dark mode is not automatically unsuitable, but faint gray text on a nearly black background may need a separate high-contrast capture if the application permits it. Do not change themes if the theme itself is part of the defect.
Verify extracted text character by character
OCR output should be treated as a draft. Error messages often contain characters that are visually similar but technically distinct: 0 and O, 1 and l, hyphens and minus signs, or straight and curly quotation marks. File paths, UUIDs, version numbers, and code fragments demand especially careful checking.
Compare the extracted result with the source at high zoom. Preserve capitalization, punctuation, and line breaks when they affect meaning. If you correct an OCR error in the ticket, do not alter the screenshot to make it agree with your correction.
A good ticket can include both forms:
- Verbatim display text: checked against the image.
- Search-friendly interpretation: a normalized phrase used in the title or labels.
For example, the interface may display a line break in the middle of an error. Preserve that fact in the evidence transcript, but use an unbroken phrase in the ticket summary so colleagues can find it.
Choose file formats without damaging evidence
PNG is usually the safest default for interface screenshots because it preserves sharp edges, flat colors, and small text. JPEG is better suited to photographic content and can introduce halos around letters and thin lines. WebP can be suitable when configured carefully, but the recipient’s systems and archival requirements should guide the decision.
| Screenshot content | Practical choice | Reason |
|---|---|---|
| Mostly interface text and flat colors | PNG | Preserves sharp edges without lossy artifacts |
| Interface plus large photographic preview | PNG or high-quality WebP | Balances text clarity and image size |
| Photograph with minimal UI | JPEG or WebP | Efficient for continuous-tone imagery |
| Unknown downstream requirements | PNG | Broad compatibility and predictable rendering |
| OCR source copy | PNG | Avoids additional character-edge damage |
If a ticket platform rejects the original format, use Convert Image to create a compatible derivative while retaining the source. Conversion should happen once, not through a chain of exports between multiple lossy formats.
Compress only after the evidence is secure
Attachment limits create pressure to make screenshots smaller, but compression should be the final optimization step. First crop, redact, annotate, and extract any required text. Then create a delivery copy.
Use Compress Image and inspect the result at actual size. Pay attention to:
- Thin font strokes disappearing.
- Colored fringes around text.
- Block artifacts inside dark panels.
- Redaction edges becoming softened.
- Tiny icons losing state indicators.
- Annotation numbers becoming ambiguous.
Do not judge only from a fit-to-window preview. Ticket interfaces frequently rescale large images, hiding damage until somebody downloads the attachment.
When one image contains a large photographic area and a small text-heavy panel, a single compression setting may serve neither well. Consider attaching a full contextual image plus a lossless close crop of the text region.
Create a compact evidence packet
A disciplined bug report does not need dozens of files. A small packet can preserve the essential layers without confusing reviewers.
A useful structure is:
- Source capture: restricted if it contains sensitive production data.
- Redacted evidence image: clean, flattened, and minimally altered.
- Annotated derivative: optional numbered markers tied to ticket notes.
- Verified transcript: relevant messages copied as searchable text.
- Context note: environment, steps, expected result, and actual result.
Use neutral file names that communicate order and purpose, such as checkout-error-source.png, checkout-error-redacted.png, and checkout-error-annotated.png. Avoid names such as final-final-2.png, which provide no provenance.
If several screenshots must travel as a single review document, convert the approved images with Image to PDF. Arrange them in chronological order, give each image a short caption in the document body, and inspect the finished PDF for scale and privacy before sharing it.
Example: a failed checkout message
Imagine that support receives a report about a checkout error visible beneath the payment form. The initial full-screen capture includes the customer’s email address, a browser tab naming an internal project, and a notification preview from a messaging app.
A strong preparation pass would look like this:
- Reproduce the failure in a test account if possible.
- Capture the payment panel, error message, and submit control at native resolution.
- Save the untouched capture in the restricted ticket area.
- Create a duplicate and cover any remaining identity or payment data with opaque blocks.
- Export and reopen the flattened derivative.
- Make a second derivative with one numbered rectangle around the error region.
- Run OCR on the clean redacted copy, not the annotated one.
- Verify the error code and punctuation against the pixels.
- Add browser, build, account role, and reproduction steps as ticket text.
- Compress only if the attachment limit requires it, then inspect the result at 100 percent.
The result is easier to search, safer to distribute, and more useful than the original desktop capture—even though it contains less visual material.
Run a final evidence audit
Before attaching the image, pause for a review that is independent of the editing pass. Familiarity makes it easy to overlook information in a tab title or notification.
Use this checklist:
Accuracy
- Does the image show the actual defect rather than a reconstruction?
- Is the relevant state visible at a readable size?
- Are annotations clearly distinguishable from captured content?
- Does the written description agree with the screenshot?
- Has OCR text been checked against the pixels?
Privacy and security
- Have all identities, secrets, records, and machine-readable codes been reviewed?
- Are redactions solid and permanent in the exported file?
- Have browser chrome, background windows, and notifications been inspected?
- Is the file name free of sensitive identifiers?
- Has the final delivery format been reopened and checked?
Technical quality
- Is small UI text still sharp at actual size?
- Has unnecessary desktop space been cropped?
- Is the format appropriate for the content?
- Has repeated lossy conversion been avoided?
- Can a reviewer understand the evidence without zooming through a huge canvas?
Handoff quality
- Are build, browser, device, role, and viewport details recorded where relevant?
- Are expected and actual results stated separately?
- Do numbered annotations match the written notes?
- Are source and derivative files named consistently?
- Is access to the unredacted source appropriately restricted?
Preserve trust in the screenshot
The most useful bug report screenshot is not the most heavily edited one. It is the image whose history and purpose are obvious: captured evidence remains intact, sensitive material is permanently removed from the shared copy, annotations are restrained, and extracted text has been verified.
That discipline matters beyond a single ticket. Searchable error text helps teams connect recurring incidents. Clean crops reduce review time. Consistent derivatives make it easier to tell source evidence from presentation copies. Careful redaction protects users without forcing engineers to debug from vague descriptions.
Treat each screenshot as a small evidence artifact rather than a disposable illustration. Capture only the context you need, retain a controlled source, prepare a safe derivative, verify the words, and optimize the file last. The resulting report will be clearer on the day it is filed and far more valuable when somebody returns to it months later.