Subtitle-Safe Cropping for Vertical Product Demo Clips
A practical guide for cropping product demo videos into vertical clips without cutting off subtitles, UI labels, captions, faces, or key interaction details.
Subtitle-Safe Cropping for Vertical Product Demo Clips
Product demo videos are often recorded in the least social-friendly shape possible: a wide desktop screen, a browser window, a slide deck, or a support recording with lots of empty space around the action. Then someone needs a 9:16 cut for a landing page, a product update post, a sales follow-up, or a short clip inside a help center article.
The hard part is not making the video vertical. The hard part is making it vertical without cutting off the parts that make the demo understandable: subtitles, cursor movement, field labels, button states, error messages, before-and-after comparisons, and the presenter’s face if there is one.
This guide is for product marketers, support teams, founders, educators, and documentation teams who need clean vertical product clips from existing material. It focuses on subtitle-safe cropping: choosing a vertical frame that survives real mobile viewing, platform overlays, and compression while still showing the product clearly.
You do not need a full video production setup. You need a repeatable way to decide what stays visible, what can be sacrificed, and where subtitles should live before the video is exported.
Why Vertical Cropping Breaks Product Demos
Most cropping mistakes happen because the editor treats the video as a picture. A still frame may look fine, but a product demo changes every second. The cursor moves. Menus open. Toast messages appear near the edge. A modal may jump to the center. A subtitle line may become two lines after export. A mobile platform may place buttons over the bottom area.
A vertical crop reduces the horizontal canvas dramatically. If the original clip is 16:9 and you crop to 9:16, you are not trimming a little from each side. You are choosing a narrow slice of the original. That means the crop must follow the actual story of the demo, not just the center of the source video.
Subtitles make this more sensitive. They compete with bottom navigation, cookie banners, screen recording controls, browser UI, product tooltips, and social platform overlays. If subtitles are burned into the video too early, later cropping may slice them apart. If subtitles are added too late, they may cover the product action.
A subtitle-safe crop solves this by planning the frame around three things at once: the action area, the reading area, and the final viewing environment.
The Three Zones That Decide Whether a Crop Works
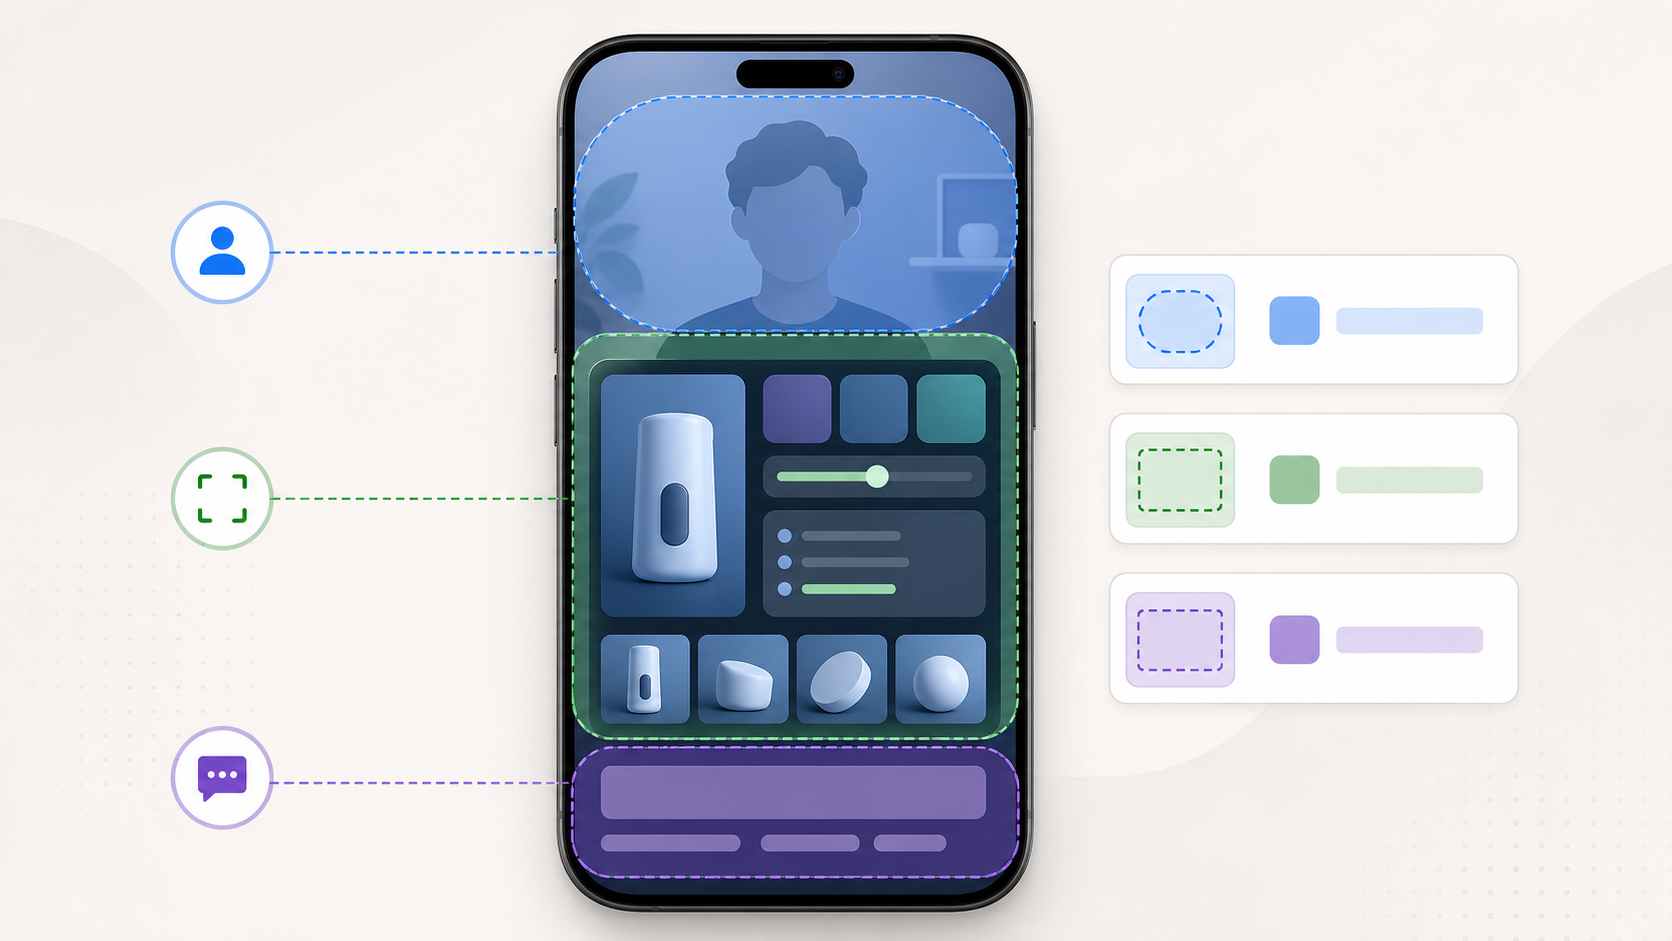
Before you crop, divide the vertical frame into three practical zones. You do not need exact broadcast-safe math, but you do need a consistent mental model.
| Zone | What belongs there | What to avoid |
|---|---|---|
| Focus zone | Cursor action, form fields, charts, buttons, selected product area | Decorative browser chrome, empty slide margins, unused sidebar space |
| Reading zone | Subtitles, short annotations, speaker labels if needed | Dense UI detail, moving cursor, critical buttons |
| Risk zone | Areas likely to be covered by app controls, captions, like buttons, progress bars, or page UI | Anything essential to understanding the demo |
For most vertical product clips, the focus zone should sit slightly above center. The reading zone should sit below it, but not at the absolute bottom. The lowest edge of a vertical video is risky because mobile players, browser bars, and social controls often occupy that space.
A common mistake is to center the product UI and place subtitles at the very bottom. This looks tidy in an editor preview, but it often fails on phones. The viewer sees the product, then a platform overlay covers the subtitle baseline or clips descenders. Even worse, if the product action happens near the lower third, subtitles may hide the button being clicked.
Instead, think of the crop as a stacked viewing system. The product action gets priority. Subtitles get a protected band. The bottom and side edges are treated as unstable.
Start With the Destination, Not the Source
The same source video may need different crops depending on where it will be used. A clip for a muted landing page embed is not the same as a clip for a social post. A help center clip may need more readable UI detail. A sales email clip may need a bolder crop with fewer interface details.
Use this table before editing:
| Destination | Best frame choice | Subtitle approach | Main risk |
|---|---|---|---|
| Landing page mobile section | 9:16 or 4:5, depending on layout | Burned-in subtitles with generous margins | Page controls or sticky elements crowd the frame |
| Social short | 9:16 | Large burned-in subtitles, short line length | Platform overlays and automatic caption areas |
| Help article embed | 4:5 or 1:1 if UI detail matters | Optional subtitles plus transcript nearby | UI labels become too small |
| Sales follow-up clip | 9:16 or 4:5 | Minimal subtitles, focus on outcome | Too much context removed from the product screen |
| Changelog post | 4:5 often works better than 9:16 | Short captions or step labels | Tiny UI changes become hard to see |
If the destination is not fixed, export a 9:16 version only when the content truly benefits from a phone-first format. Many product demos are easier to understand in 4:5 because it preserves more horizontal UI space while still fitting mobile feeds well.
Prepare Subtitles Before You Crop
Subtitles should be part of the crop plan, not an afterthought. If you already have a transcript, clean it before placing it on the video. If you need subtitles from a spoken demo, ConvertAndEdit’s video to subtitles tool can help you create a subtitle file that you can review before final placement.
The key is to make subtitles short enough to fit the vertical frame. Long subtitle lines are the enemy of product demos because they force tiny text or two-line blocks that cover too much of the interface.
Use these rules for product demo subtitles:
| Subtitle detail | Practical target |
|---|---|
| Line count | One line when possible, two lines only when needed |
| Sentence length | Short clauses, not full paragraphs |
| Timing | Change when the product action changes |
| Position | Above the highest likely player controls |
| Contrast | Strong enough after compression, not just in the editor |
Edit spoken language for readability. Product demos often include filler like now we are going to, you can see here, or basically. Subtitles do not need to capture every hesitation when the purpose is clarity. Keep the meaning, remove the clutter, and align subtitle changes with the visible action.
If your subtitle file includes long technical terms, product names, or URLs, test them in the vertical frame early. A single long token can force awkward wrapping. In those cases, rephrase the subtitle or keep the term on screen elsewhere, such as in the product UI itself.
Choose the Crop Anchor
A crop anchor is the part of the source video that the vertical frame follows. In product demos, there are usually five possible anchors.
| Anchor | Use it when | Watch out for |
|---|---|---|
| Cursor anchor | The cursor is the main guide through the product | Fast mouse movement can make the crop feel jumpy |
| Panel anchor | One panel or modal contains the key action | Sidebars and menus may be lost |
| Form anchor | The demo is about filling fields or changing settings | Labels may sit outside the crop if fields are wide |
| Speaker anchor | A presenter face is important | Product UI may become too small |
| Result anchor | The final output matters more than each click | The setup may feel confusing if cropped too tightly |
For most product demo clips, panel anchor or result anchor is more stable than cursor anchor. The cursor should guide the viewer, but the frame should not chase it constantly. A crop that moves too often feels like the viewer is being pulled around the screen.
If the product has a wide dashboard, choose the narrowest meaningful region. For example, if the demo is about exporting a report, the entire dashboard may not matter. The export button, dialog, status message, and final file preview probably matter more.
A Practical Crop Pass
Do a first pass without subtitles visible. This helps you judge whether the product story survives on its own.
- Scrub through the full clip and mark every moment where a viewer must read or notice something.
- Identify the widest moment that must fit inside the crop.
- Pick a vertical frame that contains that widest moment with side padding.
- Watch the clip at normal speed inside that crop.
- Note every moment where the cursor, menu, modal, tooltip, or result leaves the frame.
- Adjust the crop only if the missing element is essential.
Do not optimize for the prettiest still frame. Optimize for the moment where the viewer understands the product action fastest.
If the crop has to move, use fewer moves than you think. A slow pan from a settings panel to a preview panel can work. Constant reframing from click to click usually makes the product harder to follow.
When you need a supporting still image for a blog post or help article, export a representative frame and clean it separately. You can use resize image for precise display dimensions and compress image when the article needs a lighter page asset.
A Subtitle-Safe Crop Checklist
Use this checklist before exporting the final video:
| Check | Pass condition |
|---|---|
| Subtitles stay inside the frame | No line touches the left, right, or bottom edge |
| Subtitles do not cover clicks | Buttons, form fields, and menus remain visible while being discussed |
| Two-line captions remain readable | The lower line is not hidden by platform controls or embed UI |
| UI labels are legible on a phone | The smallest required label can be read without pausing on a desktop monitor at phone-preview size |
| Cursor movement is understandable | The pointer does not disappear at key moments |
| Modal edges are visible | Dialogs are not cropped so tightly that context is lost |
| Transitions are calm | Crop moves are rare and motivated by the action |
| Export compression is acceptable | Thin lines, subtitle edges, and UI text remain clear |
A useful test is to preview the clip at actual phone width on your monitor, then step back slightly. If you cannot read the key subtitle and the key UI label at the same time, the crop is too ambitious.
Subtitle Placement That Does Not Fight the Interface
Subtitle placement depends on the product UI. Many demos place subtitles at the bottom by default, but that is not always best.
Bottom subtitles work when the product action happens in the upper half of the crop and the lower area is visually quiet. They fail when the product has bottom navigation, bottom sheets, cookie banners, chat widgets, timeline controls, or command bars.
Middle-lower subtitles can work for social clips because they avoid platform overlays, but they can cover product panels. Use them only when the product action is higher in the frame.
Top subtitles are sometimes useful for mobile app demos with important bottom navigation. They are less common, but they can be the cleanest choice when the lower half of the app is active. The tradeoff is that top subtitles may compete with browser chrome, app headers, or presenter faces.
For product demos, avoid subtitle blocks that jump between positions. If you must move subtitles for one moment, make the move intentional and brief. Random movement makes the viewer search for the text instead of watching the demo.
Handling Screen Recordings With Presenter Video
Screen recordings with a presenter bubble are especially tricky. The presenter may help trust and context, but the face bubble often sits exactly where subtitles or key UI need to go.
Decide the role of the presenter before cropping:
| Presenter role | Recommended treatment |
|---|---|
| Main narrator | Keep face visible, crop product tighter, use shorter subtitles |
| Brief intro only | Show face at the start, remove or reduce it during product action |
| Trust signal | Keep a small face bubble away from subtitles and buttons |
| Not essential | Remove the bubble or crop it out |
If the presenter bubble covers product UI in the source video, cropping will not fix it. You may need to use a different recording, move the face layer in the editor, or create a product-only version.
For clips that combine a presenter and a UI, consider a 4:5 export instead of 9:16. It gives the presenter and product more room without becoming a tiny desktop recording inside a phone-shaped frame.
Compression Can Break a Good Crop
A crop can look sharp in the editor and soft after export. Product demos are vulnerable because they contain thin UI lines, small text, cursor outlines, and subtitle edges. Compression damage can turn a readable clip into a blurry one.
Before export, simplify the frame where possible. Remove unnecessary browser tabs, bookmark bars, desktop clutter, and tiny side panels. The less visual noise the encoder has to preserve, the better the subtitles and key UI will hold up.
If you create thumbnail frames, poster images, or supporting graphics from the video, keep image handling separate from video handling. Convert still frames to the right format with convert image, then compress them for the page with compress image. This keeps the article or landing page lighter without forcing the video itself to do every job.
For the video, test a short export first. Do not wait until the full clip is finished to discover that subtitles shimmer or the product labels are mushy. Export 10 to 15 seconds that include the smallest UI text, a subtitle change, and cursor movement. Review that sample on a phone.
Common Product Demo Crop Problems
Here are the issues that show up most often in vertical product clips.
| Problem | Likely cause | Fix |
|---|---|---|
| Subtitles touch the bottom edge | Subtitle layer was placed for desktop preview, not mobile viewing | Move subtitles up and reduce line length |
| UI looks readable in editor but tiny on phone | The crop preserved too much of the desktop screen | Crop closer or switch to 4:5 with fewer UI details shown |
| Cursor disappears during clicks | The frame is anchored to the panel, but the cursor travels outside it | Add one slow crop move or rerecord with tighter cursor path |
| Modal is cropped awkwardly | Crop was chosen before the modal appeared | Base the crop on the widest essential moment |
| Subtitle covers the button being clicked | Reading zone overlaps focus zone | Move subtitles, shorten timing, or pause subtitle during the click |
| Clip feels restless | Too many crop moves | Use fewer anchored sections and let the product action breathe |
| Thin UI lines flicker | Export compression is too aggressive | Increase quality, simplify frame, or use a larger display size |
Most fixes are easier before final captions are burned in. Keep subtitles editable until the last export whenever possible.
When to Re-Record Instead of Cropping
Sometimes the cleanest edit is a new recording. Cropping cannot solve every source problem.
Re-record when:
- The key product area moves across the entire desktop.
- The source is too low-resolution for readable vertical output.
- Subtitles would cover essential UI no matter where they sit.
- The presenter bubble is baked into the wrong location.
- The demo includes private data that would need heavy masking.
- The source has too much zooming, shaking, or cursor wandering.
A better recording does not have to be elaborate. Record the product with a narrower browser window, larger zoom level, cleaner test data, and a slower cursor path. If subtitles are planned, leave a quiet band in the frame from the start.
For product teams, this is often faster than trying to rescue a wide desktop recording. A five-minute rerecord can save an hour of crop fixes.
A Simple Production Pass for Teams
Use this practical system when multiple people create demo clips:
- Decide the destination and aspect ratio before recording.
- Record with the browser zoomed enough for mobile readability.
- Keep the key product action in a consistent area of the screen.
- Generate or prepare subtitles early with video to subtitles.
- Create the crop without subtitles first.
- Add subtitles in a protected reading zone.
- Export a short test sample and review it on a phone.
- Export the final clip only after subtitle placement and compression pass.
- Create still support assets separately with image tools when needed.
This keeps the editing decisions concrete. The team is not arguing about taste. They are checking whether the clip can be understood on a real device.
Final Quality Review
Before publishing, watch the vertical clip without sound. If the viewer cannot understand the main action while muted, the subtitles and visual sequence are not doing enough. Then watch it with sound and captions on. If the subtitles feel redundant but helpful, you are close. If they fight the narration or cover key UI, revise them.
Finally, test the clip in its real context. A video that looks clear in an editor may feel cramped inside a landing page section, support article, or social preview. Check the surrounding page elements, not just the media file.
Subtitle-safe cropping is less about a perfect aspect ratio and more about respecting attention. The viewer needs to read, watch, and understand at the same time. Give the product action a stable focus zone, give subtitles protected space, and treat the edges of the frame as risky. That is how a wide product recording becomes a useful vertical demo instead of a cropped fragment.