Image-to-PDF Field Report Workflow for Receipts, Site Photos, and Visual Evidence
A practical workflow for turning field photos, receipts, screenshots, and marked-up evidence into clean PDF reports without layout software or messy email threads.

Image-to-PDF Field Report Workflow for Receipts, Site Photos, and Visual Evidence
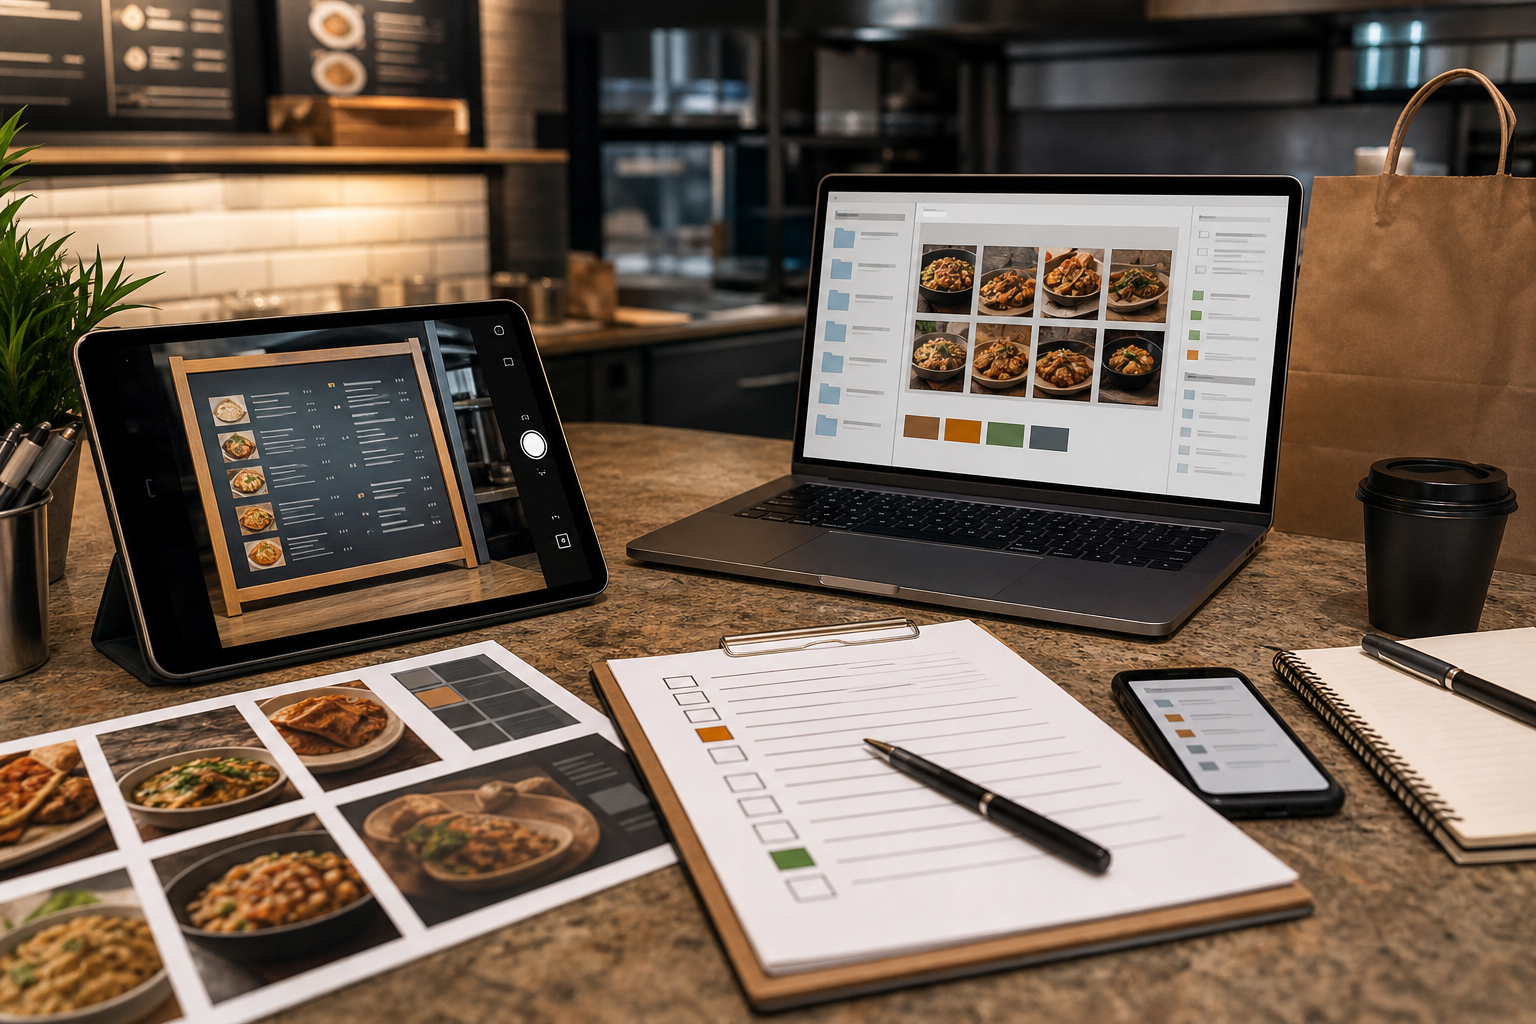
Field teams collect some of the most useful documentation a company owns: photos of damaged packaging, machine labels, delivery receipts, job site conditions, whiteboard notes, safety observations, handwritten forms, and screenshots from mobile apps. The problem is rarely the evidence itself. The problem is packaging it into something another person can review without guessing what matters.
A folder of twenty phone images is easy to capture and hard to approve. A chat thread with receipts, close-ups, and duplicate photos is fast for the sender and slow for everyone else. A PDF report, on the other hand, is predictable. It can be attached to a ticket, archived with a job number, sent to a vendor, reviewed by finance, or stored with a project record.
This guide is a practical workflow for turning mixed visual evidence into a clean PDF report without design software. It is written for operations teams, facilities managers, construction coordinators, insurance support teams, field technicians, finance assistants, and anyone who receives image-heavy documentation from people outside a desk workflow.
The goal is not to make a beautiful brochure. The goal is to make a report that is readable, complete, small enough to share, and clear enough that nobody has to ask, "Which photo am I supposed to look at?"
The Field Report Problem: Good Evidence, Bad Packaging
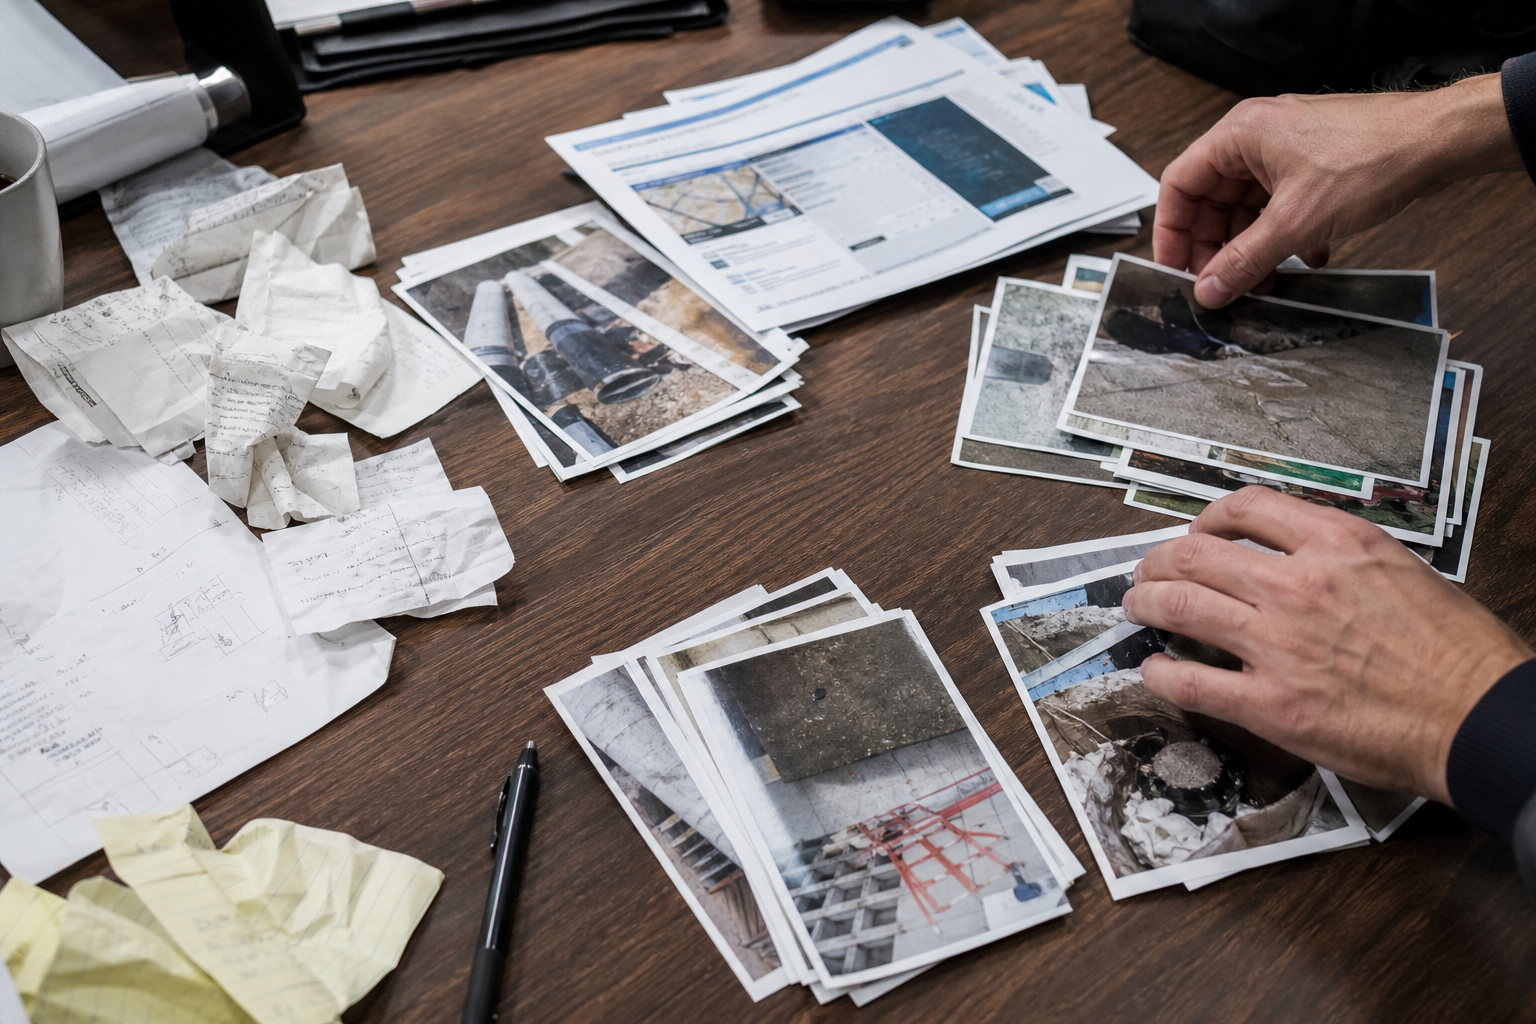
Field evidence usually arrives in the order it was captured, not the order it should be reviewed. A technician may photograph a damaged part, then a receipt, then the serial number, then the full machine, then the same damaged part again from a better angle. That sequence made sense on site. It does not automatically make sense to an approver three days later.
The second problem is mixed image quality. One photo is sharp and bright. Another is tilted. A receipt is overexposed. A screenshot includes private notifications. A wide site photo shows too much empty floor and too little detail. A close-up of a label is useful, but only if it is large enough to read after conversion.
The third problem is file sprawl. Images are sent by email, chat, shared drive, ticketing system, or mobile upload. Even if every file is technically present, the reviewer has to open each image separately. That is acceptable for three photos. It becomes expensive friction with fifteen receipts, thirty delivery images, or a recurring weekly site report.
A good image-to-PDF workflow solves these problems by forcing light editorial decisions before the PDF is assembled:
- Which images belong in this report?
- What order should they appear in?
- Which images need cropping, resizing, or cleanup?
- Which pages need OCR or searchable text?
- What file size is reasonable for the recipient?
- What should be removed before external sharing?
The important part is that these decisions happen before the PDF is final. Once the report is merged, forwarded, and archived, fixing a wrong crop or missing receipt becomes slower.
When Image-to-PDF Is Better Than Sending Photos
Sending raw image files is fine when the recipient only needs to inspect one or two visuals. A PDF becomes better when the images are part of a decision, audit, reimbursement, maintenance record, claim, or approval chain.
Use an image-to-PDF report when the recipient needs sequence, context, and permanence. For example, a facilities manager might need a before photo, a close-up, a receipt, and an after photo in the same document. A finance reviewer may need a purchase receipt plus a photo proving the item was delivered. A vendor dispute may require packaging damage, label photos, and the signed delivery note together.
Raw images are better when the recipient needs maximum image quality for inspection, editing, or forensic review. A PDF is better when the recipient needs a readable packet.
| Situation | Better format | Why |
|---|---|---|
| One clear photo for a quick chat decision | Image file | Fast and direct |
| Receipts for reimbursement | Easier to archive and review | |
| Damage documentation with multiple angles | PDF plus original images if needed | Preserves order and context |
| Product photos for editing | Original images | Avoids PDF compression and layout limits |
| Weekly site report | Consistent structure across weeks | |
| Screenshots from an app workflow | Shows sequence and keeps pages together | |
| Legal or insurance evidence | PDF with originals retained | Convenient review copy while preserving source files |
A useful rule: if someone might print it, approve it, attach it to a record, or search for it later, PDF is usually the right delivery format.
Build a Small Intake Standard Before Editing
The fastest way to improve field reports is to standardize what happens before conversion. This does not require a complicated policy. It can be a short checklist that every sender follows.
Ask field contributors to capture four types of images when relevant:
- Context photo: the whole scene, item, room, package, vehicle, shelf, or machine.
- Detail photo: the specific issue, defect, receipt line, label, or measurement.
- Identifier photo: serial number, job label, receipt header, ticket number, asset tag, or delivery note.
- Completion photo: the final state after repair, placement, delivery, installation, or cleanup.
This pattern works because it mirrors how reviewers think. They need to know what they are looking at, what the issue is, how it is identified, and whether the task is complete.
For receipts and paper forms, ask senders to capture images from directly above the page, with all corners visible and shadows minimized. The image does not need to be studio quality. It just needs to be flat, readable, and complete. Cropping can happen later, but missing corners cannot be recovered.
For screens, ask for screenshots instead of photos of screens whenever possible. A screenshot is cleaner, more readable, and easier to crop. If a phone photo of a screen is unavoidable, capture it straight on and avoid reflections.
This intake standard saves more time than any conversion tool. The PDF assembly step is only as good as the images going into it.
Prepare the Images Before Making the PDF
Do not convert every image immediately. First, prepare the visuals so each page has a job. The most common preparation steps are cropping, resizing, rotating, compressing, and extracting text.
Start with cropping. Remove empty table space around receipts, unnecessary background around labels, and private areas of screenshots that are not relevant. Cropping is especially important for mobile photos because the subject often occupies only a small part of the frame. If a receipt takes up 30 percent of a photo, the PDF page will make it feel even smaller.
Next, rotate images correctly. This sounds obvious, but sideways receipt pages are still common in operational PDFs. A reviewer should never need to rotate their head or download the file to inspect it.
Then decide whether resizing is needed. High-resolution phone images can be huge. If the report is meant for review rather than print reproduction, you can usually reduce image dimensions while keeping text readable. Use a tool like Resize Image when images are far larger than the viewing need. A 4000-pixel-wide site photo may not need to stay that large inside a report that will be viewed on laptops and tablets.
Compression should come after cropping and resizing. Compressing an oversized image before removing useless borders wastes effort and can still leave you with a bloated file. For review packets, use Compress Image to reduce weight while checking that fine text, labels, and receipt totals remain readable.
If the report includes screenshots, receipts, forms, or labels, OCR may help. Image OCR can extract text from images so you can copy job numbers, vendor names, dates, or serial numbers into the surrounding ticket or filename. Even if the final PDF is mostly visual, extracted text can reduce manual retyping errors.
For mixed formats, normalize before assembly. If you have HEIC phone images, PNG screenshots, JPEG photos, and WebP images, use Convert Image to bring them into a format that behaves consistently in your PDF workflow. JPEG is often practical for photos. PNG is often better for sharp screenshots and UI captures. The right choice depends on the image content, not habit.
A Practical Image-to-PDF Assembly Workflow
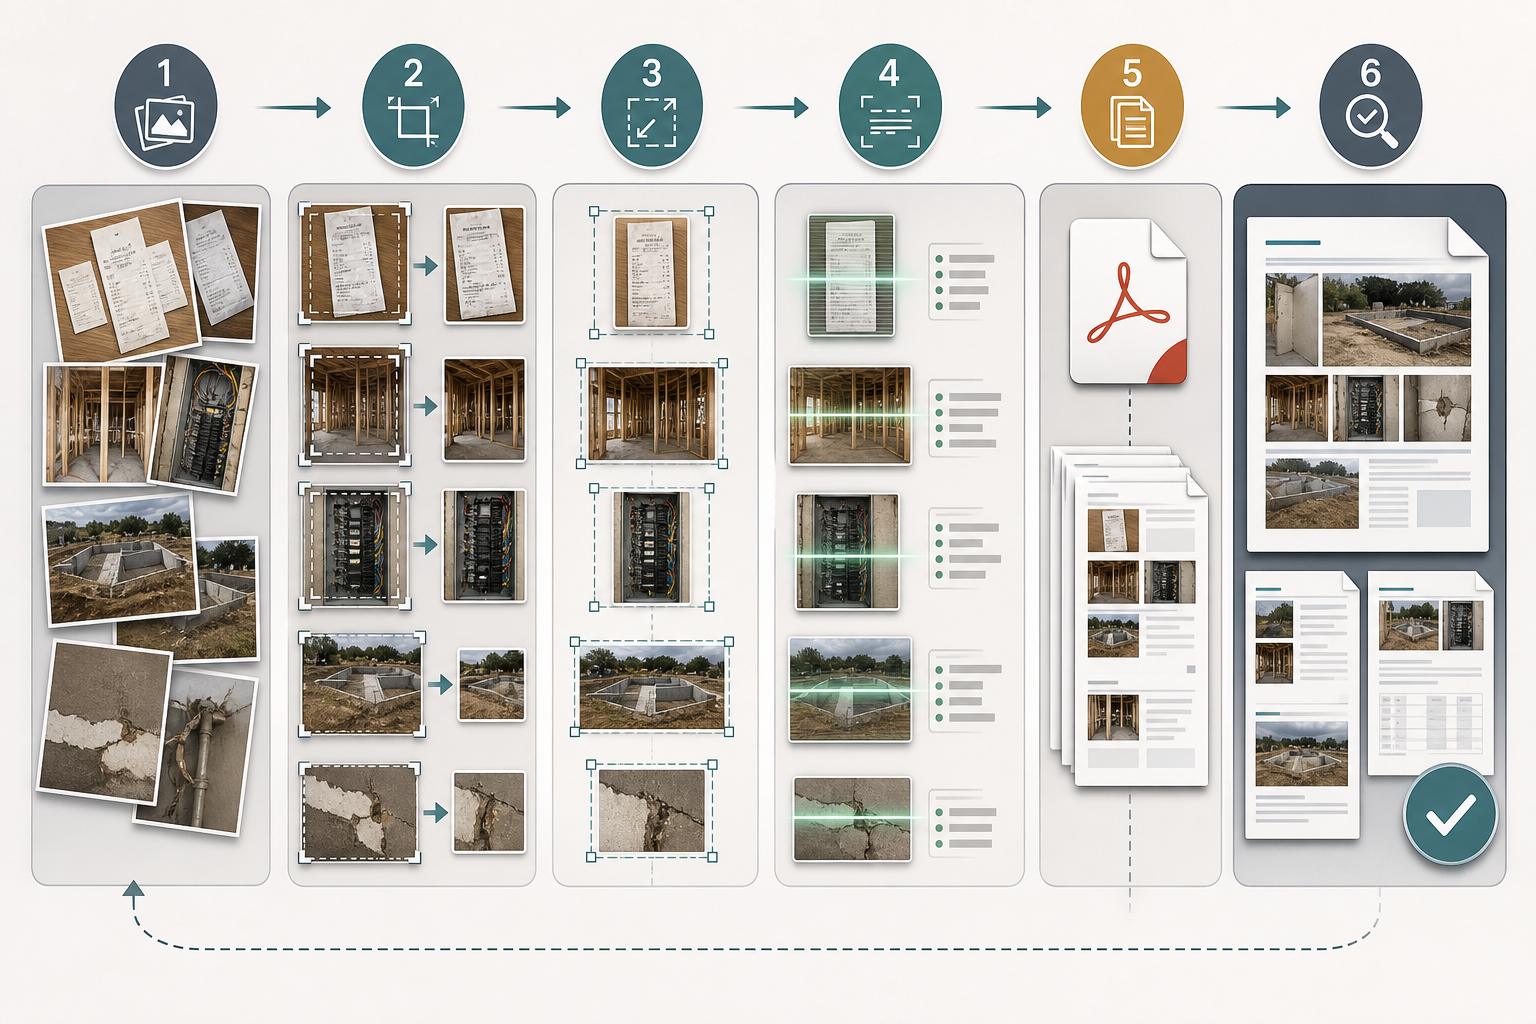
A strong field report workflow can be simple enough to repeat every week. The following sequence works for most operations teams.
1. Create a Working Folder
Create one folder for the report before editing. Use a name that includes the date, location, job number, or vendor. For example:
2026-05-warehouse-bay-4-leak-inspection
2026-05-03-vendor-delivery-claim-PO-1842
site-photos-unit-12-before-after
Put every source image in that folder. Do not edit directly in a shared chat thread or email attachment pile. A working folder gives you a place to separate originals from prepared images.
A useful folder structure is:
originals
prepared
final
Keep the originals unchanged. Put cropped, resized, converted, or compressed versions in prepared. Export the PDF into final. This structure prevents accidental overwrites and makes it easier to answer questions later.
2. Remove Duplicates and Weak Images
Before editing, scan the images quickly and remove duplicates from the report set. Keep the clearest angle, not the first angle. If two photos show the same receipt and one is sharper, only the sharper version belongs in the PDF.
Do not delete the original files if the report might matter later. Move unused images to an unused subfolder or leave them in originals. The PDF should be concise, but the source record can remain complete.
3. Sort Images Into Review Order
The order of pages should match the decision the recipient needs to make. Chronological order is not always best.
For a repair report, use:
- Context before photo
- Close-up of issue
- Asset tag or identifier
- Repair receipt or parts receipt
- Completion photo
- Any exception or follow-up image
For a delivery claim, use:
- Delivery overview
- Shipping label
- Damaged packaging exterior
- Damaged item detail
- Receipt or packing slip
- Final storage or return condition
For reimbursement, use:
- Receipt overview
- Receipt detail if needed
- Photo of purchased item or service result
- Approval screenshot if relevant
Rename prepared images with simple numeric prefixes so the final PDF order is obvious:
01-context-before.jpg
02-damage-closeup.jpg
03-asset-tag.jpg
04-repair-receipt.jpg
05-completion-after.jpg
This small habit prevents pages from being sorted alphabetically by camera filename, which can scramble the report.
4. Crop for the Page, Not the Camera
Cropping for a PDF is different from cropping for a photo gallery. The question is not "Does this look nice?" The question is "Will the reviewer see the important part immediately?"
For receipts, crop close enough that the paper fills most of the page, but keep all edges visible if completeness matters. For labels, crop tighter so the label is readable without zooming. For wide site photos, keep enough surroundings to understand location, then use a second close-up for the issue.
If an image contains private data that is not needed, remove it before PDF assembly. This may include unrelated email notifications, customer names, personal phone numbers, account numbers, or visible faces in the background. A PDF is easy to forward, so treat every page as if it may travel beyond the first recipient.
5. Resize With the Reading Distance in Mind
A report that will be read on a laptop does not need every image at maximum phone resolution. But text-heavy images need enough pixels to survive conversion.
Use this decision table as a starting point:
| Image type | Suggested handling | Watch for |
|---|---|---|
| Site overview photo | Resize moderately | Do not lose spatial context |
| Receipt photo | Keep enough resolution for small print | Totals, dates, vendor names |
| Asset label | Avoid aggressive resizing | Serial numbers and barcodes |
| App screenshot | Keep sharp edges | UI text and thin lines |
| Whiteboard note | Crop first, then resize carefully | Handwriting readability |
| Damage close-up | Preserve detail | Texture, cracks, stains, dents |
After resizing, open the prepared image at the size a reviewer will likely use. If you need to zoom heavily to read essential text, the image is too small or cropped poorly.
6. Convert Images Into One PDF
Once the images are prepared and ordered, use Image to PDF to assemble them into a single document. The key is to make page order intentional before upload. A PDF tool can combine images, but it cannot know which image is the context shot and which is the proof shot.
Choose a page layout that keeps each image readable. For evidence reports, one image per page is usually best. It may feel less compact, but it reduces ambiguity and keeps details large. For proof sheets or visual inventories, multiple images per page can work, but only when the images do not contain small text.
Name the final PDF clearly:
2026-05-03-bay-4-leak-inspection-report.pdf
vendor-delivery-claim-PO-1842-visual-evidence.pdf
unit-12-repair-before-after-receipts.pdf
Avoid vague names like photos.pdf, report-final-final.pdf, or scan.pdf. The filename should still make sense six months later.
7. Compress the Final PDF Only If Needed
After assembly, check the final file size. If the PDF is going into an email system, vendor portal, ticketing platform, or mobile review workflow, file size matters. However, do not compress blindly. If the PDF contains receipt text, serial labels, or screenshots, over-compression can destroy the point of the report.
If the PDF is too large, reduce it in stages. First, see whether any oversized image slipped through. It is often better to resize one giant photo than to heavily compress the entire PDF. If the report contains many photos, moderate compression is usually acceptable. If it contains tiny text, inspect the result carefully.
For multi-document packets, PDF Merge can help combine the image report with an existing work order, invoice, inspection form, or signed approval. Keep the visual evidence section in a logical place, usually after the summary document and before appendices.
Report Structures That Work in Real Operations
Different teams need different page structures. The easiest way to make image-to-PDF reports consistent is to pick a pattern by use case.
Receipt and Reimbursement Packet
This packet is for finance review. The reviewer needs to know what was bought, when, why, and whether the purchase matches the request.
Suggested order:
- Approval screenshot or work order image if relevant
- Full receipt photo
- Receipt close-up if the full receipt is hard to read
- Photo of purchased item, installed part, or completed service
- Any exception photo, such as missing item or substitution
Keep receipt pages upright and tightly cropped. If the receipt is long, use multiple images rather than one unreadably distant photo. A clear two-page receipt PDF is better than a single page nobody can read.
Site Condition Report
This packet is for facilities, property, construction, or maintenance review. The recipient needs to understand location and severity.
Suggested order:
- Exterior or room context
- Medium-distance location photo
- Close-up of issue
- Measurement or label photo
- Temporary fix if applied
- Final condition or follow-up requirement
Use a wide-to-tight sequence. Start by orienting the reviewer, then show the evidence. Without context, a close-up of a crack, leak, stain, or broken fitting may be technically accurate but operationally vague.
Delivery Damage Claim
This packet is for vendors, carriers, procurement teams, or customer support. The recipient needs proof that damage happened and that the item is identifiable.
Suggested order:
- Package as received
- Shipping label or tracking label
- Exterior damage
- Interior packaging condition
- Product damage close-up
- Packing slip, receipt, or order image
- Storage, return, or disposal condition
Do not crop label images so tightly that tracking context disappears. If a label contains private recipient information, create a review copy with unnecessary personal details removed while retaining the identifiers required for the claim.
Before-and-After Work Report
This packet is for supervisors, clients, or internal records. The recipient needs to see change over time.
Suggested order:
- Before context
- Before detail
- Work in progress if useful
- Receipt or material proof
- After detail
- After context
The after context matters. A close-up may show that one component was fixed, but the wider after photo shows that the area was left clean, accessible, or restored.
Quality Control Before Sending
A five-minute review prevents most embarrassing report issues. Open the final PDF and inspect it as if you are the recipient.
Use this checklist:
- The first page makes the report topic clear through the image or filename context.
- Pages are in a logical order.
- Every page is upright.
- Receipts, labels, and screenshots are readable without extreme zoom.
- Duplicate images are removed unless they show meaningful differences.
- Crops do not remove important corners, labels, totals, dates, or identifiers.
- Private or unrelated information is not visible.
- The PDF filename includes useful context.
- File size is acceptable for the destination.
- The original images are retained if the report may be disputed later.
Pay special attention to the last two pages. Many reports are reviewed carefully at the start and rushed at the end. Missing after photos, sideways receipts, and accidental duplicates often appear near the end because that is where the assembly process gets less deliberate.
Common Mistakes and How to Avoid Them
The most common mistake is turning every captured image into a PDF page. A report is not a camera roll. It should include the images needed for review and archive, not every attempt to get the shot.
Another mistake is using heavy compression too early. If you compress a receipt photo before cropping it, then crop and convert it again, you may degrade the text twice. Work from original to prepared image to PDF, and compress only when needed.
A third mistake is relying on the PDF to explain itself. A PDF made of images can be clear, but only if page order and filenames carry context. If the recipient sees a close-up of a damaged corner with no overview, they may not know which item or location it belongs to.
A fourth mistake is mixing visual purposes on one page. A receipt page should make the receipt readable. A site photo should show the site. A label page should show the label. Trying to make one image do all three jobs usually creates a page that does none of them well.
Finally, teams often forget source preservation. A PDF is a convenient review packet, not always the original record. For claims, audits, disputes, or compliance-sensitive work, keep the original images in their capture state. The PDF can be the shareable version while the originals remain available if someone needs metadata, higher resolution, or untouched evidence.
Naming Conventions That Make Reports Easier to Find
A report that cannot be found later is only half useful. Build filenames around the way people search.
A good filename usually includes:
- Date
- Location, vendor, asset, or project
- Report type
- Optional job number, purchase order, or ticket number
Examples:
2026-05-03-warehouse-bay-4-leak-visual-report.pdf
2026-05-03-PO-1842-delivery-damage-evidence.pdf
2026-05-unit-12-hvac-repair-receipts-and-photos.pdf
Avoid placing the most important identifier at the end if filenames are often truncated in your system. If your team searches by purchase order, put the purchase order near the front. If your team searches by property, put the property near the front.
For recurring reports, keep the structure stable. A folder full of reports is much easier to scan when every filename follows the same pattern.
A Lightweight Team SOP You Can Reuse
You do not need a long manual. A small standard operating procedure can make image-to-PDF reporting consistent across a team.
Here is a reusable version:
- Save all source images in an
originalsfolder. - Remove duplicates from the report set without deleting originals.
- Sort selected images into review order.
- Rename selected images with numeric prefixes.
- Crop receipts, labels, screenshots, and detail photos for readability.
- Resize oversized photos when full resolution is unnecessary.
- Convert image formats if needed for consistency.
- Extract OCR text for job numbers, serials, dates, or receipt details when helpful.
- Create the PDF from the prepared images.
- Review page order, readability, privacy, and file size.
- Merge with related PDFs if the report belongs in a larger packet.
- Save the final PDF with a searchable filename.
This SOP is intentionally boring. That is the point. Field documentation workflows should be reliable, not clever. The fewer decisions people have to remake every time, the more consistent the output becomes.
Where ConvertAndEdit Fits in the Workflow
ConvertAndEdit is useful here because field report preparation usually crosses formats. A single report may start with phone photos, screenshots, receipt images, and existing PDF documents. You may need to resize, compress, convert, OCR, assemble, and merge before the packet is ready.
A practical tool chain might look like this:
- Use Resize Image for oversized phone photos that do not need full capture resolution.
- Use Compress Image after cropping and resizing to keep image-heavy reports manageable.
- Use Convert Image when mixed formats need to become consistent before assembly.
- Use Image OCR to extract identifiers from receipts, labels, forms, and screenshots.
- Use Image to PDF to turn the prepared image sequence into a shareable report.
- Use PDF Merge when the visual report needs to be attached to an invoice, work order, or approval PDF.
The main advantage is continuity. Instead of pushing files through a desktop layout app or rebuilding the report manually in a document editor, you can prepare the assets directly around the final delivery format.
Final Review: Make the PDF Easy to Trust
A good field report does not need decoration. It needs clear evidence, logical order, readable pages, and a filename that survives the archive. The best reports feel uneventful to review because every page answers the next obvious question.
Start with better intake: context, detail, identifier, completion. Prepare images before conversion: crop, rotate, resize, compress, and use OCR where it saves retyping. Assemble the PDF in the order a reviewer needs, not the order the phone captured it. Keep originals when the report may matter later.
That small discipline turns scattered visual proof into a document people can approve, forward, store, and understand without a meeting. For operations work, that is often the difference between evidence that exists and evidence that actually helps.