Fire Door Inspection Photo Packets: A Practical Guide for Clear Defect Evidence
Build cleaner fire door inspection packets from phone photos: crop labels, preserve gaps and damage details, run OCR, compress files, and package findings into review-ready PDFs.
Fire Door Inspection Photo Packets: A Practical Guide for Clear Defect Evidence
Fire door inspection photos have a narrow job: they need to prove what was checked, where it was checked, and what condition was found. That sounds simple until a reviewer opens a folder with 137 phone images named IMG_4821, IMG_4822, and IMG_4823. Some photos show an entire hallway but not the door number. Others show a damaged edge so close that nobody can tell which door it belongs to. Labels are blurry, gaps are washed out by flash, and the final PDF is too large to email.
This guide is for facilities teams, safety coordinators, property managers, and inspection vendors who need to turn ordinary phone photos into clean fire door evidence packets. It is not a code compliance manual and it does not replace a qualified inspection. The goal is narrower: make your visual documentation easier to review, archive, and share without losing the small details that matter.
A good packet should help someone answer five questions quickly: which door is this, what does the full assembly look like, what label or identifier was captured, what defect or pass condition is visible, and can the file still be opened without special software? The practical system below focuses on image capture, cropping, OCR, compression, and PDF assembly.
Why Fire Door Photos Fail During Review
Most inspection photo sets fail for one of three reasons: missing context, missing detail, or messy packaging.
Missing context happens when a close-up defect photo is technically sharp but detached from the door it belongs to. A reviewer can see a damaged latch edge, but not the room, corridor, door number, or floor. That photo may still be useful, but it will need manual explanation.
Missing detail is the opposite problem. The full door photo exists, but the label, hinge screws, closer arm, glazing mark, clearance gap, or damaged corner is too small to inspect. A reviewer has to zoom into a compressed phone image and hope the detail survives.
Messy packaging happens after capture. Images are mixed across floors, duplicate shots remain in the set, portrait and landscape photos rotate unpredictably, file sizes are huge, and the final PDF buries the important close-ups between repeated hallway shots.
The fix is not expensive equipment. It is a repeatable capture list and a short cleanup pass before the packet leaves your team.
The Four Photo Types Every Door Packet Needs
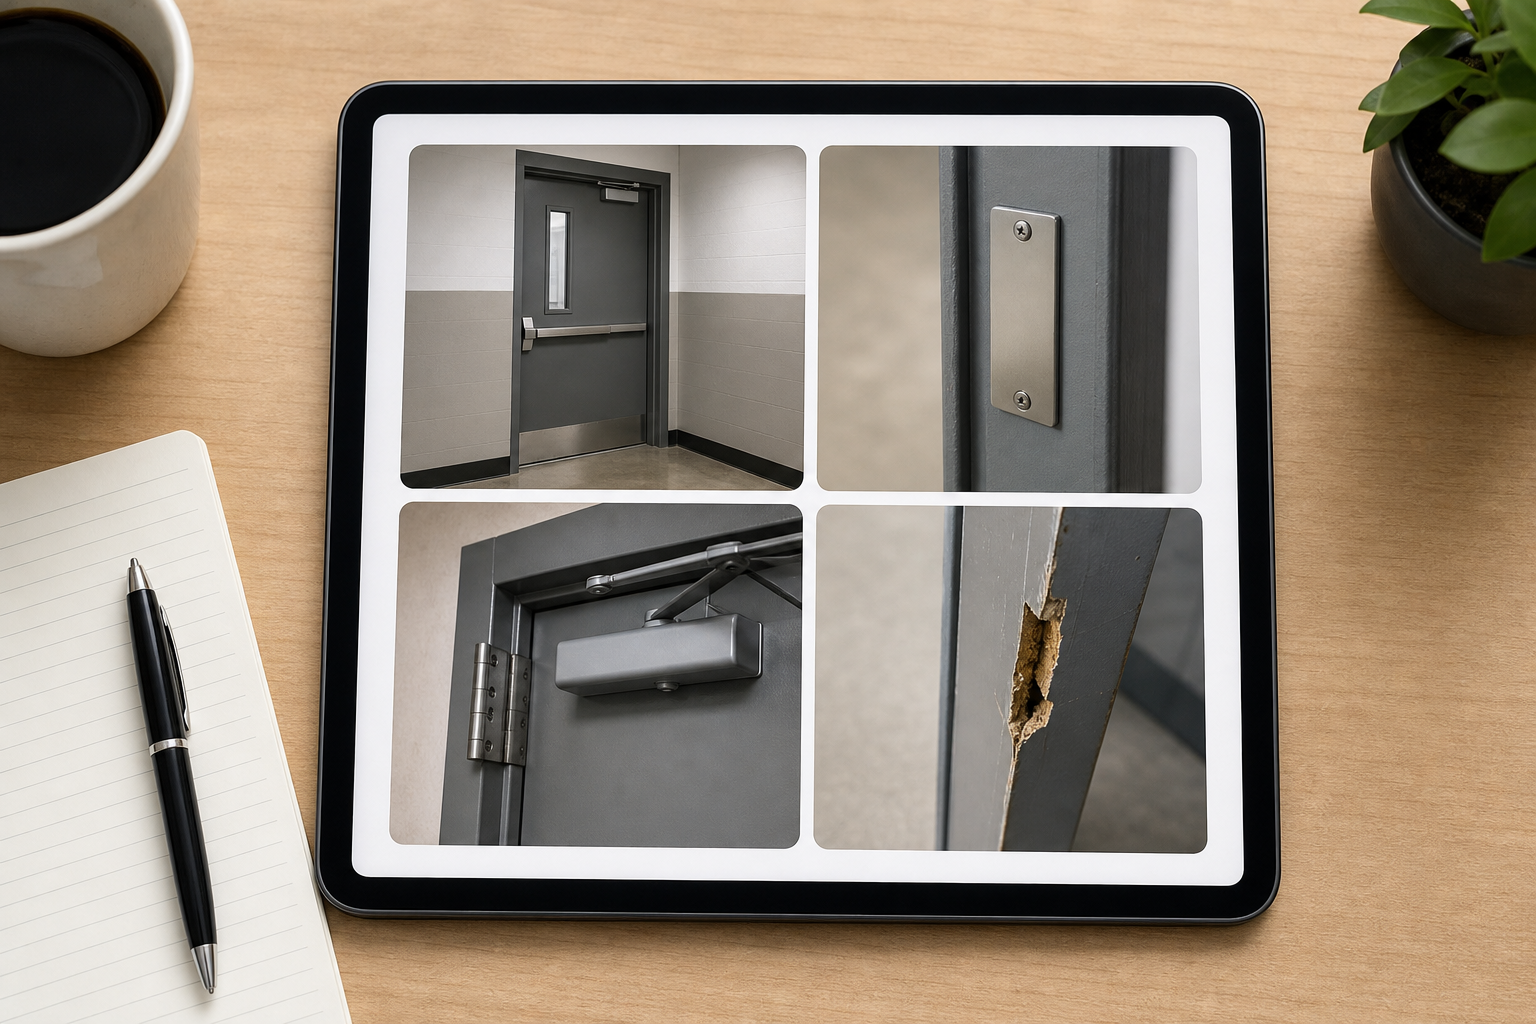
A useful fire door packet does not need dozens of beautiful images. It needs a small set of predictable photo types. For each door, aim to capture these four categories.
1. The Orientation Photo
Start with a wide photo that shows the full door assembly in its surroundings. Include the frame, hardware, closer if visible, signage area, and enough hallway or room context to identify the location later. If the door has a posted number, room sign, or nearby location marker, include it when possible.
This image is not meant to show every defect. It anchors the rest of the set. When a reviewer sees a close-up of a hinge, they should be able to connect it back to the orientation photo without guessing.
2. The Identifier Photo
Capture the door number, room sign, asset label, inspection sticker, or other location identifier. If the identifier is printed or engraved, take it square-on and close enough for OCR. If the label is reflective, tilt the phone slightly instead of relying on flash.
For metal certification labels, avoid extreme angles. The goal is legibility, not dramatic contrast. Take one wider label photo and one tighter photo if the label is worn, painted over, or partially obstructed.
3. The Hardware Photo
Fire doors are judged as assemblies, so hardware documentation matters. Capture hinges, latch area, closer, coordinator, exit device, kick plate area, glazing frame, seals, and any hold-open device if relevant to your inspection scope.
Keep each hardware photo tied to the door. If you photograph only a hinge from two inches away, also take a medium shot that shows where that hinge sits on the frame.
4. The Defect or Pass Detail Photo
When a defect is found, take a close-up that clearly shows it: damaged edge, missing screw, failed latch engagement, broken seal, blocked closer, excessive gap, field modification, paint buildup on a label, or visible warping. If a condition passes but is commonly questioned later, photograph that too.
For gap and clearance photos, include the measuring tool in the frame when appropriate. Keep it flat, visible, and aligned with the gap being documented. A blurry ruler is worse than no ruler because it creates false confidence.
Capture Settings That Make Cleanup Easier
The cleanup stage is much easier when the original photos are consistent. Before starting a building or floor, check these phone settings and habits.
Use the highest practical camera resolution, then reduce file size later. Do not capture tiny images just to save storage. Inspection details often live in small areas: labels, screws, seals, edges, and scratches.
Turn off beauty filters, scene enhancements, or aggressive document filters. They can over-sharpen paint texture, remove faint engraving, or create artificial contrast around edges.
Hold the phone parallel to flat surfaces when photographing labels, signs, and door faces. Perspective distortion makes OCR less reliable and can make a rectangular label look warped.
Use steady lighting. Flash can help in dark utility corridors, but it can also turn metal labels into white rectangles. If possible, take one photo with flash and one without flash when a label is reflective.
Avoid digital zoom. Move closer instead. Digital zoom often makes text look larger while reducing the actual detail available for review.
A Practical Naming Pattern Before Editing
File naming is not glamorous, but it prevents rework. Do not wait until every image is inside a PDF before trying to identify doors. Use a simple pattern while sorting:
| Segment | Example | Purpose |
|---|---|---|
| Building | BLDG-A | Separates sites or wings |
| Floor | L02 | Keeps review order logical |
| Door ID | D-214A | Ties every image to one opening |
| Photo type | overview, label, hardware, defect | Explains the image without opening it |
| Sequence | 01, 02 | Keeps related shots together |
A finished filename might look like this: BLDG-A_L02_D-214A_label_01.jpg.
This pattern is readable, sortable, and short enough for shared drives. If your team already has a naming standard, keep it. The important part is that every file carries door identity and photo purpose before it becomes part of a packet.
Clean Each Image for Evidence, Not Decoration
Inspection photos should look honest. The goal is not to make a damaged door look worse or better. The goal is to make the relevant evidence visible while preserving the condition captured at the time.
Start with rotation. Make the door vertical, labels horizontal, and measuring tools readable. A rotated image slows down review and increases the chance that someone misses a detail.
Next, crop only to remove waste. For an orientation photo, keep enough surrounding context. For a label photo, crop close enough that the label is the main subject, but leave a little surrounding material so the reviewer understands it is attached to the door or frame.
Then resize for the destination. Large originals are useful for archiving, but review packets usually need a balance between clarity and portability. Use Resize Image when a phone photo is far larger than needed for PDF review. A long edge around 1800 to 2400 pixels is often enough for most overview and hardware photos, while worn labels may deserve higher resolution.
Use compression carefully. Thin stamped letters, scratches, and wood grain around damage can disappear when compression is too aggressive. With Compress Image, compare the result at 100 percent zoom before replacing the original. If the label becomes muddy or the gap measurement becomes harder to read, back off.
Finally, convert formats only when it helps. JPEG is usually fine for ordinary photos. PNG can be better for screenshots or sharp graphic labels, but it may create larger files. If you receive mixed HEIC, WebP, PNG, and JPEG files from different devices, Convert Image can help standardize the set before PDF assembly.
OCR for Labels, Door IDs, and Room Signs
OCR is useful for fire door packets because it turns visual identifiers into searchable text. It is especially helpful when a reviewer needs to find one door across a large PDF or when an operations team needs to populate a spreadsheet after inspection.
The best OCR candidates are door numbers, room signs, asset tags, manufacturer labels, inspection stickers, and floor labels. The worst candidates are shiny plates at severe angles, handwritten notes on wrinkled paper, or embossed text with poor lighting.
Before running OCR, make a clean crop of the identifier. Keep the text level, remove empty background, and avoid heavy contrast edits that create halos around letters. Run the crop through Image OCR and compare the result against the image. OCR should be treated as a helper, not a source of truth.
For worn or painted labels, capture two versions: one natural photo and one slightly angled photo that catches side light. Sometimes the angled version reveals stamped characters better than the straight-on shot. Keep both if they clarify the record.
A useful OCR review table might include these fields:
| Field | What to capture | Manual check needed |
|---|---|---|
| Door ID | Room sign or asset label | Yes, especially similar characters |
| Label text | Certification or rating plate | Yes, worn labels often misread |
| Floor or area | Corridor sign or floor marker | Usually |
| Inspector note reference | Photo type or defect code | Yes |
Watch for OCR confusion between O and 0, I and 1, S and 5, and B and 8. These errors are common on metal plates and small room signs.
Decide What Goes Into the Final Packet
Not every captured photo belongs in the review packet. Keep originals in your archive, but make the packet focused. A reviewer should not have to page through five near-identical photos of the same closer unless each one adds new information.
Use this decision table when trimming the set:
| Photo | Include in packet? | Reason |
|---|---|---|
| Full door overview | Yes | Establishes location and assembly context |
| Door ID or room sign | Yes | Supports search and indexing |
| Clear label close-up | Yes | Documents rating or identifier |
| Duplicate blurry label | No, unless it is the only image | Adds noise |
| Hardware close-up with issue | Yes | Supports finding |
| Hardware close-up with no issue | Maybe | Include if required by inspection scope |
| Defect detail | Yes | Core evidence |
| Random hallway photo | No | Not tied to a door |
| Measurement photo | Yes, if readable | Supports clearance or gap finding |
If a defect is serious, include one context photo and one detail photo next to each other. The context photo shows where the defect is. The detail photo shows what it is.
Build the PDF Packet Without Burying the Evidence

A PDF packet should behave like a clean review document, not a camera roll pasted into pages. The most readable structure is usually grouped by door, then ordered by photo type.
For each door, use this order:
- Overview photo
- Identifier or label photo
- Relevant hardware photos
- Defect or measurement photos
- Optional note page or summary image if your team uses one
If your tools allow captions, keep captions short and factual. Door ID, floor, photo type, and finding code are usually enough. Avoid writing long explanations directly over the image. Text overlays can hide the exact evidence you are trying to preserve.
When you are ready to assemble, use Image to PDF for a straightforward packet from cleaned images. If separate PDFs already exist for different floors or inspectors, combine them with PDF Merge after checking the order.
A practical packet should open quickly, preserve the important details, and follow a predictable order. If it takes more than a few seconds to find a single door, the packet is too loose.
Compression Rules for Shareable Inspection PDFs
PDF size matters because inspection packets often travel through email, portals, shared drives, and maintenance systems. But file size should never be reduced by destroying the evidence.
Use a two-copy approach when possible: keep an original archive set and create a shareable review packet. The archive set can contain high-resolution originals. The review packet can be resized and compressed for practical use.
For overview photos, moderate compression is usually acceptable. Reviewers need context more than microscopic detail. For labels, measurements, and subtle defects, preserve more detail. These images carry the proof.
Before sending the final PDF, test three pages at 100 percent zoom: one overview, one label, and one defect. If those three pages remain readable, the rest of the packet is likely in good shape.
A simple target is to keep the packet small enough to share through your normal channel while keeping all key text and defects readable on an ordinary laptop screen. Avoid setting a universal megabyte limit without considering the number of doors and the type of evidence.
Quality Check Before Sending
Use a short quality check before the packet leaves your team. This is where most embarrassing problems get caught.
Check identity first. Every door group should have a door ID, floor, or location marker. If a defect photo has no clear relationship to a door, add the missing context photo or rename the file before assembly.
Check readability next. Labels should be readable without extreme zoom. Measurements should show the tool and the gap or clearance being measured. Hardware defects should be sharp enough to support the finding.
Check order. Door groups should not be mixed across floors unless the packet is intentionally organized by defect type. Most reviewers expect location order because it matches how buildings are navigated.
Check rotation. A single sideways label photo makes the packet feel careless and slows review.
Check duplicates. Remove repeated images unless each one adds a different angle or lighting condition.
Check file size. If the PDF is too large, compress the least critical images first: repeated overview photos, broad hallway context, and non-defect hardware photos. Do not start with the label crops.
Common Edge Cases and How to Handle Them
Fire door documentation often runs into imperfect conditions. The following fixes keep the packet useful without over-editing the evidence.
Painted or Partly Covered Labels
Take a wider photo showing where the label is located, then a tight crop showing the readable portion. If OCR produces uncertain text, include the crop but do not rely on the OCR alone. A manual note may be needed in your inspection system.
Reflective Metal Plates
Capture at two slight angles. One angle may remove glare while the other preserves the stamped shape. Avoid heavy flash if it wipes out the plate.
Dark Utility Areas
Use flash for one image and ambient light for another if time allows. Flash can reveal edges and hardware, while ambient light may preserve label contrast.
Very Tall or Narrow Doors
Step back enough to include the full assembly, then take separate close-ups. Do not try to make one photo do every job.
Damage Near the Floor
Take one low-angle detail photo and one medium context photo. Floor-level damage is easy to misplace without context.
Multiple Doors in One Opening
Document each leaf separately when needed. Use clear file names so left, right, active, and inactive leaf photos do not get mixed.
A Minimal Packet Template
For small buildings or quick internal reviews, this compact template is often enough:
| Page order | Content | Notes |
|---|---|---|
| 1 | Door overview | Full assembly and surroundings |
| 2 | Door ID and label | Room sign, asset tag, or certification label |
| 3 | Hardware details | Hinges, closer, latch, seals, or exit device |
| 4 | Defect details | Only if defects or measurements were captured |
For larger sites, repeat the same structure for every door and group by floor. Consistency matters more than elaborate design. A predictable packet reduces review time and makes missing evidence obvious.
Keep the Record Honest
Photo cleanup should make evidence easier to see, not change what happened. Avoid removing objects, painting over damage, replacing labels, or using edits that could misrepresent the condition. Cropping, rotation, resizing, format conversion, OCR extraction, and careful compression are usually enough.
If an image needs AI-assisted cleanup for exposure or background distractions, keep the edit conservative and preserve the original. For sensitive inspection records, avoid edits that alter the physical condition of the door, frame, hardware, label, or measurement tool.
Final Checklist
Before you send or archive a fire door inspection packet, confirm the following:
- Each door has an overview image.
- Each door has a readable identifier or location reference.
- Labels and room signs are cropped clearly enough for review.
- Hardware images show the relevant assembly parts.
- Defect photos include both context and close-up detail where needed.
- Measurement photos show the tool and the measured condition.
- OCR text has been manually checked against the image.
- Images are rotated correctly.
- Duplicates and unusable blurry shots are removed from the review packet.
- The PDF opens quickly and keeps labels, defects, and measurements readable.
Fire door inspection packets do not need to look like marketing brochures. They need to be clear, complete, and easy to trust. A small amount of image cleanup before PDF assembly can turn a messy camera roll into a useful record that reviewers, maintenance teams, and building managers can actually work with.