RMA Damage Claim Photo Packets: A Practical Image Evidence Guide
Learn how ecommerce support teams can prepare clearer damaged-package photo packets for RMAs, carrier claims, vendor reviews, and internal quality checks.
RMA Damage Claim Photo Packets: A Practical Image Evidence Guide
Damaged-package claims are won or lost in the small details. A customer may send five photos, but if they are blurry, oversized, duplicated, cropped too tightly, or scattered across a support thread, the evidence becomes harder to review. The carrier wants one set of proof. The warehouse wants another. The vendor may ask for photos of the carton, the product, the packaging materials, and the label area. Meanwhile, your support team needs to close the case without asking the customer for the same photo three times.
This guide is for ecommerce support teams, small operations teams, marketplace sellers, and repair or replacement desks that handle return merchandise authorization cases. It focuses on the practical image packet: a compact, readable set of photos that explains what happened without needing layout software or a dedicated claims system.
The goal is not to make damaged goods look better than they are. The goal is to preserve the useful evidence, remove avoidable confusion, and package the files so a reviewer can make a decision quickly.
Why RMA Photo Packets Need More Structure
A damage claim usually involves several parties. The customer wants a refund, replacement, or repair. The carrier may need proof of mishandling. The warehouse may need to identify a packing failure. The vendor may need to confirm a manufacturing defect. Finance may need a clean record before writing off inventory.
When photos remain as loose attachments, each person has to reconstruct the story. Which image came first? Is the cracked corner the product or the box? Is the label shown clearly enough? Are there duplicate images? Did compression from a messaging app destroy the barcode or fine product detail?
A photo packet gives the case a predictable shape. It does not have to be fancy. A strong packet usually has a short visual sequence, consistent file sizing, and a final PDF that is easy to forward or archive. For small teams, this is enough to reduce back-and-forth and make claim review less subjective.
The best packets answer five questions:
- What arrived damaged?
- What did the outer carton look like?
- Was the shipping label or tracking area documented?
- How was the item protected inside the package?
- What specific damage is being claimed?
If the packet answers those questions visually, the written support note can stay short.
The Four Photos Every Claim Packet Needs
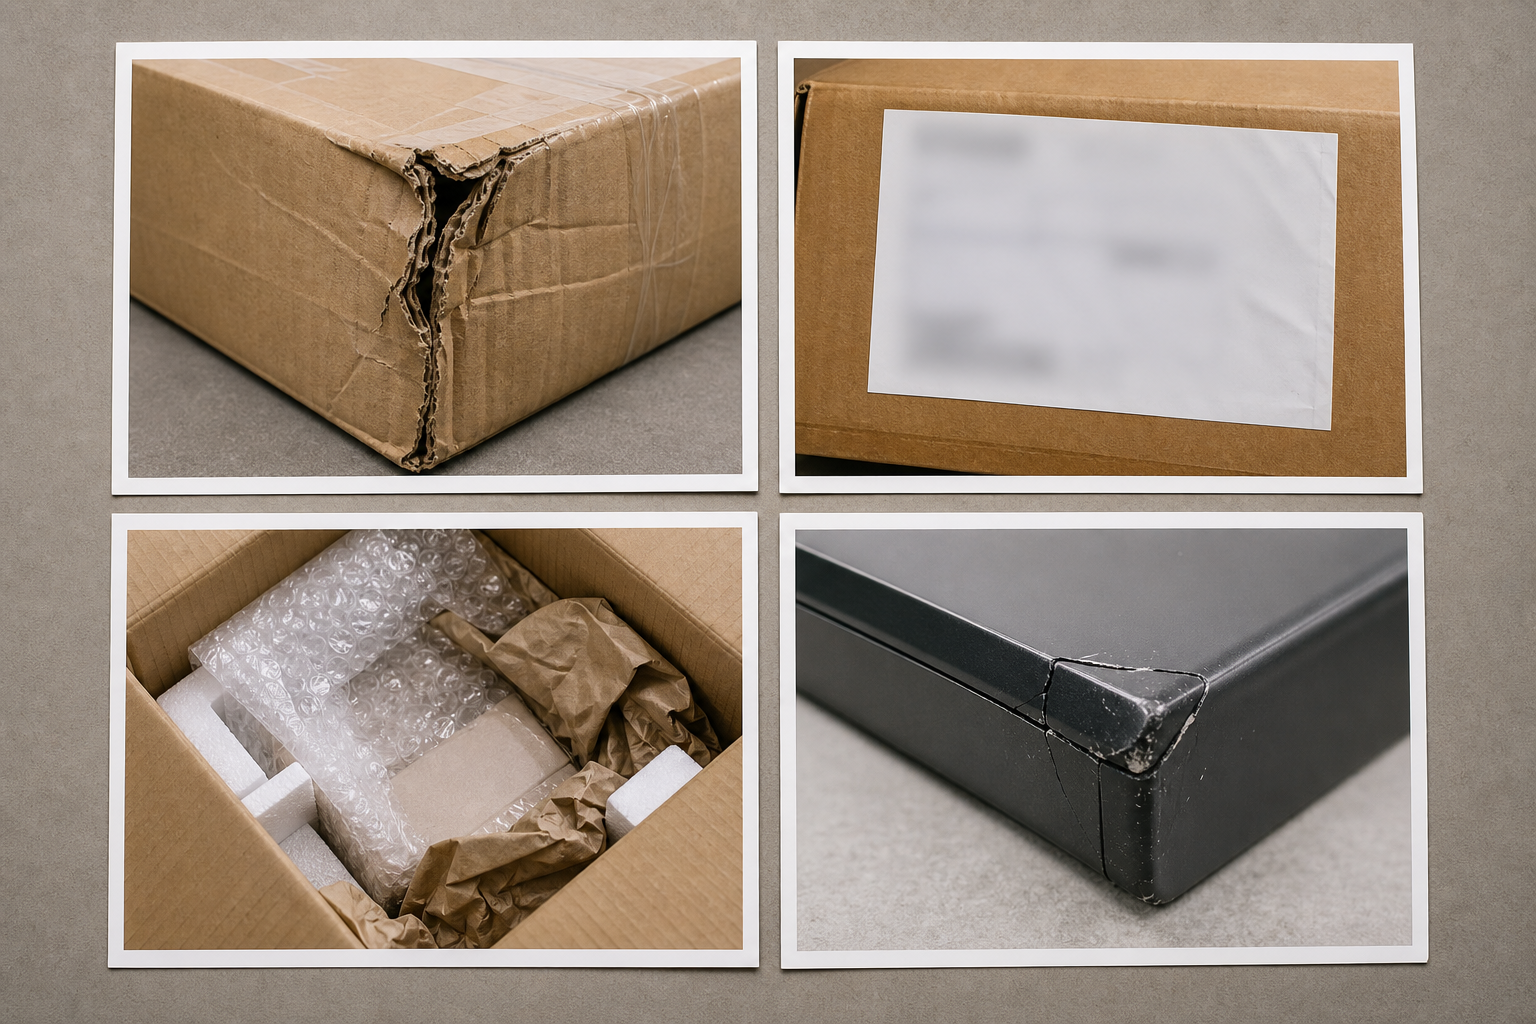
Most RMA damage cases need four core image types. More photos can help, but only if they add context. Ten similar closeups of the same dent usually make review slower.
| Photo type | What it proves | Common mistake | Better capture |
|---|---|---|---|
| Outer carton | Shows crush, puncture, water damage, or corner impact | Cropped so tightly that box shape is unclear | Include the full side or corner with surrounding edges |
| Label area | Connects the damage to the shipment | Sensitive details left visible when not needed | Keep tracking context only when appropriate for the reviewer |
| Inner packaging | Shows whether cushioning failed or was missing | Packing material removed before photo | Photograph the box as opened before rearranging items |
| Product damage | Shows the actual defect or breakage | Closeup has no scale or orientation | Include one closeup and one wider product view |
For high-value products, add a fifth photo with scale. A ruler, coin, or plain object beside the damage can help show crack length, dent depth, or missing material. Avoid using personal items that introduce unnecessary identifying information.
A good packet normally starts wide and moves closer: box, label area, packing, product, detail. That order helps reviewers understand the damage without guessing.
Intake Rules for Customer-Submitted Photos
Customers will send whatever is convenient: screenshots from a messaging app, HEIC images from a phone, large JPEGs, or pasted images inside email. The support team needs a simple intake checklist before editing or packaging anything.
Start by saving originals. Keep a copy of the customer-submitted files exactly as received, especially for higher-value claims. Then prepare a cleaner review copy. This gives your team a record while still allowing a readable packet for day-to-day decisions.
Use this intake checklist:
- Confirm the case number or order number before renaming files.
- Remove exact duplicates and near-duplicates that do not add new information.
- Keep at least one wide photo and one close detail photo.
- Check whether label photos contain personal data that should be hidden for vendor review.
- Convert unusual formats into a broadly readable format when needed.
- Avoid heavy edits that could make the image look altered or misleading.
If a file format is awkward for your team, ConvertAndEdit's image converter can help turn customer uploads into a consistent format before the packet is assembled. For most review packets, JPEG is fine for standard photos, while PNG is useful when screenshots or sharp label details matter.
Clean Up Photos Without Changing the Evidence
Damage claim images often need basic cleanup. They may be sideways, too dark, too large, or cluttered with irrelevant background. The important boundary is simple: improve readability, but do not change the damage.
Acceptable cleanup usually includes rotating, cropping, resizing, compressing, and adjusting the image enough to make existing detail easier to see. Risky cleanup includes painting over cracks, reconstructing missing corners, removing dents, or making a stain appear larger or smaller.
If you use an editor, keep edits conservative. The AI photo editor can be useful for removing irrelevant background clutter from a copy of a review image, but claim evidence should remain honest. Do not remove objects that explain scale, packaging condition, or handling. Do not retouch the damaged area.
A practical rule: if an edit would change the answer to a claim question, do not make that edit. If it only makes the existing photo easier to inspect, it is usually reasonable.
Examples of safer edits:
- Rotate a sideways carton photo.
- Crop empty floor area while keeping the full damaged corner visible.
- Brighten a dark image slightly so the puncture can be seen.
- Resize a 12 MB phone photo for faster review.
- Blur or crop personal address details when they are not needed by the recipient.
Examples to avoid:
- Removing tape, stains, dents, scratches, or broken parts.
- Extending a cropped edge with generated content.
- Replacing a messy background in a way that affects shadows around the product.
- Sharpening so aggressively that cracks or edges look exaggerated.
For internal quality review, a lightly edited copy is often enough. For carrier disputes, keep the original files available in case someone requests them.
Resize Before You Compress
Large phone photos create bloated packets. A single modern smartphone image can be several megabytes. Ten images can quickly become an email attachment problem, especially when support agents forward packets to vendors or carriers.
Compression helps, but resizing first is usually smarter. If a reviewer only needs to inspect a box corner and a broken component on a laptop screen, a 4000-pixel-wide image may be excessive. A clean 1600 to 2200 pixel image often preserves enough detail while keeping the packet manageable.
Use resize image when the original dimensions are far larger than needed. Then use compress image to reduce file size while checking that thin cracks, label edges, and product textures remain readable.
A good target depends on the case:
| Claim type | Suggested long edge | Notes |
|---|---|---|
| Low-value replacement | 1200-1600 px | Enough for quick support review |
| Carrier claim | 1800-2400 px | Preserve carton and label detail |
| Vendor defect review | 2000-2600 px | Keep product surface detail visible |
| Archive copy | Original plus review copy | Store original separately if policy requires it |
Do not chase the smallest possible file. Over-compressed images create artifacts around edges, labels, and cracks. A packet that is 4 MB and clear is better than a 900 KB packet that creates doubt.
Name Files So Reviewers Can Follow the Case
File names are a small operational detail with a large payoff. If every image is named IMG_4821.jpg, the reviewer has to open every file and guess the sequence. A naming pattern makes the set easier to audit.
Use a consistent pattern that includes the case identifier, sequence number, and photo type. Keep it short enough that it remains readable in email clients and file managers.
Example naming pattern:
| Sequence | File name |
|---|---|
| 01 | RMA-1842-01-outer-carton.jpg |
| 02 | RMA-1842-02-label-area.jpg |
| 03 | RMA-1842-03-inner-packaging.jpg |
| 04 | RMA-1842-04-product-wide.jpg |
| 05 | RMA-1842-05-damage-closeup.jpg |
Avoid customer names in file names unless your internal policy requires them. Case numbers are usually enough. Also avoid vague names like damage1, better-photo, or final-final. They make archives harder to search later.
For marketplaces where claim uploads are limited, sequence numbers are especially helpful. If only four images can be submitted, the names make it obvious which evidence was selected.
Use OCR Carefully on Labels, Invoices, and Packing Slips
Some damage packets include label photos, packing slips, serial plates, or vendor part numbers. OCR can help turn those details into searchable notes, but it should be treated as a support aid rather than unquestioned truth.
ConvertAndEdit's image OCR can help extract visible text from label or document photos. This is useful when a support agent needs to copy a tracking number, SKU, serial number, lot code, or order reference into the case note.
Before relying on OCR output, check it against the image. Shipping labels and low-light photos are prone to errors. The characters 0 and O, 1 and I, 5 and S, and 8 and B can be confused. A single wrong character can break a tracking lookup or vendor claim.
Use OCR most carefully for:
- Tracking numbers from label photos.
- Serial numbers on damaged electronics or appliances.
- SKU and batch codes from packaging.
- Packing slip references.
- Warranty or inspection stickers.
If the packet is going to an external vendor, decide whether the OCR text belongs inside the packet or only in the support system. Some teams keep extracted text in the case note and include only the relevant images in the PDF.
Build a Clean PDF Packet Without Layout Software

Once the images are cleaned, resized, and named, assemble them into a single review file. A PDF is often easier to forward than a folder of loose images. It also gives the packet a stable order.
Use image to PDF to combine the selected images into one document. Put the strongest overview photo first, then move toward detail. If your team adds a cover page in another tool, keep it short: case number, order number, date received, item, and claim reason are usually enough.
A practical PDF order looks like this:
- Outer carton overview.
- Carton damage closeup.
- Label or shipment reference area, with sensitive details limited as needed.
- Inner packaging before items are removed.
- Product overview.
- Product damage closeup.
- Optional scale photo.
- Optional packing slip, serial plate, or accessory damage.
Keep one image per page when detail matters. N-up layouts can work for internal triage, but they may make cracks, crushed corners, and label details too small. If a carrier or vendor will inspect the PDF, clarity should win over page count.
Also check page orientation. Mixed portrait and landscape pages are fine when they match the source photos, but rotated pages feel careless and slow down review. Rotate images before building the PDF rather than relying on the reviewer to adjust them.
Redaction: Hide Only What the Recipient Does Not Need
Damage claim packets often contain personal information. A shipping label may show a customer's name, address, phone number, email, order number, or tracking barcode. Internal photos may show warehouse bins, employee badges, or other customer orders in the background.
Redaction should be purposeful. Hide what the recipient does not need, but keep enough context for the claim to remain understandable.
For a carrier claim, tracking and label context may be necessary. For a vendor quality review, the vendor may only need the product defect, SKU, batch code, and packaging condition. For an internal warehouse review, the team may need packing station context but not the customer's home address.
Use this decision table:
| Recipient | Usually keep visible | Usually hide |
|---|---|---|
| Carrier | Tracking area, carton damage, shipping service context | Customer phone or email if not required |
| Vendor | SKU, batch, product defect, packaging method | Customer address and unrelated order details |
| Internal warehouse | Packing materials, carton state, item orientation | Other customers' labels in the background |
| Finance archive | Case number and approved claim evidence | Extra personal data not needed for accounting |
Do not over-redact the image until it becomes useless. A black rectangle over the entire label area may protect privacy, but it may also remove the proof that the damaged box belongs to the shipment. When in doubt, create recipient-specific copies rather than one universal version.
Quality Checklist Before Sending the Packet
Before the packet leaves support, run a final review. This does not need to be slow. A thirty-second check catches most issues.
Use this checklist:
- The H1 or cover note matches the case number, if a cover is included.
- Photos are in a logical order from outside to inside, wide to close.
- Every image is rotated correctly.
- Damage is visible without zooming excessively.
- At least one photo shows the whole item or whole box side for context.
- The packet does not include irrelevant duplicates.
- Personal data is handled according to the recipient.
- File size is small enough to upload or email.
- Original images are retained separately when the case value or policy requires it.
- The final PDF opens correctly on another device or browser.
The most common failure is over-cropping. A closeup of a crushed corner may be dramatic, but a reviewer also needs to know which corner of the box it is. Pair detail images with wider context images.
The second most common failure is compression damage. If a crack, puncture, serial plate, or label edge becomes fuzzy, go back to a larger resize target or lighter compression setting.
Example Packet for a Broken Ceramic Item
Imagine a customer reports that a ceramic planter arrived cracked. They send nine phone photos: three of the broken planter, two of the shipping box, one of the label, one of packing paper, and two blurry duplicates.
A support agent could prepare the packet like this:
- Save all nine originals to the case archive.
- Remove the two blurry duplicates from the review copy.
- Rotate the carton photo and crop empty floor area while keeping the full crushed side visible.
- Resize large phone images to around 2000 px on the long edge.
- Compress gently and check that the crack line remains clear.
- Use OCR on the label image to confirm the tracking number for the case note.
- Redact the customer's street address for the vendor version.
- Build a PDF with outer carton, label area, packing paper, product overview, and crack closeup.
The resulting PDF may be only five pages, but it tells the complete story. The vendor can see the product and packaging. The carrier can see the carton condition. The support team has a clean record without forcing the customer to resend files.
Common Edge Cases
The Customer Only Sends a Product Closeup
Ask for one wider product photo and one outer carton photo. A closeup can prove damage exists, but it does not explain whether the damage occurred in transit, during packing, or before shipment.
The Label Photo Shows Too Much Personal Data
Create a recipient-specific copy. Keep tracking context if needed, but hide customer details that the recipient does not need. Store the original according to your team's policy.
The Photos Are Screenshots Instead of Original Images
Screenshots may be lower quality and may include phone UI. If the case is low value, they may be enough. For carrier or vendor disputes, ask for original photos when detail is missing.
The Box Was Thrown Away
Document what remains: product damage, inner packaging, packing slip, and any customer description. Note clearly that the outer carton is unavailable. Do not try to compensate by over-editing the remaining images.
The PDF Is Too Large to Upload
Resize first, then compress. Remove duplicate pages. If needed, split the packet into an evidence PDF and an archive folder, but keep the main review packet concise.
A Small System Support Teams Can Actually Keep
The best RMA photo packet process is simple enough to repeat during a busy queue. Do not require agents to design pages by hand. Do not create a naming pattern with ten fields. Do not ask every customer for twenty photos.
A durable system has a short capture list, a predictable order, conservative cleanup rules, and a PDF handoff. That is enough for most small teams.
A good default standard is:
- Four required views: box, label area, packaging, product damage.
- One optional scale photo for high-value or ambiguous damage.
- Consistent case-based file names.
- Resize before compression.
- Redact per recipient.
- Assemble one clear PDF for review.
- Retain originals when the claim value or policy calls for it.
ConvertAndEdit tools can support the practical parts: convert unusual uploads with convert image, resize large photos with resize image, reduce attachment size with compress image, extract label details with image OCR, and combine the final set with image to PDF.
A claim packet should make the damage easier to understand, not prettier, more dramatic, or harder to question. When the visual evidence is clean, ordered, and appropriately sized, everyone reviewing the case spends less time asking what they are looking at and more time deciding what should happen next.