Museum Object Condition Photo Packets: A Practical Image-to-PDF Guide
Build clear, compact condition photo packets for museum objects, loans, and exhibits with practical capture, cleanup, naming, compression, OCR, and PDF handoff steps.
Museum Object Condition Photo Packets: A Practical Image-to-PDF Guide
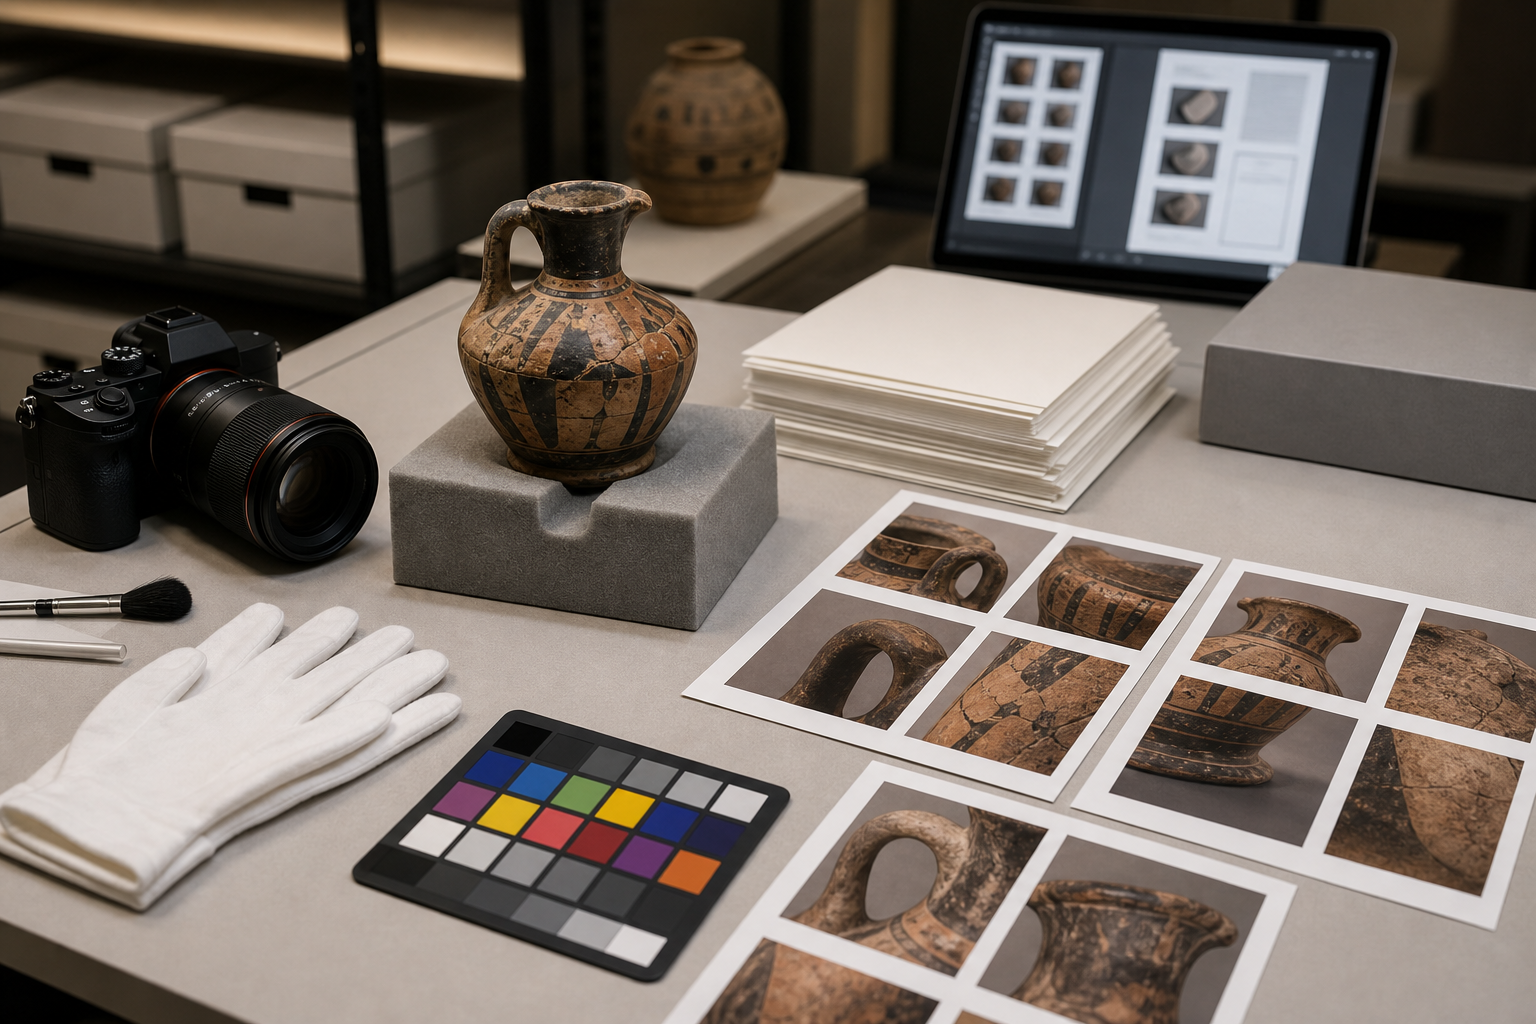
Museum condition documentation often lives in an awkward middle ground. It is not a glossy exhibition catalog, but it also cannot be a messy folder of random phone photos. Registrars, collections managers, conservators, lenders, couriers, insurers, and installation teams need a compact visual record that answers practical questions quickly: what does the object look like, where are the existing marks, what changed during travel, and which images belong to which object?
A condition photo packet is one of the simplest ways to make that record useful. It gathers object photos, detail shots, labels, and optional OCR notes into a single PDF that can travel with a loan file, shipment record, installation binder, or internal review. The goal is not beauty. The goal is legibility, consistency, and trust.
This guide focuses on small museums, galleries, archives, historical societies, university collections, and independent conservators who need reliable packets without building a heavy digital asset system first. You can use professional capture equipment if you have it, but the same structure also works with a modern phone, a clean table, and careful habits.
Where Condition Photo Packets Help Most
A photo packet is useful whenever several people need to understand an object's visible state without searching through a loose image folder. The PDF format is not perfect for every preservation need, but it is excellent for review, handoff, and comparison.
Common uses include:
- Incoming loan condition checks before unpacking is complete
- Outgoing loan documentation before crates leave the building
- Exhibition installation notes for fragile or complex objects
- Insurance support when documenting existing damage
- Conservation triage when several objects need quick visual review
- Object movement records between storage, gallery, and studio spaces
- Donor intake files where the catalog record is not complete yet
- Courier packets for travel where offline access matters
The important distinction is that a PDF packet should not replace your master image archive. Keep original photos separately at full quality. The packet is the readable, shareable reference copy.
The Photo Set You Actually Need
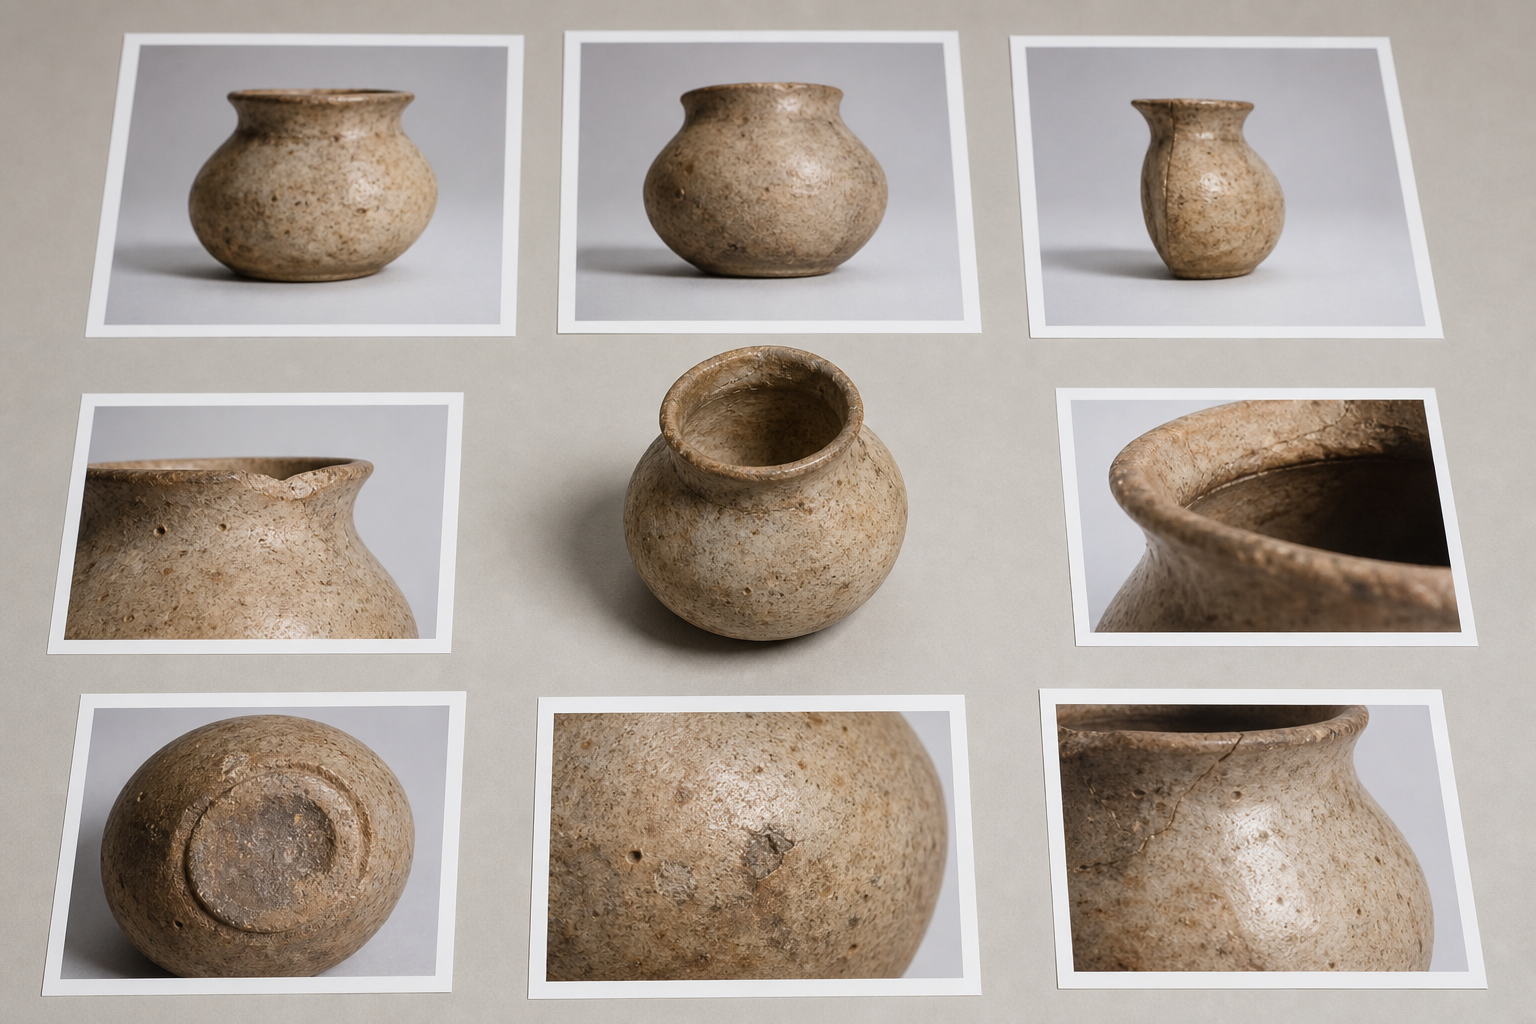
For condition documentation, more photos are not always better. A packet with forty near-duplicate images can hide the one detail that matters. Start with a defined capture set, then add exceptions only when the object needs them.
A useful baseline set for most three-dimensional objects includes:
- Overall front view
- Overall back view
- Left and right side views
- Top and bottom views when safe and relevant
- Scale or color reference shot when your practice allows it
- Closeups of each visible mark, crack, stain, repair, loss, abrasion, or label
- One identifying shot that clearly ties the photo set to the object
For flat works, textiles, documents, photographs, and prints, adjust the set:
- Full recto image
- Full verso image if accessible
- Corner details
- Edge details
- Signature, stamp, accession number, or label closeup
- Surface texture under raking light when condition depends on texture
- Detail photos of tears, foxing, cockling, adhesive residue, abrasions, or losses
Do not force every object into the same number of images. Force every object into the same logic: overall context first, then details, then identifiers.
Capture Order That Keeps Packets Understandable
Use the same order for every object whenever possible. A predictable packet is easier to review under time pressure.
A practical order is:
- Object identifier photo or accession label photo
- Overall front or primary view
- Other overall views in a clockwise or physical sequence
- Closeups from top to bottom or left to right
- Special lighting photos, if used
- Packing, mount, frame, or support details
This order also helps later if you run OCR on label photos or file names. The reviewer can infer intent from placement, even if a caption is minimal.
Naming Files Before You Build the PDF
File names are not decoration. They are the cheapest metadata you have when images are exported, shared, downloaded, or separated from a packet.
Use a pattern that stays readable outside your collection system:
objectid_view_sequence_date.ext
Examples:
1984-012_front_01_2026-07-02.jpg1984-012_back_02_2026-07-02.jpg1984-012_crack-rim_03_2026-07-02.jpg1984-012_label-base_04_2026-07-02.jpg
Avoid spaces, vague camera names, and words that will become meaningless later. IMG_4421.jpg is fine as a camera source file, but it is weak as a review file. object_after_cleaning_final_final.jpg is even worse because it describes uncertainty rather than evidence.
If you need to publish or send a lighter packet, keep a separate export folder. Do not rename or overwrite originals just to make a PDF.
Image Format Choices for Condition Records
Most condition packets do not need exotic formats. The format decision is usually about balancing detail, compatibility, and file size.
| Use case | Good format | Why it works | Watch out for |
|---|---|---|---|
| Master capture archive | TIFF, RAW, or highest-quality JPEG | Preserves source detail for future review | Large files are not ideal for email or quick handoff |
| Working review images | JPEG | Small, widely compatible, easy to combine into PDFs | Repeated saving can soften detail |
| Transparent object cutouts | PNG or WebP | Useful for documentation graphics or teaching assets | Transparency is usually unnecessary for condition packets |
| Scanned labels or flat documents | PNG or high-quality JPEG | Keeps fine lines and label edges readable | Heavy compression can damage small type |
| Final packet | Keeps the visual set together in order | Bad export settings can make photos blurry or too large |
If your images arrive in mixed formats, normalize copies before building the packet. A browser-based converter such as Convert Image can help turn stray HEIC, PNG, or WebP exports into a consistent set when your review partner expects JPEG or PDF-friendly image files.
A Practical Cleanup Pass Before PDF Export

Condition photos should be honest, but honest does not mean untouched. Cleanup is acceptable when it improves readability without hiding or inventing condition information. Think of the cleanup pass as basic document preparation, not retouching.
Useful edits include:
- Crop away empty table space while keeping the whole object visible
- Straighten tilted flat works or labels
- Adjust exposure when the object is too dark to inspect
- Reduce distracting background clutter
- Resize copies so huge phone images do not create a massive PDF
- Compress review copies to a reasonable transfer size
- Convert inconsistent file types into one format
Avoid edits that change the evidence:
- Do not remove cracks, stains, chips, labels, dust, abrasions, or color differences
- Do not clone out shadows that reveal shape or surface texture
- Do not over-sharpen until edges look artificial
- Do not use beautifying filters on documentation images
- Do not alter color aggressively unless you document why
When you need a neutral crop or size adjustment, use Resize Image on copies rather than originals. For packet exports that are too large to send, Compress Image can reduce review-image weight before assembling the PDF. Keep your full-resolution source files in the archive.
When AI Editing Is Appropriate
AI editing can be useful for documentation support, but it needs strict boundaries in museum contexts. Use it for non-evidentiary presentation copies, background cleanup around an object, or public-facing educational graphics. Be cautious with anything that will support a condition claim.
Appropriate uses may include:
- Removing a distracting background from a duplicate image for a teaching handout
- Extending a neutral background around a crop for a slide deck
- Cleaning a non-condition reference image used in a public guide
- Creating a clearer object overview for a web article when the original condition record is preserved separately
Poor uses include:
- Filling in missing object areas
- Making damaged areas look less visible
- Reconstructing labels or marks that are hard to read
- Altering color or texture in a way that affects interpretation
If you use AI Photo Editor, label the output internally as an edited derivative and keep it out of the evidentiary packet unless your institution's policy specifically allows it. For condition packets, ordinary crop, resize, and compression are usually safer than generative editing.
Building the PDF Packet
Once images are named, cleaned, and ordered, the PDF build should be straightforward. The simplest packet is one image per page. That is often the clearest choice for detailed condition review, especially when closeups matter.
A compact packet structure can look like this:
- Cover or first page with object identifier photo
- Overall views
- Detail views
- Label, accession number, frame, mount, or support photos
- Packing or installation reference images
- Optional final page with extracted text or notes
Use Image to PDF to combine ordered image files into a single PDF. Before exporting, confirm that the images appear in the intended sequence. If your file names begin with object ID and sequence number, sorting becomes much less painful.
One Image Per Page or Multiple Images Per Page?
There is no universal answer. Choose based on how the packet will be used.
| Packet type | Layout | Best for | Risk |
|---|---|---|---|
| Condition review | One image per page | Detail inspection and annotations | More pages |
| Courier reference | Two images per page | Quick offline comparison | Small damage may be harder to see |
| Intake overview | Contact-sheet style | Fast triage across many objects | Too dense for fine detail |
| Insurance support | One image per page with clear closeups | Evidence review | Larger files if not compressed |
| Exhibition install notes | Mixed overview and details | Matching mounts, orientation, and placement | Needs careful ordering |
If the object has fine surface condition, choose larger images and fewer per page. If the packet is only a quick inventory reference, a denser layout may be acceptable.
OCR for Labels, Accession Numbers, and Notes
OCR can make a packet easier to search, especially when it includes photos of labels, accession numbers, old tags, inscriptions, or handwritten notes. It is not a substitute for catalog metadata, but it can help reviewers find an object in a large file.
Use Image OCR on clear label photos or scanned notes before finalizing the packet. Then paste corrected text into your internal notes, file inventory, or a final summary page if your packet format allows it.
OCR works best when:
- The label fills a meaningful part of the image
- The photo is sharp and evenly lit
- The label is not strongly angled
- Glare is controlled
- The background is not visually busy
- The accession number uses common characters
OCR struggles when:
- Pencil marks are faint
- Labels are torn, curled, stained, or glossy
- Handwriting is highly stylized
- The photo includes multiple unrelated labels
- The object surface has decorative marks that resemble text
Always proofread OCR output. A single wrong digit in an accession number can attach a condition packet to the wrong object.
Compression Without Losing Evidence
Large PDFs are common because modern phones create huge images. A single object packet can become 80 MB even when the reviewer only needs screen-level inspection. Compression is helpful, but it must not erase the condition details the packet exists to show.
Use this compression checklist:
- Check detail photos at 100 percent zoom before and after compression
- Look at cracks, small labels, pencil marks, textile weave, and surface abrasions
- Avoid repeated JPEG saving across multiple tools
- Keep a full-quality export folder separate from the compressed review folder
- Use stronger compression on overall views than on critical closeups
- Split very large multi-object packets into object-level PDFs when possible
A practical target is not a magic file size. It is a readable PDF that the intended recipient can open, transfer, and inspect. For email, you may need a smaller file. For legal, insurance, conservation, or loan documentation, readability should win over convenience.
Quality Control Before Sending
Before sending the packet, open it like a recipient would. Do not only trust the export screen. Use a fresh PDF viewer if possible.
Check the following:
- The first page clearly identifies the object or packet subject
- All images belong to the same object or declared group
- The page order matches the physical review path
- Overall views appear before closeups
- No image is accidentally sideways or upside down
- Detail photos are large enough to inspect
- File size is realistic for the recipient
- OCR text, if included, has been proofread
- No private donor information, addresses, unrelated objects, or staff notes are visible by accident
- The PDF name includes the object ID and date
This last check catches a surprising number of problems. Museum images are often captured in busy spaces. A background clipboard, shipping label, laptop screen, or neighboring object can reveal information that does not belong in an external packet.
Example Packet Specifications
Here are three practical specifications you can adapt.
Incoming Loan Object Packet
Purpose: record the object's visible condition when it arrives.
Recommended contents:
- Object ID or lender reference photo
- Overall front, back, sides, top, and bottom where safe
- Packing condition photos before full unpacking
- Closeups of existing damage
- Photos of labels, mounts, frames, and supports
- Optional OCR text from labels or tags
Recommended export:
- One image per page
- Moderate compression
- Object ID and arrival date in the PDF filename
- Full-resolution originals kept separately
Small Exhibition Installation Packet
Purpose: help preparators, registrars, and curators confirm placement and support details.
Recommended contents:
- Overall object view
- Orientation reference
- Mount, bracket, frame, or base details
- Vulnerable areas that should not be handled directly
- Gallery placement reference if already approved
- Detail shots of fasteners, spacers, or support contact points
Recommended export:
- Mixed overview and detail pages
- Clear sequence by installation step or physical area
- Smaller PDF for tablet viewing on the gallery floor
Donor Intake Visual Record
Purpose: document a newly offered or received object before full cataloging.
Recommended contents:
- Full object views
- Existing labels, signatures, stamps, or inscriptions
- Condition concerns visible at intake
- Group photo if the intake includes several related items
- Separate object-level detail photos for any item likely to be cataloged individually
Recommended export:
- Contact-sheet style for overview, plus full-page critical details
- Conservative file names until permanent identifiers are assigned
- Notes that distinguish temporary intake references from permanent accession numbers
Common Mistakes That Make Packets Hard to Trust
The most damaging packet problems are usually ordinary ones.
One common mistake is mixing objects without clear separators. If a PDF includes five artifacts, each object needs a visible boundary in the sequence. Otherwise, a closeup crack on page 12 may be mistaken for the object on page 10.
Another mistake is over-cropping. A closeup of a chip is useful, but if it gives no sense of location, reviewers cannot tell whether the damage is on the rim, base, corner, frame, or reverse. Pair closeups with enough context.
A third mistake is letting compression destroy small evidence. Fine scratches, inscriptions, and surface texture can disappear quickly. If a detail is important enough to photograph, inspect the exported PDF before sending it.
The fourth mistake is treating the PDF as the archive. It is a packet, not the master record. PDFs are convenient for review, but they often flatten metadata, reduce image quality, and hide the original capture sequence. Store source images separately.
A Simple Naming System for Final PDFs
Your final PDF name should be boring and informative. Good names survive email forwarding, shared drives, and downloads.
Use a pattern like:
objectid_condition-photos_context_date.pdf
Examples:
1984-012_condition-photos_incoming-loan_2026-07-02.pdfTEMP-2026-044_condition-photos_donor-intake_2026-07-02.pdfL2026-18_condition-photos_pre-install_2026-07-02.pdf
Avoid names like:
museum photos.pdfcondition final.pdfnew object packet latest.pdfloan images small version.pdf
Clear names prevent accidental reuse and make it easier to compare packets from different dates.
Final Preflight Checklist
Use this short checklist before the packet leaves your team:
- Originals are stored separately and remain unchanged
- Review copies are consistently named
- Images are ordered from overall views to details
- Crops improve clarity without hiding condition evidence
- Compression has not damaged important marks or labels
- OCR text has been corrected manually
- Sensitive background information has been removed or excluded
- The PDF opens correctly on another device or viewer
- The final filename includes object ID, context, and date
- The packet is stored with the related loan, intake, exhibition, or conservation record
Closing Thoughts
A good condition photo packet is quiet, structured, and easy to inspect. It does not need elaborate design. It needs the right photos, honest cleanup, stable names, readable exports, and a final PDF that keeps everything in order.
For small teams, the biggest improvement usually comes from standardizing the capture set and file naming before touching any editing tool. After that, simple steps like resizing copies, compressing carefully, extracting label text with OCR, and combining images into a PDF can turn scattered documentation into a practical record people can actually use.