Warranty Claim Photo Packets: A Practical Image-to-PDF Workflow for Facilities Teams
A focused workflow for turning maintenance photos, serial labels, receipts, and short notes into clean warranty claim packets that vendors can review quickly.
Warranty Claim Photo Packets: A Practical Image-to-PDF Workflow for Facilities Teams
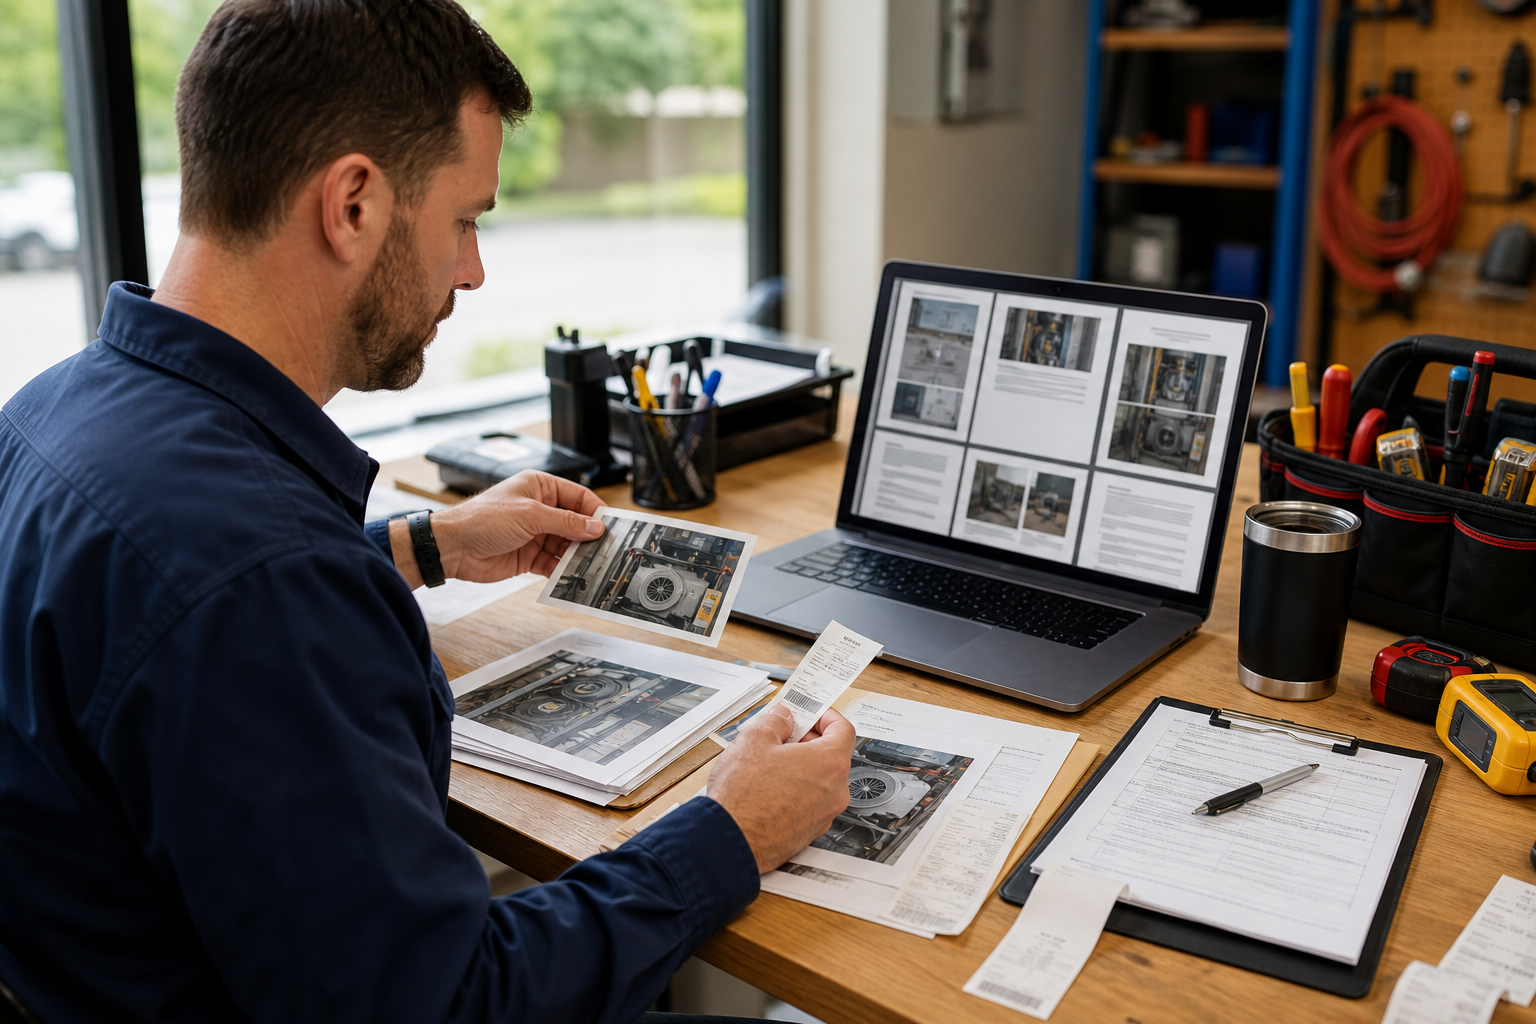
Warranty claims fail for boring reasons. The equipment is covered, the defect is real, the receipt exists, and the serial number is visible somewhere in the camera roll. But the vendor receives a messy email thread with eight oversized photos, two cropped screenshots, a blurry invoice scan, and a note that says the unit stopped working last week. The reviewer cannot confirm the model, the purchase date, or the failure condition quickly, so the claim gets delayed.
Facilities teams, property managers, school maintenance departments, small hotel operators, clinic administrators, and field service coordinators all run into the same problem: they need to document physical assets fast, often without design software or a formal document management system. A warranty claim packet should be simple enough to build from a browser, but organized enough that a vendor can approve, reject, or request one missing item without digging through attachments.
This guide covers a practical workflow for turning field photos, serial plates, receipts, handwritten notes, and inspection images into a clean PDF packet. It is written for teams that handle real objects: HVAC controllers, water heaters, appliances, fixtures, pumps, security cameras, office chairs, lab equipment, access panels, printers, and anything else with a model number and a support address.
The goal is not to create a beautiful report. The goal is to create evidence that is easy to trust.
Why Warranty Photo Packets Need a Workflow
A warranty claim packet has a different job than a project report or a maintenance log. It has to answer a few questions quickly:
- What product is this?
- Is the serial number readable?
- When and where was it purchased or installed?
- What exactly failed?
- Is the defect visible?
- Has the unit been modified, damaged, or misused?
- Who should the vendor contact if the claim needs more information?
Most delays happen when one of those answers is missing or hard to verify. A vendor may not need a polished document, but they do need a packet that can survive forwarding between support, warranty, technical review, and logistics. If every important image is buried in a separate attachment, the packet becomes fragile.
The better pattern is to standardize the packet before the claim is urgent. A consistent structure reduces back-and-forth, makes internal review easier, and gives field staff a clear checklist when taking photos.
A browser-based workflow is especially useful because the source material is rarely perfect. Photos may be too large to email. Receipts may be sideways. Serial plates may be readable only after cropping. Defect photos may need compression, but not so much that cracks, leaks, error lights, or corrosion disappear.
The Packet Structure Vendors Actually Need
A strong packet follows a simple order. Put identity first, proof second, failure evidence third, and contact details last. That order mirrors how most warranty reviewers think.
| Section | What to include | Why it matters |
|---|---|---|
| Cover page | Asset name, location, claim date, contact person | Gives the reviewer context before opening images |
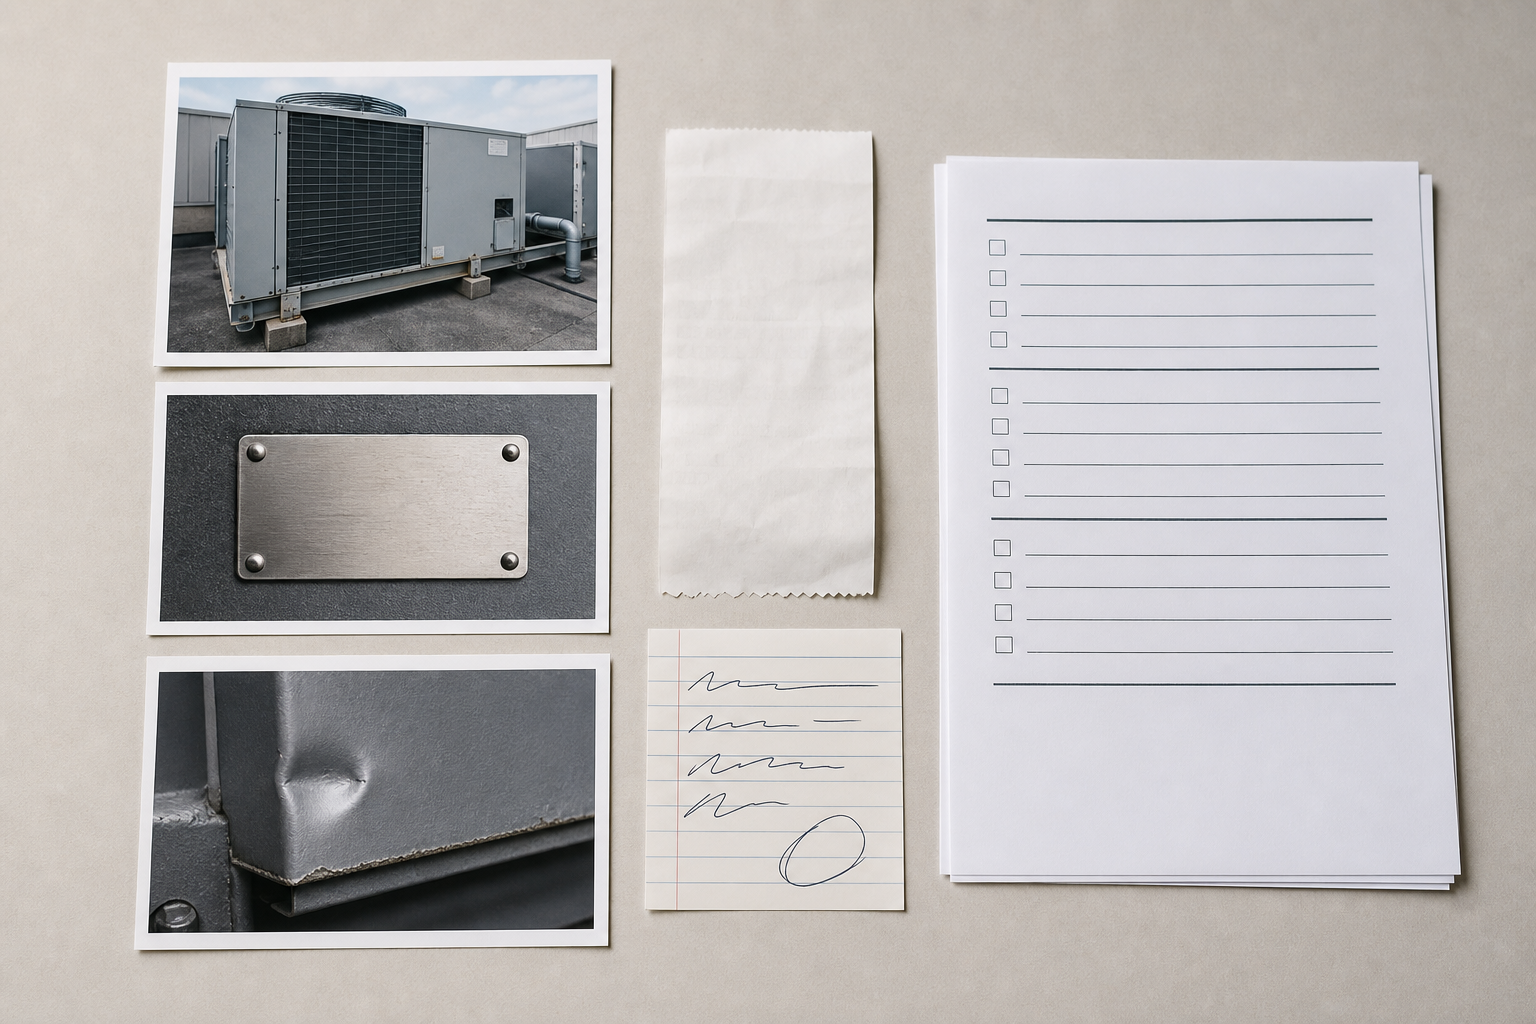
| Product identity | Full equipment photo, model plate, serial number plate | Confirms the covered item |
| Proof of eligibility | Receipt, invoice, purchase order, installation record | Supports warranty period and ownership |
| Failure evidence | Defect close-ups, error displays, leak marks, broken parts | Shows the actual claim reason |
| Context photos | Surrounding installation, mounting, ventilation, cable routing | Helps rule out misuse or incorrect setup |
| Notes | Short timeline, troubleshooting already attempted | Reduces repeat questions |
This structure is more useful than grouping everything by file type. A reviewer should not have to open all images first, then all PDFs, then all scans, then reconstruct the story manually.
For a small claim, the packet might be only four pages. For a more complex claim, it may be ten to fifteen pages. Longer is not automatically better. Redundant photos can make the packet feel less credible if they bury the useful details.
A practical target is one page for each evidence type:
- One page showing the product in place.
- One page showing the model and serial label.
- One page showing proof of purchase or installation.
- One to three pages showing the failure.
- One page with notes and contact information.
If the product is expensive, safety-related, custom-installed, or likely to be disputed, add context images. If the claim is routine, keep the packet lean.
Field Photo Rules Before Anyone Edits
Good packets start before the files reach the browser. A little discipline while taking photos prevents a lot of cleanup later.
Use these rules for field staff:
- Take one wide photo that shows the whole asset in its environment.
- Take one straight-on photo of the manufacturer label.
- Take one close photo of the serial number or model number.
- Take defect photos from two distances: one close, one medium.
- Keep a finger, pen, or small ruler near the defect only when scale matters.
- Avoid flash glare on metal plates, glossy labels, and display screens.
- Retake any image where the serial number is not readable on the phone screen.
- Photograph receipts and invoices on a flat surface with all corners visible.
The most common mistake is taking only close-ups. A close-up of a cracked hinge or blinking display is useful, but it does not prove which product it belongs to. The packet needs both identity and defect evidence.
Another common mistake is over-annotating photos in the field. Thick arrows, circles, and handwritten markup can hide the thing the reviewer needs to inspect. If annotation is needed, keep one clean original and create a marked copy separately.
File Naming That Prevents Claim Confusion
File names matter because warranty claims often get separated from their original email. A reviewer may download the PDF, split it, forward a page, or ask for one image again. Names should be boring and predictable.
Use a naming pattern like this:
location_asset_claimdate_sequence_description
Examples:
north-wing_rooftop-unit-3_2026-05-12_01_full-view.jpgnorth-wing_rooftop-unit-3_2026-05-12_02_serial-plate.jpgnorth-wing_rooftop-unit-3_2026-05-12_03_invoice.jpgnorth-wing_rooftop-unit-3_2026-05-12_04_error-display.jpg
Avoid names like IMG_4821, final, new, claim photo, or broken thing. They make sense for one minute and then become useless.
If your team handles multiple sites, include a short site code. If multiple assets share a room, include an asset tag. If the vendor has already issued a ticket number, add it to the final PDF name, but do not depend on it for the internal source files.
Deciding What to Crop, Resize, Compress, and OCR
Not every file needs the same treatment. The right edit depends on what the image must prove.
| Source item | Best action | What to preserve |
|---|---|---|
| Full equipment photo | Resize and lightly compress | Overall installation context |
| Serial plate photo | Crop, keep sharp, avoid heavy compression | Every digit and manufacturer mark |
| Receipt photo | Crop borders, rotate, use OCR if needed | Date, vendor, item, total |
| Defect close-up | Crop only if it clarifies the failure | Crack, leak, corrosion, display, broken part |
| Handwritten note | Convert to PDF page or OCR if legible | Timeline and technician initials |
| Screenshot from vendor portal | Compress carefully | Ticket number and claim status |
Use resize image when a photo is much larger than needed but still needs to remain clear. Many phone photos are several thousand pixels wide. That is useful for archiving, but excessive for a warranty packet. A 1600 to 2200 pixel wide image is often enough for full-page visual evidence, while serial plates may need more resolution if the label text is tiny.
Use compress image after you know the important details are readable. Compression should never be the first step for serial labels, receipts, or defect close-ups. If you compress too early, small text and fine cracks may turn into fuzzy artifacts.
Use image OCR when a receipt, label, or document photo contains text that the team will need to search, copy, or verify. OCR is not a substitute for a readable image, but it is useful for extracting invoice numbers, dates, model numbers, and vendor names into your notes.
Use image to PDF when the evidence images are ready to assemble into one claim packet. One PDF is easier to forward, archive, and attach to ticketing systems than a loose set of files.
A Step-by-Step Browser Workflow
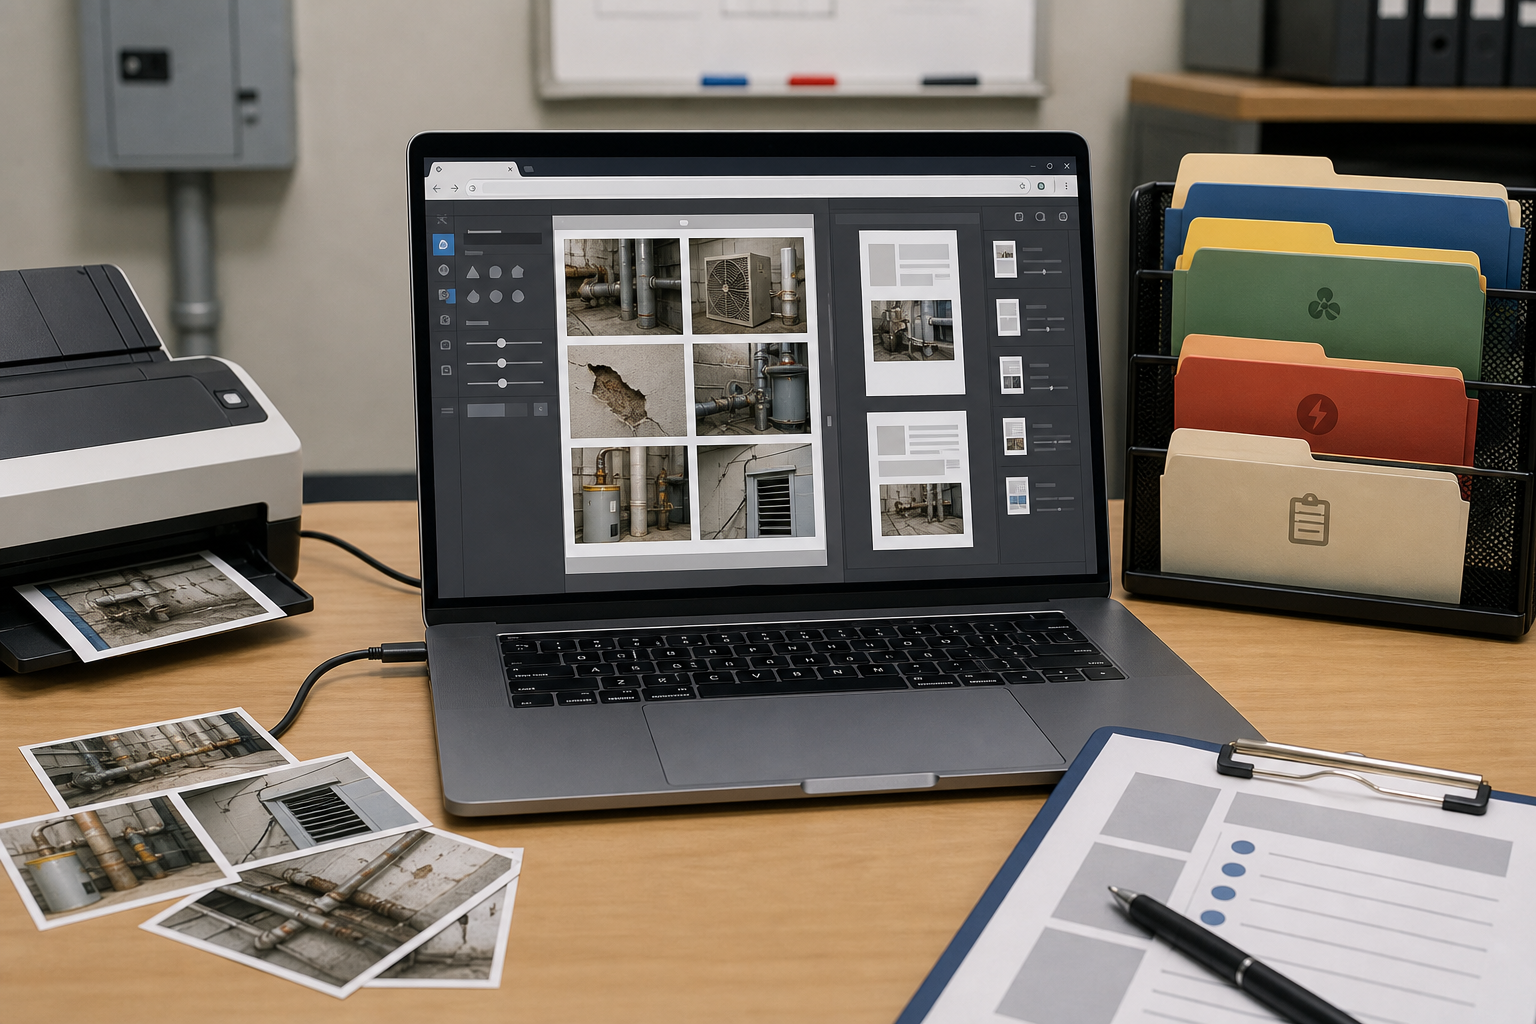
This workflow assumes you have a folder of source photos from a phone, plus any receipt scans, screenshots, or notes. It avoids layout software and keeps the process practical for a busy coordinator.
Step 1: Create a Claim Folder
Start with one folder for the claim. Inside it, create three subfolders:
sourceeditedpacket
Put untouched originals in source. Put cropped, resized, compressed, or OCR-ready files in edited. Put the final PDF in packet.
This sounds basic, but it prevents a common failure: overwriting the only readable serial plate photo with a smaller compressed version. Originals should stay untouched until the claim is resolved.
Step 2: Select the Evidence Set
Before editing anything, choose the images that will actually go into the packet. For most claims, you need:
- One full asset photo.
- One model label photo.
- One serial number photo.
- One proof of purchase or installation record.
- Two defect photos.
- One context photo if installation conditions matter.
Move alternates into a separate holding area or leave them in source. Do not include ten near-identical defect images unless each shows a different issue. More photos can make the reviewer wonder which one matters.
Step 3: Fix Orientation and Crop Only the Noise
Rotate sideways receipts and labels. Crop out tabletops, shoes, tool bags, and empty wall space. For serial plates, crop enough to make the label central, but leave a little surrounding material so the vendor can see it is attached to the product.
For receipts, include all four corners if possible. A receipt cropped too tightly may look incomplete, even if the important line item is visible.
Step 4: Resize Large Photos
Resize wide context photos and full equipment photos first. The aim is a packet that opens quickly in email and vendor portals. Large phone images are often unnecessary once the evidence has been selected.
A good rule:
- Full asset photos: about 1800 to 2200 pixels wide.
- Context photos: about 1400 to 1800 pixels wide.
- Defect close-ups: keep larger if fine detail matters.
- Serial and model labels: resize only after confirming readability.
Open the resized image and zoom in. If the serial number or defect detail is hard to read, go back to the original and use a larger size.
Step 5: Compress With Evidence in Mind
Compression is about reducing friction, not winning the smallest file contest. A claim packet that is tiny but unreadable is worse than a larger file that gets approved.
Compress full-view images more aggressively than label images. Defect close-ups sit in the middle: a photo of a broken plastic tab may tolerate compression, while a hairline crack, leak trail, or error code display may not.
After compression, check three things:
- Are all label digits readable?
- Are receipt dates and item names readable?
- Is the defect still visible without guessing?
If the answer is no, reduce compression or use the original crop at a higher resolution.
Step 6: Extract Key Text With OCR
OCR is especially useful for internal notes. You can extract purchase dates, model numbers, serial numbers, invoice numbers, and vendor names, then paste them into the cover page or claim notes.
Use OCR on:
- Receipts.
- Invoices photographed as images.
- Manufacturer plates with clear printed text.
- Screenshots of vendor ticket pages.
- Handwritten notes only when handwriting is clear enough to be worth checking.
Always proofread OCR output. Serial numbers are easy to misread because zero, O, one, I, five, and S can look similar. Treat OCR as a speed tool, not an authority.
Step 7: Build the PDF Packet
Once the edited images are ready, assemble them in claim order. The final PDF should read like a small evidence packet, not a photo dump.
Recommended order:
- Cover page or claim summary image.
- Full asset view.
- Model label.
- Serial label.
- Proof of purchase or installation.
- Defect photo one.
- Defect photo two.
- Context photo.
- Notes or troubleshooting record.
If you do not have a designed cover page, create a simple one in a document editor and export it, or use a clean screenshot of a short claim summary. Keep it plain. The value is in the facts, not the styling.
The One-Page Claim Summary Template
A short summary page prevents the reviewer from hunting through images for basic details. Keep the wording factual and neutral.
Use this structure:
| Field | Example |
|---|---|
| Asset | Rooftop HVAC controller |
| Location | North Wing mechanical room |
| Asset tag | NW-HVAC-03 |
| Manufacturer | Manufacturer name from label |
| Model | Model number from label |
| Serial | Serial number from label |
| Purchase or install date | Date from invoice or record |
| Claim reason | Unit display fails after power cycle |
| First observed | Date issue was noticed |
| Troubleshooting | Power reset, cable check, error photographed |
| Contact | Name, email, phone |
Do not include speculation. Write display does not power on after reset, not bad motherboard. Write water visible under pump housing, not seal definitely failed, unless a qualified technician has confirmed it.
Neutral wording helps because warranty teams may need to route the claim to technical staff. Overstated conclusions can trigger unnecessary disputes.
Handling Receipts, Invoices, and Purchase Proof
Receipts are often the weakest part of a claim packet. They are folded, faded, photographed at an angle, or stored as forwarded email screenshots. The packet should make purchase proof as easy to verify as the defect photo.
For paper receipts:
- Place the receipt on a flat, contrasting surface.
- Photograph it straight down.
- Avoid shadows from the phone.
- Include the whole receipt, then add a cropped detail if needed.
- Use OCR to extract date, vendor, and item line.
For invoices:
- Use the original PDF if available.
- If only a photo exists, crop the page edges cleanly.
- Keep invoice number, date, vendor, buyer, and item visible.
- Include only pages relevant to the claim when possible.
For purchase orders or installation records, include the page that connects the asset to the site. A generic order form may prove that something was bought, but not necessarily that the failed unit is the covered item.
When to Include Context Photos
Context photos can help or hurt. Include them when installation conditions are relevant to the product or likely to be questioned.
Good reasons to include context:
- The product requires ventilation clearance.
- The failure may relate to mounting or orientation.
- The vendor may ask about water exposure, cable strain, dust, or temperature.
- The product is one of several similar units in the same room.
- The serial plate is hard to connect to the whole asset without context.
Bad reasons to include context:
- The photo is just another angle with no new information.
- The surrounding area is cluttered and distracts from the claim.
- Sensitive information is visible in the background.
- The image makes the packet larger without answering a likely question.
Before adding a context photo, ask: what question does this answer? If there is no answer, leave it out.
Privacy and Redaction Checks
Warranty packets can accidentally expose more than product evidence. Facilities photos may include employee badges, patient information, student names, Wi-Fi labels, access codes, security camera views, private addresses, or unrelated documents.
Before sending the packet outside your organization, check each page for:
- People in reflections or background areas.
- Whiteboards, wall notices, room schedules, and screens.
- Network names, passwords, QR codes, and access labels.
- Customer, patient, resident, or student information.
- Unrelated invoices or account numbers.
If sensitive information is visible, crop it out when possible. If cropping would remove important context, create a redacted copy for external sharing and keep the original internally.
Redaction should be obvious and complete. Do not rely on a transparent highlight or a blurry brush if the hidden text can still be guessed. For warranty claims, the vendor usually needs product facts, not personal data.
Quality Control Before Sending
Use a short final checklist. It takes less time than answering one vendor follow-up.
- The final PDF opens without errors.
- The file name includes site, asset, date, and claim or ticket number if available.
- The first page explains what the packet is about.
- The model number is readable.
- The serial number is readable.
- Purchase or installation proof is included.
- Defect photos show the actual issue.
- Context photos answer a real question.
- No sensitive background information is visible.
- The file size fits the vendor portal or email limit.
If the packet is too large, compress full-view and context images first. Do not start by shrinking the serial plate, receipt, or defect close-up. Those are the pages most likely to determine whether the claim moves forward.
A Practical Example: Failed Break Room Appliance
Imagine a property team filing a claim for a commercial break room refrigerator that stopped cooling eight months after purchase.
A weak submission might include three phone photos named IMG_8120, IMG_8121, and IMG_8122, plus a forwarded receipt screenshot. The vendor has to infer which photo shows the model, whether the serial number matches, and what failure is being claimed.
A stronger packet would include:
- Summary page with location, model, serial, purchase date, and claim reason.
- Full photo of the refrigerator in place.
- Close photo of manufacturer label.
- Cropped serial label photo.
- Receipt or invoice page.
- Photo of temperature display or thermometer reading.
- Photo of interior condition if relevant.
- Note stating when cooling failure was first observed and what reset steps were attempted.
The second packet does not require fancy design. It simply removes ambiguity.
Building a Reusable Team Habit
The best warranty workflow is one that people will actually use when a unit fails at 4:30 p.m. on a Friday. Keep the system lightweight.
Create a shared checklist. Keep a sample claim packet in a team folder. Teach field staff the five required photos: full asset, model label, serial label, defect close-up, and purchase proof. Give coordinators a consistent file naming pattern and a simple browser editing path.
For teams that handle many assets, it also helps to keep a warranty-ready record at installation time. Photograph the asset, serial plate, model plate, and receipt when the product is new. Store those files with the asset tag. When something fails later, half the packet already exists.
This habit is especially valuable for seasonal equipment, shared devices, and assets installed in hard-to-access locations. The worst time to discover that a serial plate is hidden behind a mounted panel is after the vendor asks for it.
Final Takeaway
A warranty claim packet is not just a PDF. It is a small chain of trust. The vendor needs to trust that the product is identifiable, the purchase is eligible, the defect is real, and the person filing the claim has provided the right context.
The workflow is straightforward: protect originals, choose the evidence, crop carefully, resize large photos, compress with readability in mind, extract key text when helpful, and assemble everything into one clean PDF. Done consistently, this turns scattered field images into a claim package that is easier to review, easier to archive, and less likely to come back with avoidable questions.