Security Questionnaire Screenshots: A Practical Redaction and Readability Guide
Prepare screenshots for vendor security questionnaires without leaking sensitive data, blurring key evidence, or making UI details unreadable to reviewers.

Security Questionnaire Screenshots: A Practical Redaction and Readability Guide
Security questionnaires often ask for evidence that is difficult to describe in words: screenshots of admin settings, access controls, audit logs, backup configuration, SSO enforcement, encryption options, incident response settings, or user permission screens. The screenshot is supposed to prove that a control exists. The problem is that the same screenshot can also expose account names, email addresses, customer identifiers, internal project names, IP ranges, ticket titles, API key prefixes, or vendor names that were never meant to leave your company.
This guide is for small security, operations, support, and product teams that need to prepare screenshot evidence for vendor reviews without turning every image into an unreadable blur. The goal is not to hide everything. The goal is to remove sensitive context while preserving the visible proof a reviewer actually needs.
A good security questionnaire screenshot has three qualities: it shows the relevant control, it removes unnecessary private detail, and it stays readable after upload to a portal, PDF, email thread, or shared drive. That sounds simple until you are preparing twenty images at 5 p.m. for a procurement deadline. A practical checklist helps you move faster without making risky edits.
Why Security Questionnaire Screenshots Are Easy to Get Wrong
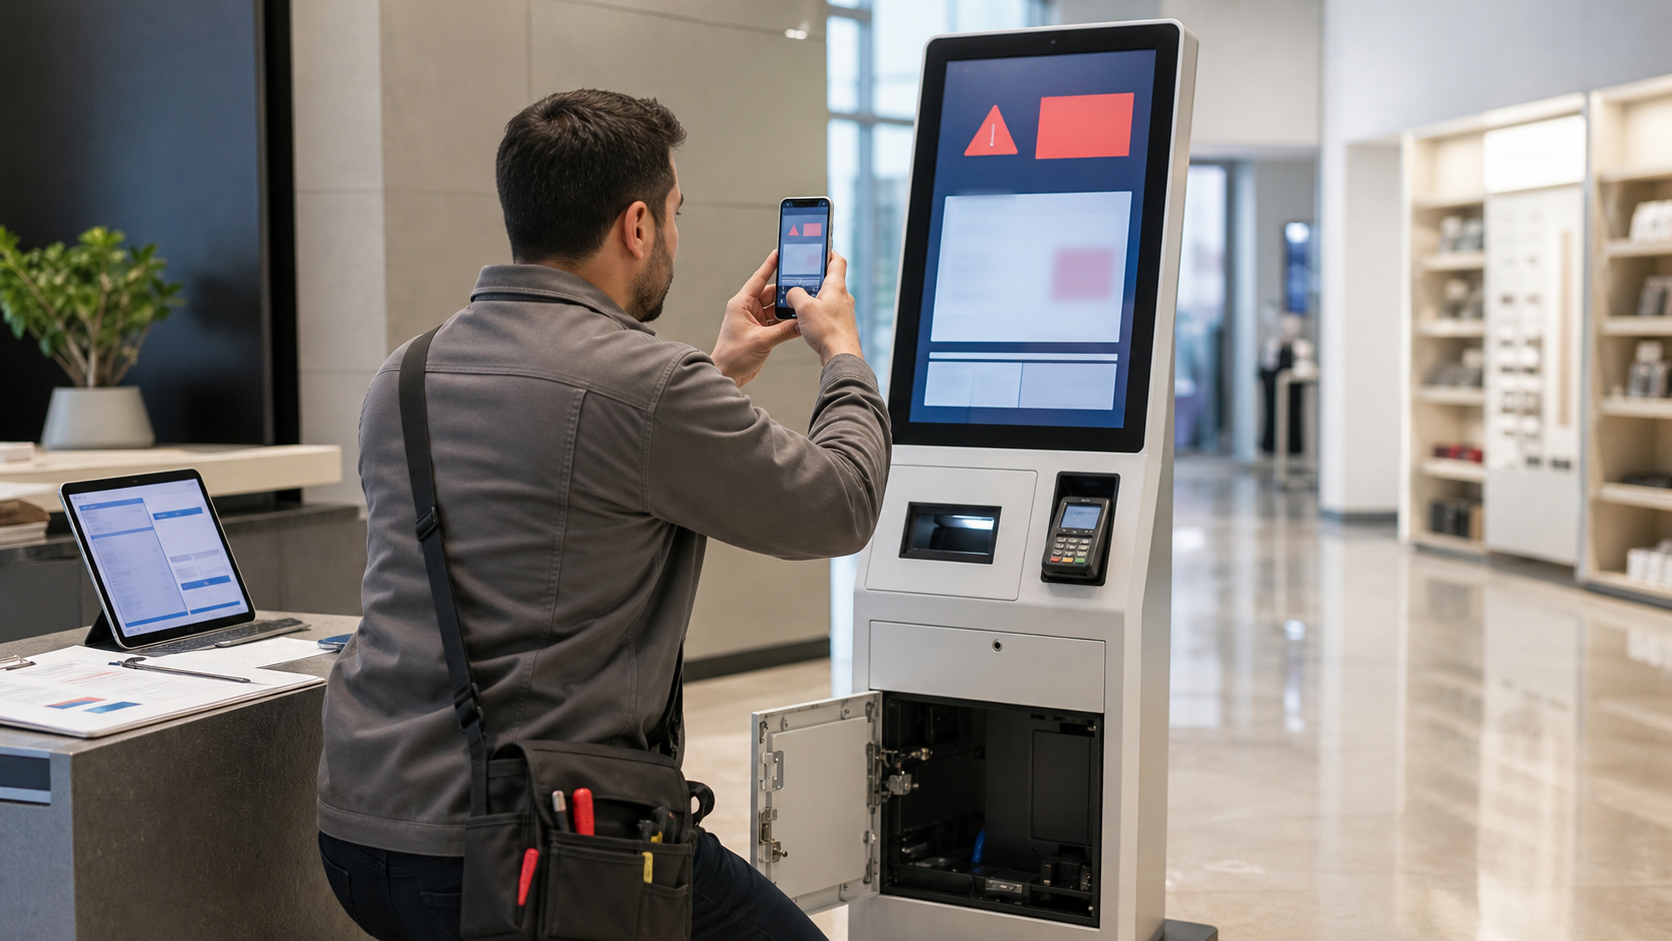
Most screenshot mistakes happen because the team treats the image as a quick attachment rather than a document with a job to do. A screenshot for a questionnaire is not the same as a casual Slack capture. It may be stored by another company, forwarded between teams, attached to a due diligence packet, or retained as part of a procurement record.
The common failure modes are predictable. One team crops too aggressively and removes the page context that proves the setting belongs to the right system. Another team blurs a whole table and leaves the reviewer unable to confirm whether the control is enabled. Someone else hides names but leaves browser tabs, bookmarks, workspace labels, or profile photos visible. In many cases, the screenshot gets compressed later by a portal, making small interface text too soft to read.
The safest approach is to treat each screenshot as evidence. Evidence needs enough surrounding context to be credible. It also needs enough restraint to avoid leaking unrelated information. That balance is what this guide focuses on.
The Screenshot Types That Usually Need Cleanup
Security questionnaire screenshots tend to fall into a few repeatable groups. Knowing the group helps you decide what to preserve and what to redact.
| Screenshot type | Preserve | Usually redact |
|---|---|---|
| SSO or identity settings | Enabled status, provider type, enforcement toggle, domain verification state | Admin email addresses, tenant names, internal domains if not required |
| User and role lists | Role names, permission model, MFA status if relevant | User names, email addresses, avatars, last login timestamps |
| Audit logs | Event type, logging availability, retention setting, export option | Actor names, IP addresses, object names, exact event contents |
| Backup or retention settings | Frequency, retention period, destination type, success status | Bucket names, file paths, account IDs, environment names |
| Encryption settings | Encryption status, key management option, certificate presence | Key aliases, certificate fingerprints, infrastructure identifiers |
| Admin dashboard overview | Navigation context, page title area, relevant control panel | Revenue figures, customer names, ticket counts, internal metrics |
This table is not a legal policy. It is a practical starting point. If your company has a data classification policy, apply that first. If the questionnaire specifically asks for a detail, keep that detail visible and redact unrelated fields around it.
A useful rule: redact values, not structure. The reviewer needs to see that a user table, policy list, toggle, export option, or retention setting exists. They usually do not need to see the real people, accounts, customers, object names, or infrastructure labels inside it.
Decide What the Screenshot Must Prove
Before editing, write a one-sentence evidence goal for the screenshot. You do not need to put this sentence in the image. It is simply a decision tool.
Examples:
- This screenshot proves that SSO is enabled for all users.
- This screenshot proves that audit logging is available and turned on.
- This screenshot proves that backups are retained for 30 days.
- This screenshot proves that only administrators can invite new users.
- This screenshot proves that MFA is required for privileged roles.
Once the evidence goal is clear, every edit becomes easier. If an element supports the claim, preserve it. If it does not support the claim and contains sensitive detail, redact it. If it does not support the claim but provides useful orientation, keep it only if it is harmless.
This step prevents the two worst extremes: over-redaction and under-redaction. Over-redaction produces a screenshot that says, in effect, "trust us." Under-redaction exports internal context that was never needed.
Capture Clean Source Images First
Editing cannot fully rescue a messy source capture. Start with a clean screenshot before you redact.
Use a browser window or app window that shows only the relevant product. Close personal tabs, internal dashboards, chat apps, password manager popovers, calendar reminders, and debug panels. If the screenshot includes a browser, use a clean profile when possible. Remove bookmarks bars unless the URL or app context is required. Avoid capturing the whole desktop unless the questionnaire explicitly asks for environmental proof.
Set the zoom level before capture. For most web app evidence, 100% or 110% browser zoom is a good starting point. If the UI has dense tables, increase zoom slightly and capture fewer rows. Reviewers rarely need twenty rows of a user list. They need enough rows to understand the structure and the relevant control.
Use a wide enough window that labels do not truncate. A redacted screenshot with cut-off column names is frustrating because it forces the reviewer to guess. If the UI is responsive, widen the window or capture from a desktop layout rather than a narrow tablet layout.
If the source image is too large for the destination portal, resize it after editing with a tool such as Resize Image. Do not start by making the screenshot tiny. Redaction and review are easier when the source image is still sharp.
A Step-by-Step Redaction Pass
A disciplined redaction pass keeps the screenshot useful. Follow the same order each time so you do not miss hidden details.
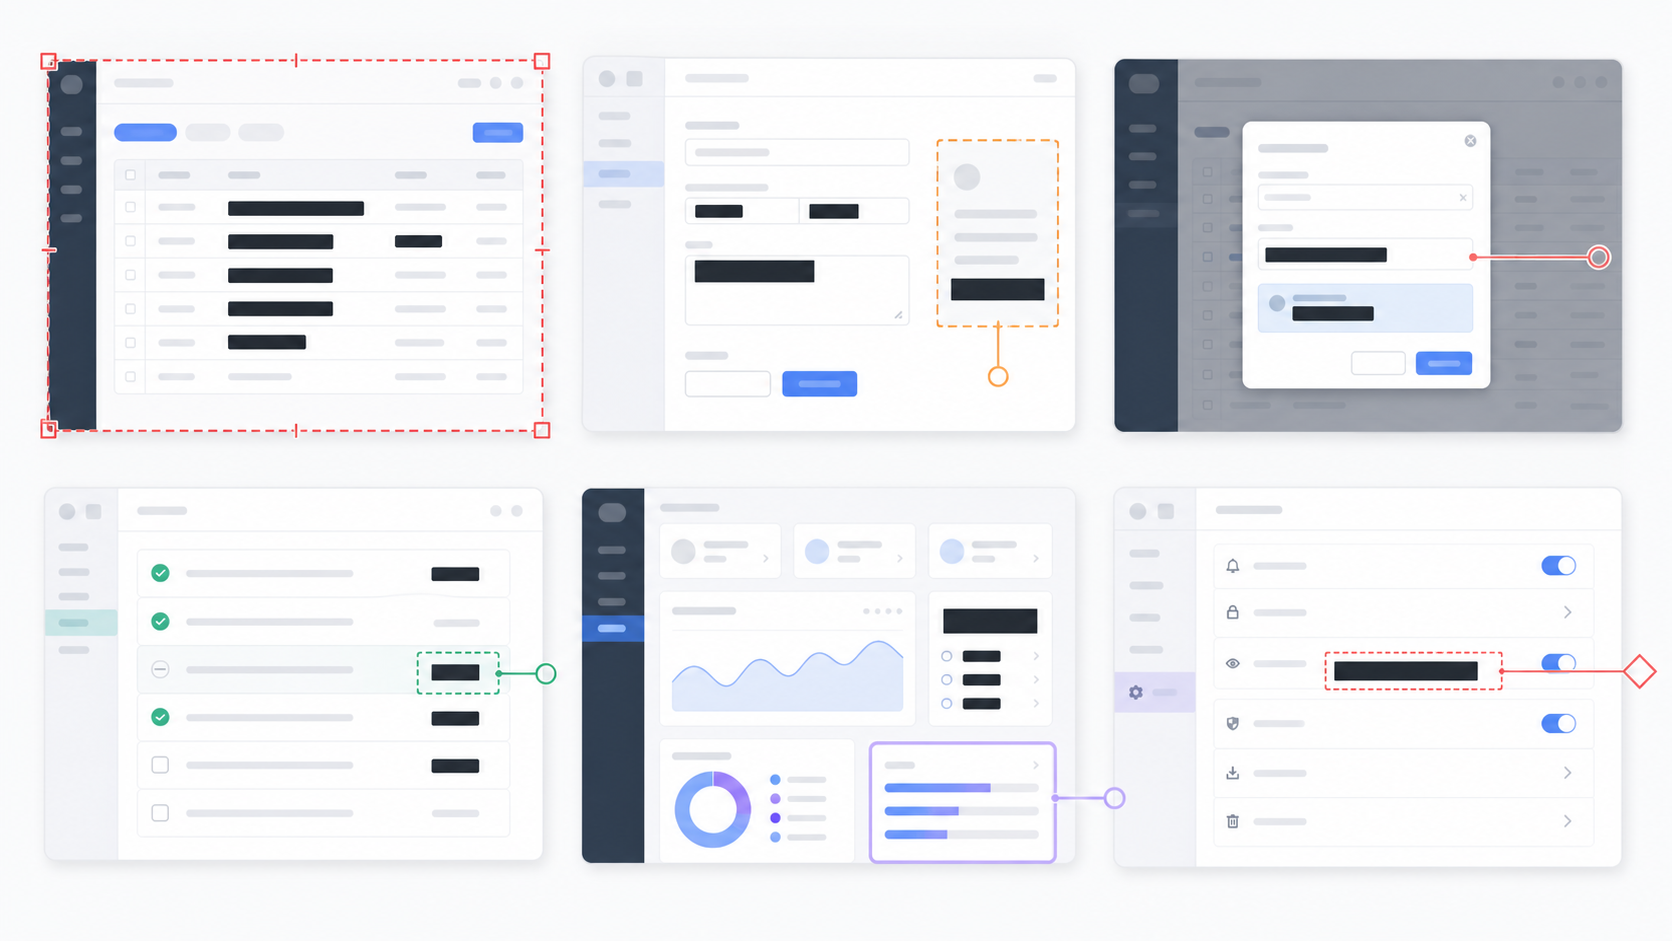
1. Crop to the Evidence Area
Start by cropping away unrelated browser chrome, side panels, empty space, and neighboring content. Keep enough navigation or page context to show where the setting lives. For example, if the screenshot is about an SSO enforcement toggle, keep the settings section label and the toggle area. You probably do not need the entire left navigation, a long footer, or unrelated account panels.
Cropping is not just about aesthetics. It reduces the amount of sensitive information you must inspect. Smaller evidence areas are faster to verify and easier for the recipient to understand.
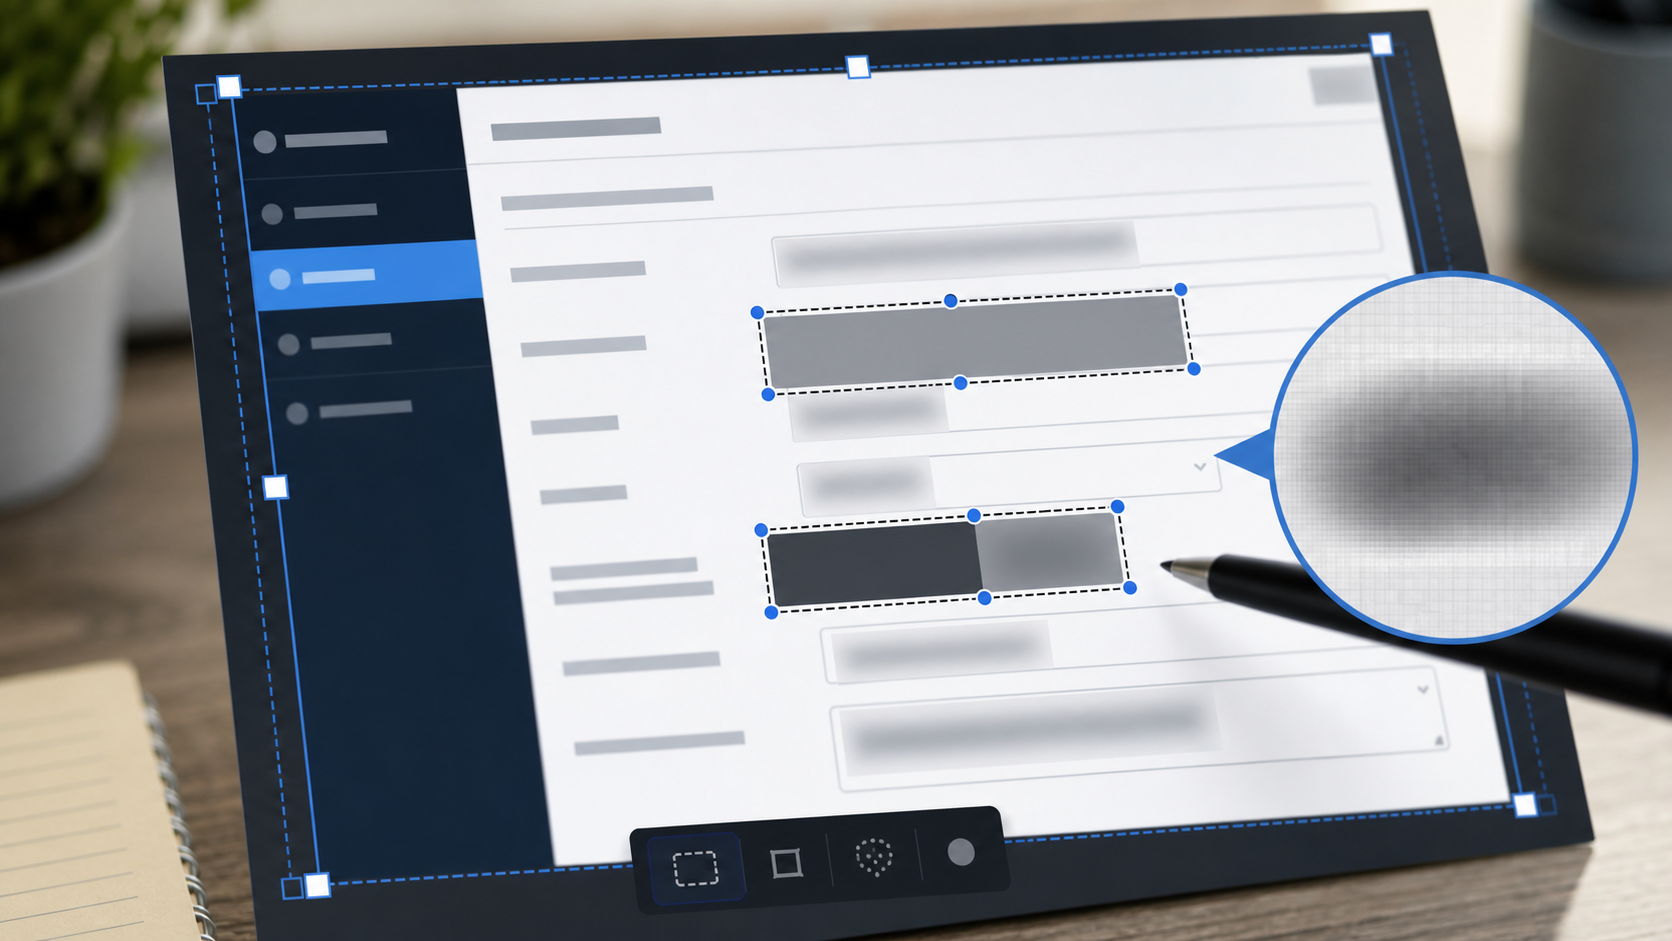
2. Redact Direct Identifiers
Direct identifiers include names, emails, phone numbers, user avatars, customer names, exact ticket titles, workspace names, tenant IDs, IP addresses, domains, repository names, storage bucket names, and internal hostnames. Cover them with solid blocks or clean masking. Avoid decorative scribbles because they can look informal and may leave readable fragments at the edges.
For screenshots with many repeated identifiers, redact consistently. If three columns contain names, emails, and departments, do not hide only the email column. The name and department may still identify the person.
3. Redact Indirect Identifiers
Indirect identifiers are easier to miss. These are details that may reveal sensitive context when combined: unusual project labels, rare role names, region names, customer initials, visible URLs, account numbers, time stamps, IP ranges, or internal environment names such as staging, prod-eu, or enterprise-migration.
Time stamps deserve special attention. A log screenshot may need approximate recency, but it rarely needs exact event times down to the second. If the reviewer only needs to know logging exists, preserve event categories and redact exact values.
4. Preserve Control Labels and States
Do not redact the words that prove the claim. If the answer depends on an "enabled" state, a selected radio option, a checked box, a role permission, or a retention period, that information must remain legible. If the interface uses a small toggle with color alone, include the surrounding label so the reviewer can understand it without guessing.
This is where many screenshots fail. A team hides names correctly but also blurs the entire row, including the visible MFA status. The result is safer in one sense, but it no longer answers the questionnaire.
5. Add Minimal Annotation Only When Needed
Use annotations sparingly. A simple highlight box or arrow can help when the relevant setting is buried in a dense admin screen. But a screenshot covered in arrows, circles, and labels becomes its own source of confusion.
If you annotate, keep the annotation away from private details and avoid adding new claims inside the image. Put explanatory text in the questionnaire response or document body instead. The screenshot should support the answer, not carry the whole answer by itself.
6. Export a Review Copy
After editing, export a clean copy and inspect it at the size the recipient will see. If the image will be embedded into a PDF, test it inside the PDF. If the image will be uploaded to a portal that previews at a reduced width, open it at that approximate width before submitting.
When several images belong together, convert them into a concise packet with Image to PDF or combine related PDF pages with PDF Merge. A packet can be easier for procurement teams than a folder full of loosely named PNG files.
Redaction Methods: Solid Mask, Blur, Pixelate, or Crop
Different redaction methods communicate different things. Choose deliberately.
| Method | Best for | Watch out for |
|---|---|---|
| Crop | Removing unrelated page regions | Do not crop away the page context needed to prove the setting |
| Solid mask | Names, emails, IDs, secrets, exact values | Use clean rectangular coverage with no visible fragments |
| Blur | Low-risk background values where structure matters | Strong blur is needed; weak blur can leave text guessable |
| Pixelate | Visual anonymization where exact text is not needed | Large pixels can look messy on dense UI screenshots |
| Replacement values | Demo environments or recreated evidence | Never imply fake data is live production evidence |
For sensitive values, a solid mask is usually better than blur. Blur can be visually appealing, but weak blur is sometimes reversible enough for a person to infer short text, especially if the font, field length, or context is obvious. Pixelation has similar risks when the block size is too small.
Cropping is the cleanest redaction when the removed area is irrelevant. If a private customer name appears in a right-side panel unrelated to the control, crop the panel away. The viewer does not need to know that something was hidden there.
Replacement values are useful only when you are intentionally using a demo account or sample environment. Do not alter production screenshots in a way that changes the meaning of the evidence. If a field says a control is disabled, changing it to look enabled is not cleanup. It is false evidence.
File Format Choices for Screenshot Evidence
Most questionnaire screenshots start as PNG files because PNG preserves crisp interface lines and text. That is usually the best source format for UI screenshots. JPEG can be acceptable for photos or mixed visual content, but it often adds artifacts around small text and thin lines.
Use PNG when the screenshot contains interface text, tables, toggles, diagrams, or code-like content. Use JPEG only when the file is primarily photographic or when the receiving portal has a strict file size limit and text readability remains acceptable. Use WebP when your destination supports it and you need smaller files while preserving decent clarity.
If you need to convert a screenshot format without opening heavy design software, use Convert Image. Keep the original capture separately until the review is complete. If a reviewer asks for a clearer crop or a different section, starting from the original is much better than re-editing a compressed copy.
For multi-page submissions, PDF is often the most convenient handoff format. It keeps image order stable and lets you add short captions outside the screenshots. Just make sure the PDF does not downsample images so aggressively that the evidence becomes unreadable.
Compression Without Destroying Small UI Text
Security portals often impose upload limits. The trap is to compress screenshots until they fit, then discover that the reviewer cannot read the setting labels. UI screenshots have fragile details: thin strokes, small numbers, status labels, checkmarks, and table borders.
Use these rules when reducing file size:
- Crop first, because removed pixels cost nothing.
- Resize only after deciding the final viewing size.
- Prefer PNG for sharp UI text unless the file is still too large.
- If using JPEG or WebP, inspect small labels at 100% and at preview size.
- Avoid repeated export cycles, which compound artifacts.
A tool such as Compress Image is useful after redaction and cropping, but compression should be the final pass, not the first pass. If the image becomes soft, go back to the edited source, crop tighter, or reduce dimensions more carefully rather than recompressing the already damaged output.
A practical target for many questionnaire images is readability at 1200 to 1800 pixels wide. Wider images may be useful for dense tables, but only if the destination accepts them and the reviewer can zoom. Narrower images can work for single-setting captures. There is no universal size; the test is whether the claim remains visible.
Naming and Ordering Screenshots for Reviewers
File names are part of the evidence package. A reviewer should not have to open ten files named screenshot-final-new2.png to find the SSO proof.
Use names that describe the control without exposing private details. Good examples:
- sso-enforcement-enabled.png
- audit-logging-retention-settings.png
- privileged-role-mfa-status.png
- backup-retention-policy-redacted.png
- admin-invite-permissions.png
Avoid names with customer names, internal project codes, employee names, ticket IDs, or exact dates unless those details are required. If you need order, prefix with numbers:
- 01-sso-enforcement-enabled.png
- 02-mfa-admin-roles.png
- 03-audit-log-retention.png
For a PDF packet, keep the order aligned with the questionnaire sections. If question 4.2 asks about audit logs and question 4.3 asks about retention, the evidence should follow that sequence. This reduces back-and-forth and makes the reviewer less likely to request duplicate clarification.
A Practical Pre-Submission Checklist
Before sending screenshots outside your company, run a final check. It should take less than a minute per image once the habit is built.
| Check | Question to ask |
|---|---|
| Evidence goal | Does this image clearly prove the control it is attached to? |
| Identifiers | Are names, emails, customer details, IDs, hostnames, and IPs removed if unnecessary? |
| Context | Is enough page context visible to show where the setting lives? |
| Readability | Can a reviewer read the relevant labels after upload or PDF export? |
| Redaction coverage | Are masked areas fully covered with no exposed edges or fragments? |
| Browser and desktop | Are tabs, bookmarks, notifications, and profile details absent? |
| File name | Does the name describe the evidence without leaking private context? |
| Version | Is the original preserved separately in case a clearer export is needed? |
This checklist is intentionally plain. The value comes from consistency. Most leaks are not dramatic secrets in the center of the screen. They are small details at the top edge, in a side panel, or inside a file name.
When AI Editing Helps and When It Does Not
AI-assisted image editing can help with visual cleanup, especially when you need to remove a distracting background, tidy a non-sensitive mockup, or prepare a clean illustrative image. For actual security evidence, be careful. The screenshot must remain faithful to the system state you are proving.
Use AI Photo Editor for supporting visuals, public-facing explanatory images, or cleanup tasks where the image is not compliance evidence. Do not use generative edits to alter the meaning of a security setting, change a disabled control into an enabled one, fabricate missing UI, or replace real audit details with invented ones in a way that could mislead a reviewer.
For evidence screenshots, deterministic edits are usually better: crop, mask, resize, convert, and compress. Those changes are easier to explain and easier to repeat. If you need example screenshots for training material, label them as examples and keep them separate from live questionnaire evidence.
Common Mistakes That Trigger Follow-Up Questions
A strong screenshot packet reduces reviewer questions. A weak one creates extra email loops. These are the mistakes that most often cause friction.
The first is hiding the exact setting the reviewer needs. If a question asks whether MFA is required, the screenshot must show the MFA requirement state. A blurred user list does not answer that.
The second is showing a setting without context. A cropped toggle that says enabled may not prove much if the page, section, or product context is missing. Keep enough surrounding interface to establish meaning.
The third is mixing multiple claims in one busy screenshot. If the screen shows SSO, SCIM, MFA, session duration, and audit exports, consider splitting it into two or three focused captures. One clear screenshot per claim is often faster to review than one giant capture with tiny annotations.
The fourth is exporting at a size that destroys text. This is especially common when teams paste screenshots into slide decks and then export the deck as a PDF. The image may look fine while editing, but the final PDF can downsample it. Always inspect the exported file.
The fifth is leaving sensitive details in the edges: a browser profile icon, a tab title, a URL path, a notification preview, or a side panel. Edges are easy to ignore because everyone focuses on the highlighted control.
Building a Repeatable Evidence Folder
Even if you only answer questionnaires a few times per year, a simple folder structure saves time. Keep source captures, edited images, and final packets separate.
A practical structure can be:
- source-captures
- redacted-images
- final-packet
- notes
Source captures should stay internal and access-controlled. Redacted images are the cleaned files. The final packet contains only the files you plan to send. Notes can include the evidence goal for each screenshot and the questionnaire section it supports.
Do not store secrets or private explanations in image metadata. If you receive screenshots from multiple teammates, normalize file names before creating the final packet. Mixed naming styles make it harder to spot missing sections.
If a questionnaire is recurring, keep a clean template list of evidence needs rather than reusing old screenshots blindly. Controls change, UI changes, and old screenshots can create confusion. Re-capture important evidence when the review cycle matters.
Final Thoughts
Security questionnaire screenshots sit in an awkward middle ground. They are not polished marketing assets, but they are also not disposable captures. They are evidence that may travel outside your company, and they deserve a careful pass before submission.
The best preparation method is simple: define what each screenshot must prove, crop away unrelated areas, redact values instead of structure, preserve the control state, and test readability after export. Use image tools for the mechanical parts: resize when dimensions are too large, compress only after checking clarity, convert formats when the destination requires it, and assemble PDF packets when order matters.
A clean screenshot does not need to be beautiful. It needs to be specific, readable, and restrained. When reviewers can confirm the control without seeing anything extra, the image has done its job.