Turn Webinar Q&A Moments Into Silent Social Proof Clips
A practical workflow for turning recorded webinar answers into short, captioned social proof clips that work without sound on landing pages, email, and social feeds.
Turn Webinar Q&A Moments Into Silent Social Proof Clips
Webinars often contain the most persuasive marketing material a team has, but it is usually buried inside a 45-minute recording that nobody wants to scrub through. The strongest moments are rarely the polished intro slides. They are the short answers: a customer explains why they switched, a founder handles a difficult objection, a product lead shows a workaround, or an expert gives a clear one-minute answer to a question buyers actually ask.
Those moments can become useful social proof clips, but only if they are rebuilt for silent viewing. A raw webinar extract usually has awkward pauses, tiny slide text, shifting layouts, audience names, chat panels, and audio-first phrasing. If you simply cut a minute out of the replay and post it, the clip may technically exist, but it will not travel well across landing pages, email newsletters, sales follow-ups, or social feeds.
This workflow is for small teams that need to repurpose webinar Q&A segments into short, captioned clips without turning the project into a full video production cycle. The goal is not cinematic polish. The goal is a compact, readable, trustworthy clip that communicates one answer clearly even when the viewer never turns sound on.
Why Q&A Clips Need a Different Workflow
A webinar presentation clip and a webinar Q&A clip behave differently. Presentation clips are usually linear: slide, explanation, takeaway. Q&A clips are more conversational. The speaker may begin with context, restate part of the question, pause to think, mention a customer scenario, then finally deliver the useful answer.
That structure is human, but it creates editing problems. The clip needs enough context to make sense, but not so much that the viewer leaves before the answer arrives. It also needs captions that feel natural, not a transcript dumped across the bottom of the frame.
A good Q&A social proof clip normally has four traits:
- It answers one specific buyer concern.
- It starts close to the useful part, not at the beginning of the question.
- It works without sound because the captions carry the message.
- It has a clear visual frame, even if the original webinar layout was messy.
The best clips are not always the most energetic ones. For B2B, support-led products, agencies, education businesses, and technical tools, a calm 35-second answer can outperform a flashy highlight because it reduces uncertainty. The viewer sees a real person explain a real issue in plain language.
Choose the Right Q&A Moment
Before opening any editing tool, decide what kind of proof the clip should provide. This keeps you from clipping every quotable sentence and ending up with a folder full of fragments that do not serve a clear purpose.
Use this decision table when reviewing a webinar recording:
| Clip type | Best source moment | Ideal use | Keep it if |
|---|---|---|---|
| Objection answer | Speaker responds to a concern about effort, risk, migration, accuracy, or setup | Landing page section, sales email, retargeting ad | The answer removes a real buying hesitation |
| Customer proof | Customer describes what changed after using a product or workflow | Case study page, testimonial carousel, newsletter | The result is concrete without sounding scripted |
| Expert shortcut | Host gives a practical tip or framework | LinkedIn post, blog embed, help center article | The advice is useful even outside the full webinar |
| Feature context | Product lead explains why a feature matters | Product page, onboarding email, changelog | The clip explains the benefit, not just the button |
| Myth correction | Speaker corrects a common misunderstanding | Top-of-funnel education, sales enablement | The first five seconds create curiosity |
Avoid clips that depend heavily on unseen chat messages, private customer details, or slide text that cannot be read on mobile. Also avoid answers that require two minutes of setup. A strong Q&A clip should survive when removed from the full session.
Map the Answer Before You Cut the Video

Do a quick paper edit before touching the timeline. This is the step that saves the most time because it separates the idea of the clip from the mechanics of trimming.
Write the answer in four parts:
| Part | Question to answer | Example shape |
|---|---|---|
| Hook | What concern is this answering? | “Will this still work if my source files are inconsistent?” |
| Context | What does the viewer need before the answer? | “Most teams have mixed formats from different sources.” |
| Proof | What makes the answer credible? | “We handle the files in stages instead of forcing one export.” |
| Close | What should the viewer remember? | “Start with cleanup, then convert, then compress.” |
This is not copywriting for an overlay. It is a map for the edit. You are deciding which phrases are essential and which can be removed without changing the meaning.
When reviewing the transcript, mark the sentence where the answer truly begins. In many webinars, that sentence comes after filler such as “That’s a great question” or “It depends a little bit on your setup.” You can often cut straight to the first meaningful phrase. If the question itself is needed, paraphrase it in the clip title or surrounding page copy instead of forcing the viewer to watch the whole exchange.
A practical target length is 25 to 55 seconds. Shorter than 20 seconds can feel abrupt unless the answer is extremely focused. Longer than 60 seconds can work for a landing page embed, but it becomes harder to use in social feeds and email previews.
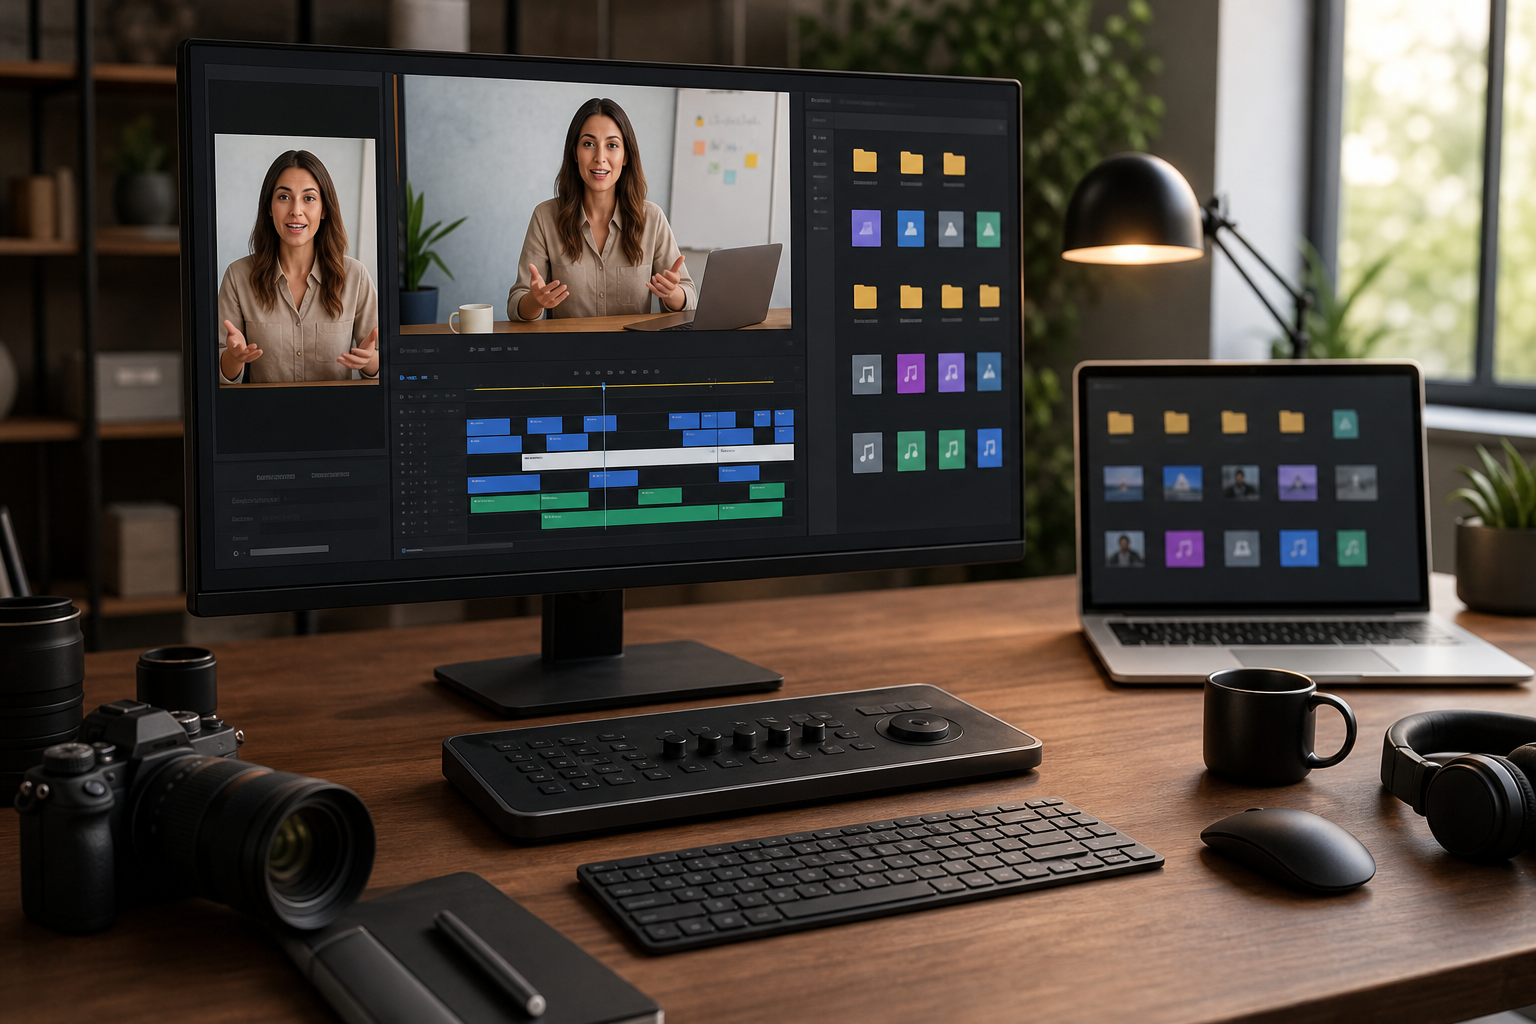
Create a Clean Source Extract
Once you have chosen the moment, export a working extract rather than editing inside the full webinar file. A smaller source file makes review faster and reduces the chance of accidental timeline drift.
Include a little extra room on both sides of the answer:
- Start 3 to 5 seconds before the first useful sentence.
- End 3 to 5 seconds after the final useful sentence.
- Keep the original audio intact at this stage.
- Preserve the highest available resolution from the webinar platform.
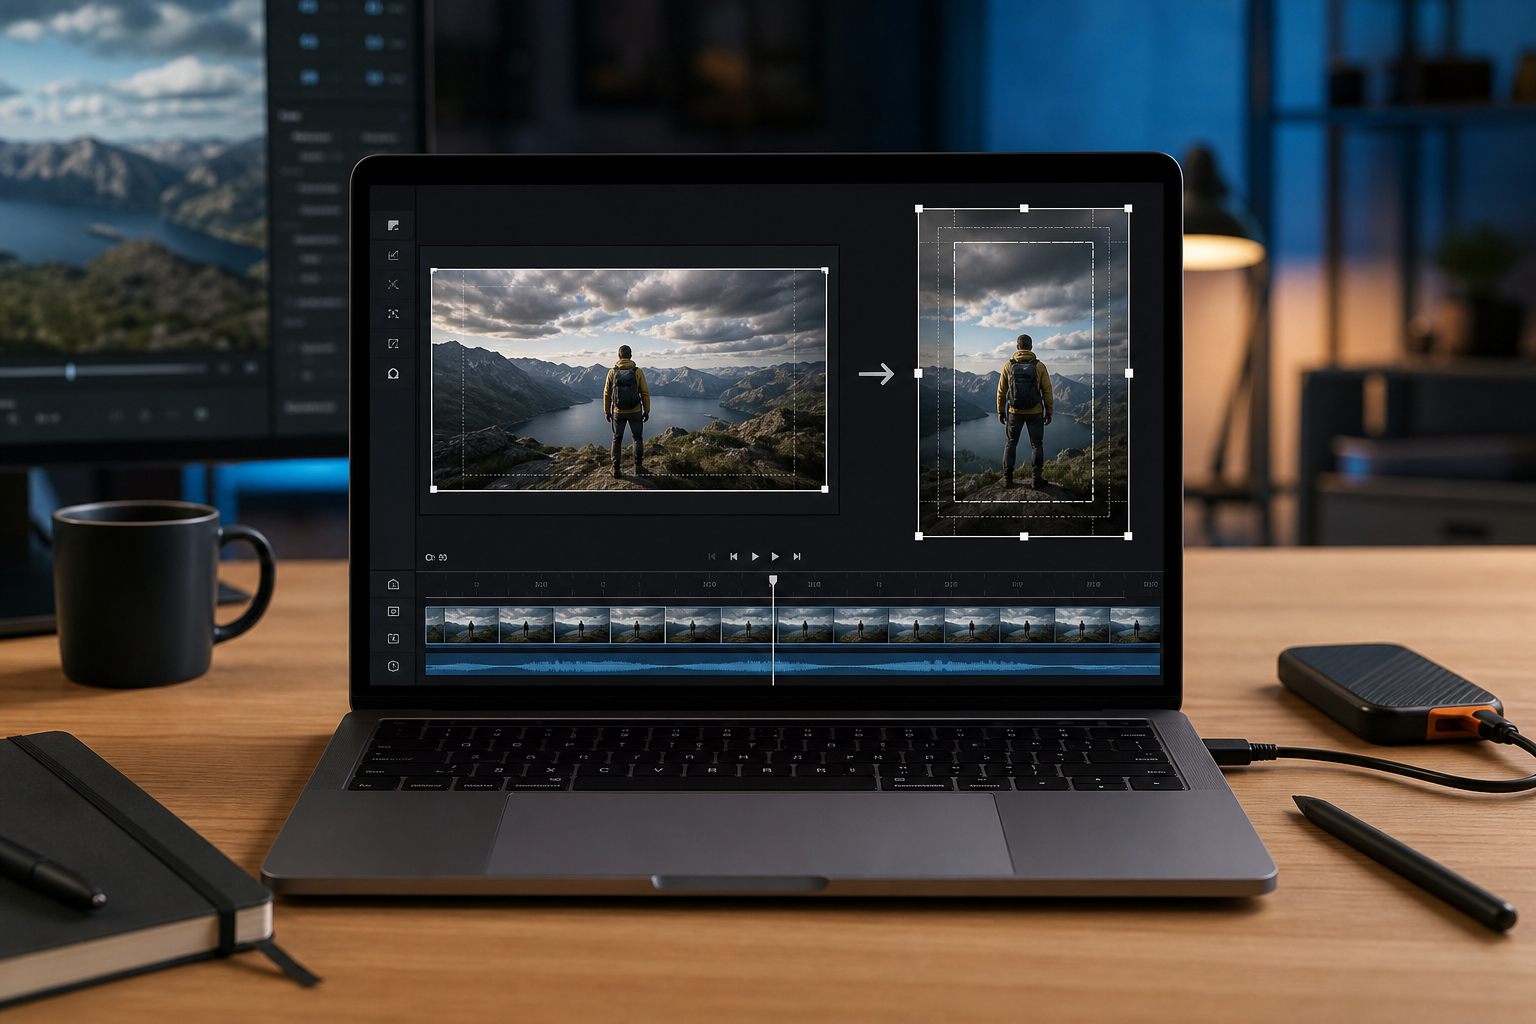
Do not crop aggressively yet. The first extract is your safety copy. You may later need a wider frame for horizontal embeds, a tighter crop for vertical social, or a version that hides the attendee list. Keeping a wider master extract gives you options.
If the webinar recording includes slides, webcam, and screen share, note which visual element carries the value. Sometimes the speaker’s face is the proof because the answer is personal. Sometimes the slide or product screen matters more. For technical explainers, the product screen may be essential, but the webcam can still add credibility if it does not crowd the frame.
Clean the Frame Without Overproducing It
Webinar recordings often contain interface clutter: participant names, chat sidebars, platform controls, timestamps, unreadable slide thumbnails, and empty letterboxing. The goal is to remove distractions while keeping the clip honest.
Use this framing checklist:
- Remove black bars where possible.
- Hide chat panels unless they are part of the story.
- Crop out private attendee names or email addresses.
- Keep the active speaker large enough to read facial expression.
- Keep product screens large enough to understand the action.
- Leave space for captions before committing to a vertical crop.
For a landing page, a 16:9 or 4:5 frame often feels more stable than a full vertical crop. For social feeds, 9:16 may be necessary, but it should not force captions on top of the speaker’s mouth or important UI elements. If the webinar has a slide on one side and a speaker on the other, test whether the clip still makes sense when the slide is cropped out. If it does not, the clip may need a layout rebuild rather than a simple crop.
When you need a still frame for a blog post, landing page card, or newsletter preview, export a clean image from the clip and prepare it separately. You can use ConvertAndEdit’s /resize-image tool to make consistent preview sizes, then use /compress-image when the image is ready for publishing. Treat the thumbnail as part of the workflow, not an afterthought.
Build Captions for Silent Viewing
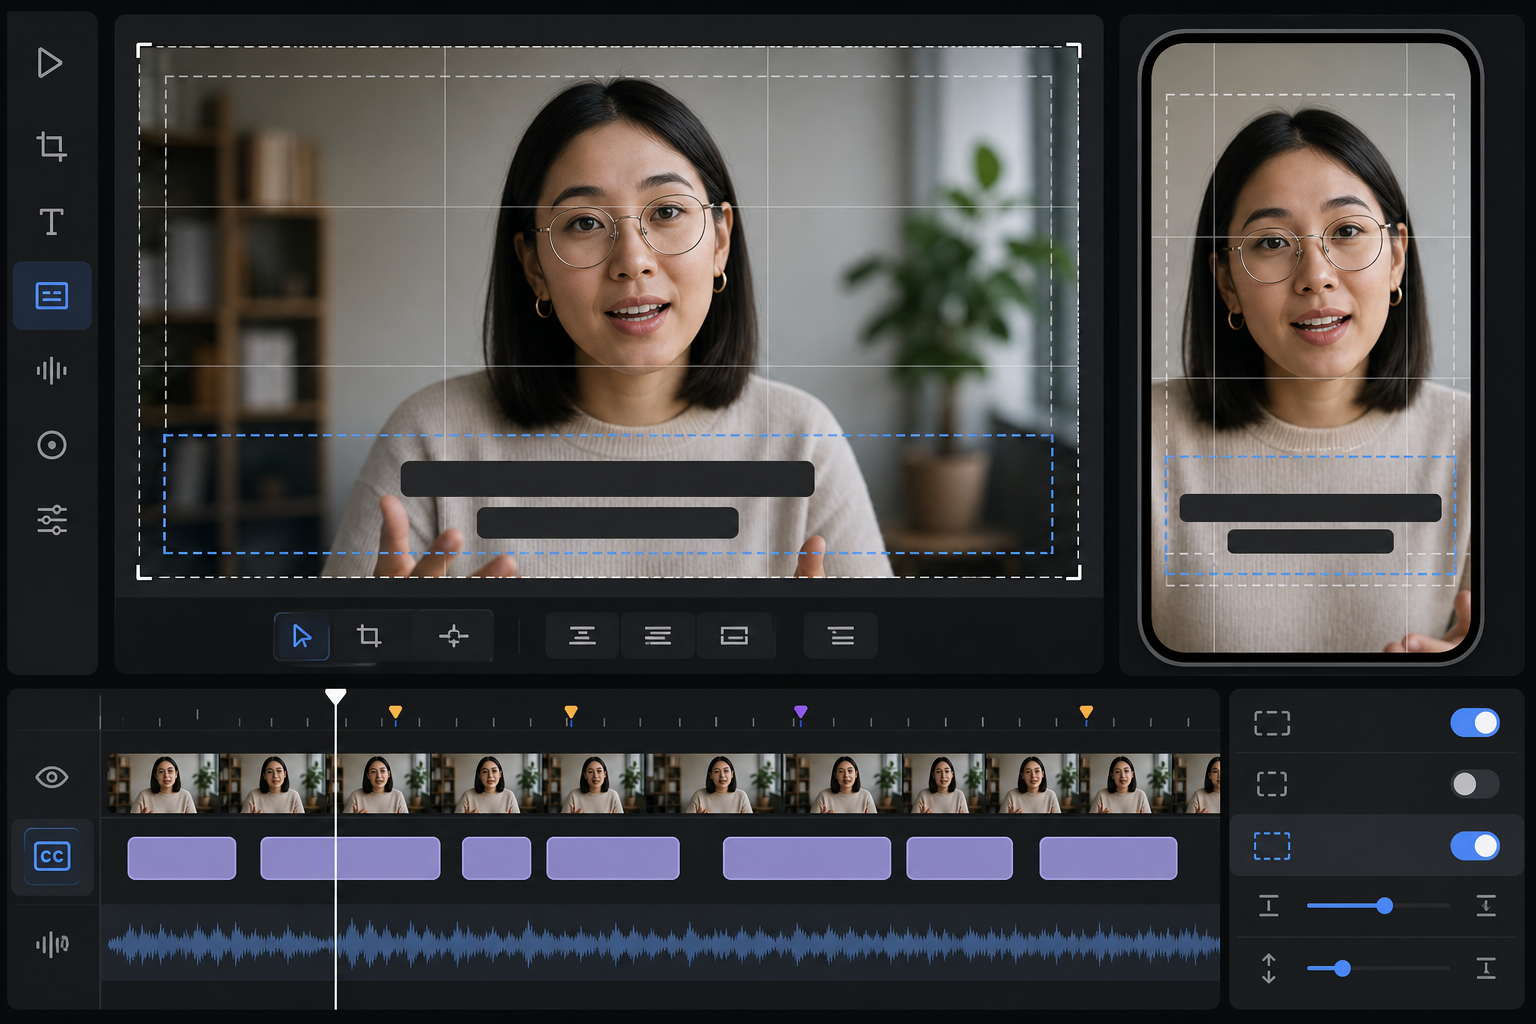
Captions are the product in a silent social proof clip. The video may provide trust, but the captions provide comprehension. A viewer should understand the core answer while scrolling with sound off.
Start by generating a transcript or subtitle file from the extract. A tool like /video-to-subtitles can help turn the spoken answer into editable subtitle text. After that, edit the captions manually. Raw transcripts usually preserve speech patterns that are natural in audio but heavy on screen.
Caption editing is not about changing the speaker’s meaning. It is about making spoken language readable.
A practical caption pass includes:
- Remove repeated filler words when they do not affect tone.
- Break long sentences into short caption units.
- Keep one idea per caption where possible.
- Use punctuation to clarify the thought, not to mimic every pause.
- Preserve important terms, product names, and numbers accurately.
- Avoid stacking three dense lines at the bottom of a mobile frame.
For social proof clips, readability matters more than perfect transcript fidelity. If the speaker says, “So, yeah, I think what we found was that teams were basically losing time because the files were coming in from everywhere,” the caption can become: “Teams were losing time because files came from too many sources.” The meaning remains intact, and the viewer can read it quickly.
Keep caption lines short enough for small screens. A useful rule is to aim for 32 to 42 characters per line and no more than two lines at once. Technical words may force longer lines, so preview on a narrow mobile width before final export.
Decide Whether to Burn In Subtitles
There are two common subtitle approaches: burned-in captions and separate subtitle files. Burned-in captions are permanently visible inside the video. Separate subtitles can be toggled by the player or platform.
For webinar Q&A clips used as social proof, burned-in captions are often the safer choice because they travel with the clip. They remain visible in email previews, landing page embeds, social reposts, internal sales decks, and lightweight GIF-style demonstrations.
Use this table to choose:
| Need | Better choice | Why |
|---|---|---|
| Social feed clip | Burned-in captions | Most viewers start muted and may not enable platform captions |
| Landing page hero proof | Burned-in captions | The message is immediately visible without player controls |
| Full webinar archive | Separate subtitles | Accessibility and search benefit from proper subtitle tracks |
| Sales deck embed | Burned-in captions | Playback environments are unpredictable |
| Help center video | Both if possible | Burned-in captions help scanning; subtitle files support accessibility |
If you burn captions into the video, still keep the subtitle file. It helps with future edits, accessibility review, blog excerpts, and translation. Store it next to the clip using the same base filename.
Create Format Variants Without Losing the Message
One webinar answer can produce several useful assets, but only if you plan variants carefully. Do not create variants by blindly resizing the final export. Reframe from the clean source extract when possible.
Common variants include:
| Variant | Size idea | Best use | Watch out for |
|---|---|---|---|
| Horizontal | 16:9 | Blog embeds, YouTube clips, product pages | Captions may feel too low if copied from vertical |
| Square | 1:1 | LinkedIn feed, compact landing page proof | Speaker and slide can become cramped |
| Vertical | 9:16 | Reels, Shorts, Stories, mobile-first pages | Product UI may become unreadable |
| Thumbnail | Static image | Newsletter, card preview, archive page | Needs a clear facial expression or visual cue |
| Micro GIF | 3 to 8 seconds | Changelog, support article, lightweight demo | No audio, limited detail, file size pressure |
For a very short visual loop, /gif-maker can be useful when the moment is more about motion than speech, such as showing a before-and-after interface state. For spoken proof, a captioned video is usually better than a GIF because the timing and text remain easier to control.
If you need a static thumbnail or supporting image in another format, /convert-image can help normalize files before upload. For example, you might export a PNG frame from the video, convert it to a web-friendly format, resize it, and compress it for the page.
Name Files So the Clip Can Survive Handoff
A surprisingly common failure point is file naming. A clip may move from marketing to sales to web publishing to paid social, and every person exports another version called final-final-webinar-clip.mp4. That creates confusion, duplicate uploads, and broken review notes.
Use a file naming pattern that includes the source, answer topic, format, caption status, and date.
Example pattern:
webinar-topic_answer-focus_format_captionstatus_YYYY-MM-DD.ext
Example files:
customer-panel_migration-risk_16x9_captioned_2026-05-08.mp4customer-panel_migration-risk_9x16_captioned_2026-05-08.mp4customer-panel_migration-risk_square_captioned_2026-05-08.mp4customer-panel_migration-risk_thumbnail_2026-05-08.webpcustomer-panel_migration-risk_subtitles_2026-05-08.srt
Keep the source extract and subtitle file even after publishing. They make future edits much cheaper. If a product name changes, a caption typo is discovered, or a different crop is needed, you can revise from a known source instead of downloading a compressed social version.
Review the Clip Like a First-Time Viewer
After exporting, do not review the clip only in your editing environment. Watch it like someone who has never seen the webinar.
Use this review pass:
- Watch with sound off.
- Watch on a phone-sized preview.
- Check the first three seconds for context.
- Confirm the caption timing feels readable.
- Pause randomly and check whether private data is visible.
- Confirm the final frame does not end on an awkward expression or half-caption.
- Watch with sound on and confirm captions do not misrepresent the speaker.
The sound-off pass matters most. If the clip does not make sense muted, it is not ready for most marketing placements. The captions should carry the argument, while the speaker and visuals provide credibility.
Also check compression after upload. Some platforms soften small text, especially in product screens and slides. If the clip includes UI details, avoid making the product screen the only source of meaning. Captions should explain the point even if the UI is slightly softened by compression.
A Practical Publishing Checklist
Before publishing the clip, run through a final production checklist. This keeps the workflow repeatable for future webinars.
| Check | Done when |
|---|---|
| Clip has one purpose | The viewer can summarize the answer in one sentence |
| Context is immediate | The clip does not require the full webinar to understand it |
| Captions are edited | The text is readable, accurate, and not just raw transcript output |
| Frame is clean | Private names, platform clutter, and useless panels are removed |
| Mobile preview works | Captions and key visuals remain readable on a narrow screen |
| Variants are named clearly | Format, caption status, and date are visible in filenames |
| Source files are stored | Extract, subtitle file, thumbnail, and exports are kept together |
| Page assets are optimized | Thumbnails are resized and compressed before upload |
For web publishing, keep the surrounding page copy short. The clip should not need a long explanation. A short heading, one sentence of context, and the clip itself are usually enough. If the clip answers an objection, place it near the section where that objection naturally appears. If it shows customer proof, place it near the claim it supports.
Common Mistakes to Avoid
The most common mistake is starting too early. Webinar clips often include the host reading the question, thanking the attendee, or explaining the session format. That may be polite live, but it is slow in a clip. Start where the value begins.
The second mistake is keeping captions too literal. Spoken language contains loops, restarts, and softeners. Captions should preserve meaning, not every verbal detour.
The third mistake is cropping before caption planning. A vertical crop may look good until captions cover the speaker’s face or hide the product action. Always reserve caption space before finalizing the frame.
The fourth mistake is using the same export everywhere. A landing page proof clip, a LinkedIn post, and a mobile story may need different framing. Make a small set of intentional variants rather than one compromised file.
The fifth mistake is ignoring the thumbnail. Many viewers see the still frame before they decide to play. A blurry slide, closed eyes, or random transition frame weakens the clip before it starts.
Example Workflow for a Small Team
Here is a realistic workflow for a team repurposing one 50-minute webinar into three proof clips:
- Review the transcript and mark five candidate Q&A moments.
- Choose the three moments that each answer a different buyer concern.
- Export wide source extracts with extra seconds at both ends.
- Generate subtitles for each extract with /video-to-subtitles.
- Edit captions for readability and accuracy.
- Create horizontal and vertical versions only for the strongest two clips.
- Export clean thumbnail frames and prepare them with /resize-image and /compress-image.
- Store source extracts, subtitle files, thumbnails, and final videos in one folder.
- Publish each clip next to the relevant claim, objection, or customer proof point.
This is enough structure for repeatability without creating a heavy production process. The important part is that each clip has a job. One clip might reduce migration anxiety. Another might explain a workflow improvement. A third might show that a real customer understands the product well enough to describe it plainly.
Final Thoughts
Webinar Q&A clips work because they feel specific. They are not generic brand videos, and they are not over-polished ads. They show a person answering a question that a real buyer might already have.
The production standard is simple: make the answer easy to understand, make the frame clean, and make the captions strong enough for silent viewing. When you treat the transcript, crop, captions, thumbnail, and file naming as one workflow, a single webinar can become a practical library of proof assets instead of a recording that disappears after the event.