Whiteboard System Diagram Photo Cleanup: A Practical Handoff Guide
Turn imperfect photos of technical whiteboards into readable, compact reference files without erasing faint marker lines, color coding, annotations, or revision context.

Whiteboard System Diagram Photo Cleanup: A Practical Handoff Guide
A whiteboard photograph often becomes the only surviving record of an important technical discussion. It may contain service boundaries, cable routes, failure modes, ownership notes, database dependencies, or the one exception that never made it into the formal diagram. Unfortunately, the photograph is frequently taken from the corner of a meeting room under harsh ceiling lights, with faint marker strokes disappearing into glare.
Cleaning such an image is not simply a matter of increasing contrast. Aggressive processing can remove pale arrows, merge neighboring colors, obscure eraser ghosts that show revision history, or make handwriting look sharper without making it more understandable. The useful goal is a faithful reference image that another person can inspect without having attended the meeting.
This guide presents a practical method for photographing, correcting, exporting, and handing off dense whiteboard system diagrams. It is designed for engineering teams, technical support groups, facilities staff, workshop instructors, and anyone preserving diagrams that mix handwriting, symbols, color coding, and physical context.
Decide What the Photograph Must Preserve
Before editing, determine what kind of record you need. A diagram intended only as a visual reminder can tolerate more cleanup than evidence of an operational decision. A board that will later be transcribed needs maximum legibility, while a board documenting the progression of a discussion may need visible erasures and surrounding sticky notes.
Use the following preservation priorities:
| Intended use | Preserve first | Acceptable cleanup | Main risk |
|---|---|---|---|
| Short-term team reference | Labels, arrows, grouping | Strong background whitening | Losing faint secondary notes |
| Formal diagram reconstruction | Every readable mark and color | Perspective and tonal correction | Mistaking enhancement artifacts for marks |
| Change or incident record | Marks, erasures, dates, board context | Conservative exposure correction | Removing evidence of revisions |
| Training material | Main sequence and visual hierarchy | Cropping, cleanup, selective emphasis | Oversimplifying exceptions |
| OCR-assisted transcription | Character separation and even lighting | Grayscale or local contrast tests | Incorrect text becoming authoritative |
When in doubt, preserve an untouched original. Editing decisions are easier to reverse when the source remains available at its original resolution.
Capture a Better Source Before Editing
Image cleanup cannot fully reconstruct information hidden by a bright reflection or recorded as a few blurred pixels. If the board is still available, spend one minute improving the capture.
Stand as close to the centerline of the board as the room allows. Keep the phone or camera parallel to its surface rather than pointing upward from a seated position. Include all four corners of the writing area, plus a narrow margin. That border makes later perspective correction much easier.
Turn off the camera flash. A direct flash usually creates a concentrated reflection and uneven falloff. If ceiling lights produce glare, try switching off the row closest to the board, closing blinds, or moving the camera slightly while keeping it square. Reflections move as the viewing angle changes, so take several variations.
Tap to focus on a cluster of small writing, not on a blank region. Hold the camera with both hands and capture at the device's native resolution. Digital zoom throws away useful detail; move closer or take overlapping detail photographs instead.
A robust capture set contains:
- One complete, centered view of the board.
- One alternate full view from a slightly different height to shift reflections.
- Detail photographs of dense labels, pale writing, and crowded intersections.
- One context photograph showing nearby legends, sticky notes, or numbered hardware.
- A quick note recording the date, meeting, room, and photographer.
Do not erase the board until someone has opened the images and confirmed that the smallest important labels are readable.
Correct Perspective Before Enhancing the Marks
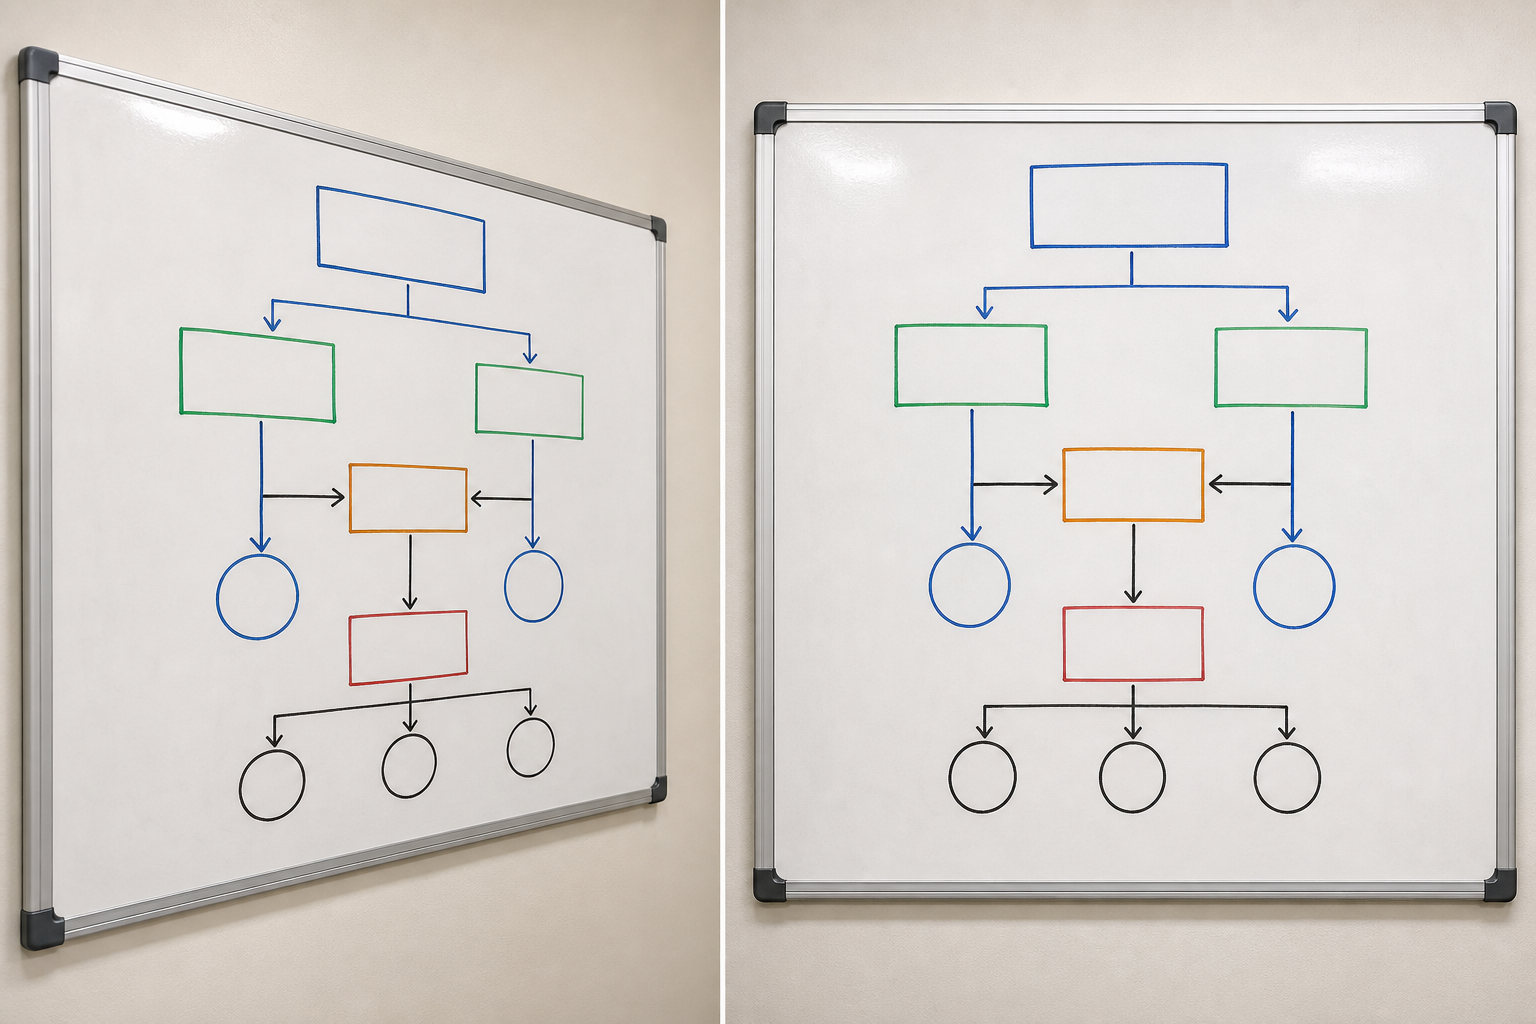
Perspective correction should come before sharpening, contrast changes, or OCR. When a rectangular board appears as a trapezoid, text and line thickness vary across the image. Correcting the geometry first gives later adjustments a more consistent source.
Identify the true corners of the writing surface rather than the outer frame if the frame is curved or partially hidden. Drag each correction point carefully. A small error at one corner can stretch handwriting across an entire side of the board.
After correction, inspect familiar shapes. Hand-drawn squares will not be mathematically perfect, but wall sockets, printed magnets, grid lines, and the board frame offer useful references. Circles should not become obvious ellipses, and repeated boxes should remain reasonably consistent in width.
Crop only after the board has been squared. Keep legends, marker color samples, sticky notes, and handwritten dates if they explain the diagram. Remove empty wall, chairs, and people unless the wider context has documentary value.
If the image still needs a standard output size, use the image resize tool only after perspective correction and cropping. Resizing earlier reduces the number of pixels available for geometric repair.
Neutralize Uneven Lighting Without Erasing Faint Ink
A photographed whiteboard rarely has a uniformly white background. One side may appear gray, a ceiling light may create a bright band, and old eraser residue may tint sections blue or red. The safest correction is gradual.
Start with white balance. Use an unmarked portion of the board as a neutral reference, but avoid selecting a reflection because it may be clipped to pure white. Correcting a warm or green cast often separates marker colors before any contrast increase is needed.
Next, raise overall exposure modestly while watching the faintest strokes. Reduce highlights if reflections are approaching pure white, and lift shadows only enough to reveal writing in darker corners. A gentle curve usually performs better than a single extreme contrast slider.
Local adjustments are valuable when one part of the board is darker. Apply a broad gradient or soft mask rather than painting tightly around individual words. Tight masks can create halos that make the document look altered and may interfere with later recognition.
Avoid converting the only edited copy to pure black and white. Thresholding can produce a striking result, but it frequently deletes pale marker, breaks thin arrows, and removes color-based meaning. If a monochrome copy helps OCR, export it as a separate derivative.
Recognize Irrecoverable Glare
A bright area with no visible texture is clipped, not merely overexposed. Moving an exposure slider cannot reveal marks that were never recorded. Inspect the alternate photograph or a detail shot from another angle. If no source contains the missing section, label the gap during transcription instead of guessing.
Glare is especially dangerous at line intersections. A missing segment may change whether two services connect, cross independently, or point in opposite directions. Treat uncertain topology as an unresolved question for the diagram's author.
Enhance Marker Strokes Conservatively
Once geometry and lighting are stable, make the writing easier to inspect. Moderate local contrast can strengthen marker strokes, but global saturation and heavy sharpening tend to amplify dirt, compression blocks, and eraser residue as well.
Use this order:
- Apply mild noise reduction only if the source is visibly grainy.
- Increase local contrast in small increments.
- Adjust individual color channels if one marker color remains weak.
- Add light sharpening while viewing the image at 100 percent.
- Check arrows, punctuation, and narrow gaps before exporting.
Color-specific adjustments can rescue a pale red or green marker without darkening the entire board. However, keep colors recognizable. If red denotes an outage path and blue denotes normal operation, pushing both toward black destroys information.
Sharpening should reveal recorded edges, not manufacture them. Stop when characters become easier to distinguish. Bright halos around dark strokes, crunchy board texture, and doubled-looking lines indicate excessive sharpening.
The AI photo editor may help with broad tonal cleanup or distracting environmental elements, but technical marks require careful review. Do not rely on generative filling to reconstruct missing labels, arrows, ports, or line segments. A plausible addition is more dangerous than an obvious blank because future readers may treat it as fact.
Separate Diagram Legibility From Text Recognition
A clean-looking image is not automatically an OCR-friendly image. Whiteboards combine handwriting, abbreviations, arrows, icons, underlines, and colored boundaries. Recognition software may interpret a connector as a character, split one label into several lines, or read a service abbreviation as a common word.
Prepare a duplicate specifically for recognition. Crop it into logical regions with a small overlap, straighten each region, and test both color and grayscale versions. Larger regional crops often produce better results than feeding a recognition system the entire board at once.
Use the image OCR tool to create a draft transcription, then compare every result against the image. Keep uncertain readings marked with brackets or question marks. Never silently replace a technical identifier with the software's best guess.
Use an OCR Verification Ledger
A simple verification ledger prevents uncertain text from entering formal documentation unnoticed:
| Region | Detected text | Visual reading | Confidence | Action |
|---|---|---|---|---|
| Upper-left service box | Similar service name | Confirmed manually | High | Accept |
| Central connector | Ambiguous short label | Two possible readings | Low | Ask author |
| Lower-right note | Partial sentence | First words obscured | Low | Mark incomplete |
| Color legend | Three category names | Confirmed from detail photo | High | Accept |
Verify identifiers more strictly than ordinary prose. Hostnames, port numbers, version numbers, ticket references, dimensions, and units can look credible even when one character is wrong. Compare them with existing records when those records are available.
OCR is most useful as an index and transcription aid. It should not replace the photographed source, especially when spatial relationships carry as much meaning as the words.
Preserve Revision Clues and Color Meaning
Whiteboards often show several layers of thought. A partially erased box may indicate a rejected design. A darker arrow may have been added after the main discussion. A sticky note may represent an unresolved decision rather than a permanent component.
Do not automatically remove every smudge. First decide whether it is dirt, eraser residue, or meaningful revision history. If the board documents an incident review, planning decision, or compliance discussion, conservative treatment is preferable.
Create a small legend during handoff when color has known meaning. Record statements such as blue for current state, green for proposed service, or red for failure path only when someone who attended confirms them. Do not infer a legend solely from conventional color associations.
If several marker colors become indistinguishable in grayscale, preserve a color master even when the sharing copy is monochrome. Readers with color-vision differences may also benefit from a short written legend or numbered annotations in a separately prepared diagram.
Protect Sensitive Information Before Sharing
Technical whiteboards can expose internal URLs, credentials, customer names, personal phone numbers, network ranges, room access details, or security assumptions. Review the entire image at high magnification before uploading it to a broad channel.
Use opaque redaction, not blur, for information that must be removed. Weak blur can leave short identifiers recognizable and may sometimes be partially reversed. Flatten the redaction into the exported sharing copy, then reopen that file to verify it.
Keep the unredacted master only in an approved location with suitable access controls. Do not overwrite it with the public or cross-team version. Record what was redacted and why so that a future maintainer knows the gap is intentional.
Also check environmental details around the board. Badge photographs, wall schedules, reflected laptop screens, and adjacent boards may reveal information unrelated to the diagram.
Build a Master, Sharing Copy, and Detail Set
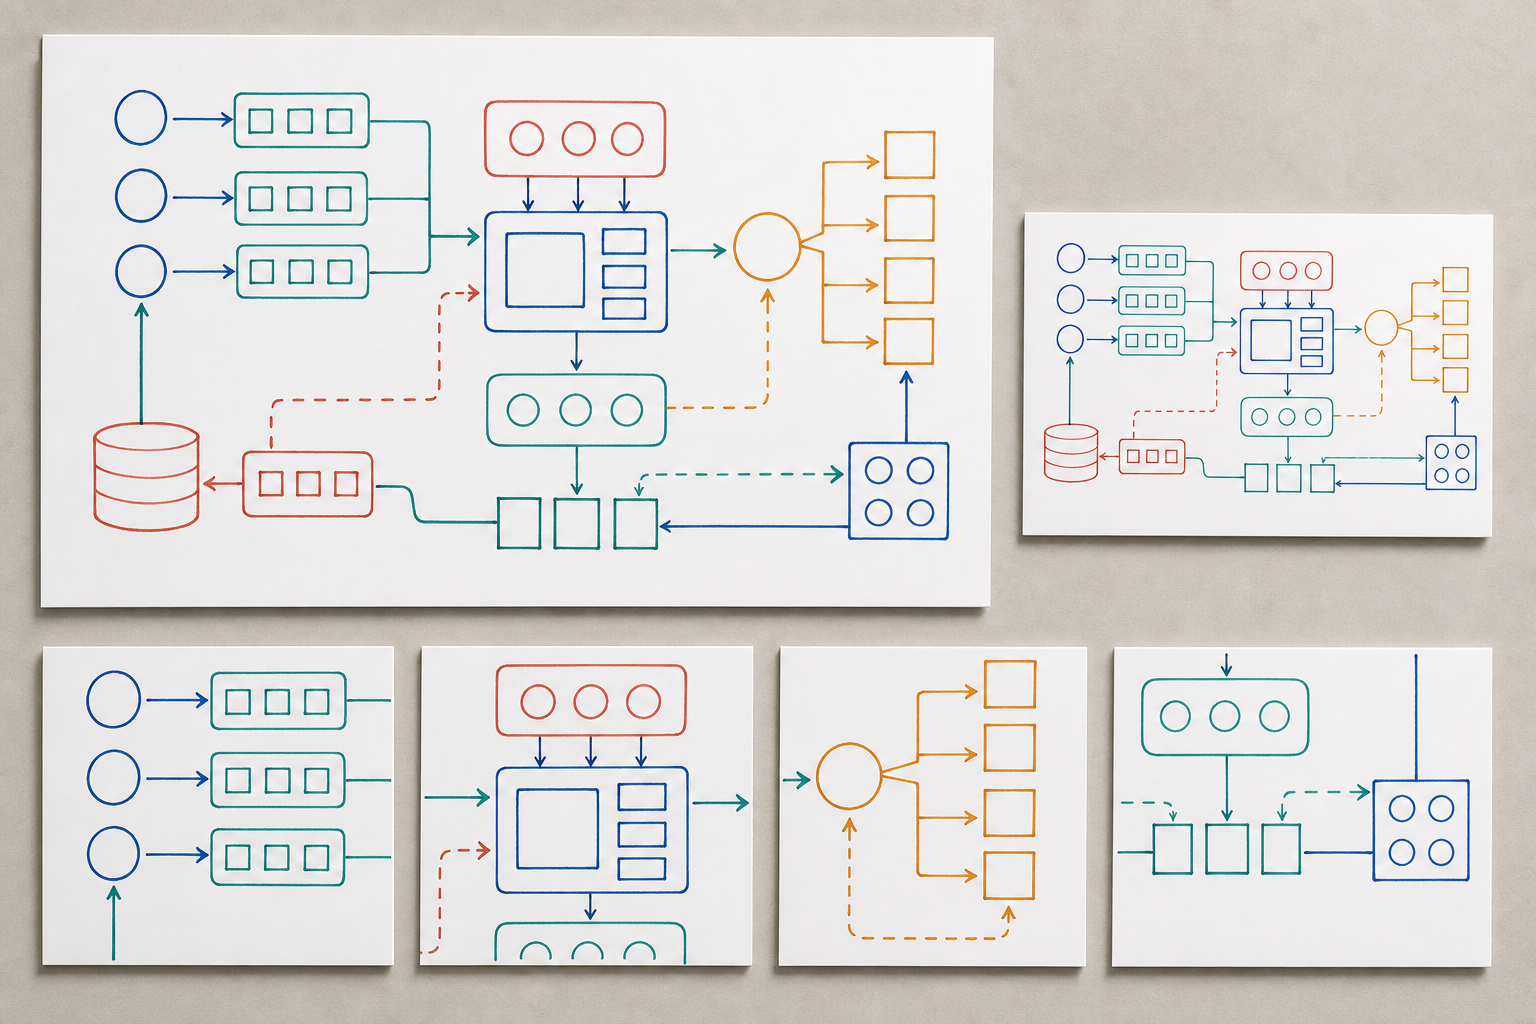
A single image rarely serves preservation, chat sharing, OCR, and close inspection equally well. Create a compact package with distinct purposes.
The master should retain the highest practical resolution, original color, conservative corrections, and broad context. Prefer a lossless or high-quality format. Keep the untouched camera original beside it.
The sharing copy should be cropped, readable on an ordinary laptop, and compressed enough for documentation platforms or team messages. Use the image compression tool and compare the result at actual size. Thin marker strokes and small punctuation are the first features to suffer when compression is too aggressive.
Detail crops should cover dense or ambiguous regions. Give each crop a small overlap with neighboring sections so readers can locate it within the complete board. Avoid making dozens of fragments; include only the areas that genuinely need closer inspection.
For a fixed review packet, combine the complete board, detail crops, transcription notes, and legend into a PDF. The image-to-PDF tool can place the selected images into a portable document, but confirm page order and orientation before distribution.
A sensible package might contain:
2026-07-26-system-map-original.jpg2026-07-26-system-map-master.png2026-07-26-system-map-sharing.webp2026-07-26-system-map-detail-a.png2026-07-26-system-map-detail-b.png2026-07-26-system-map-transcription.md2026-07-26-system-map-review.pdf
Use dates in year-month-day order so files sort chronologically. Add a short subject identifier, but keep filenames free of secrets and personal data.
Apply a Two-Pass Technical Review
The person who edits the photograph should not be the only person who validates it. Familiarity makes it easy to read what one expects rather than what the pixels show.
In the first pass, review image integrity:
- All board regions are included or intentionally excluded.
- Perspective correction has not stretched a side excessively.
- Faint marker strokes remain visible.
- Color distinctions still match the source.
- Compression has not broken thin lines or punctuation.
- Redactions are opaque and flattened.
In the second pass, review technical meaning:
- Arrowheads point in the correct direction.
- Crossing lines are not mistaken for connected lines.
- Box boundaries remain visible.
- Identifiers match the source character by character.
- Units, version numbers, and port numbers are confirmed.
- Uncertain or missing content is explicitly marked.
- The recorded color legend has been verified.
Ask someone who attended the session to inspect the ambiguous regions. If that is impossible, preserve uncertainty rather than resolving it through visual guesswork.
Common Cleanup Mistakes
The most damaging mistakes usually come from trying to make the image look like a digitally drawn diagram.
Whitening the board until it is pure white: This can erase pale writing and revision clues. Aim for readability, not a perfectly blank background.
Removing every shadow or smudge: Some apparent defects contain erased text, grouping marks, or faint connectors. Inspect them before removal.
Using generative reconstruction on missing areas: A visually convincing arrow or label is not evidence. Leave the area blank or mark it as unavailable.
Exporting only a small JPEG: A compact file may look acceptable in a chat preview while hiding compression damage at full size. Retain a high-resolution master.
Trusting OCR without verification: Technical abbreviations and identifiers are unusually sensitive to single-character errors.
Cropping away the legend: Color samples, sticky notes, and marginal annotations may explain the entire diagram.
Overwriting the original: Every later correction becomes harder when the untouched capture is gone.
Final Handoff Checklist
Before treating the whiteboard record as complete, confirm the following:
- The untouched originals and alternate angles are retained.
- The board has been corrected for perspective before resizing.
- Uneven lighting is reduced without deleting faint strokes.
- Marker colors remain distinct where color carries meaning.
- Glare-obscured regions are sourced from alternate images or marked missing.
- OCR output has been manually checked against the photograph.
- Sensitive information is removed from the sharing copy with opaque redaction.
- The master, sharing copy, and necessary detail crops have clear filenames.
- Another person has checked both image integrity and technical meaning.
- The storage location, date, subject, and known uncertainties are documented.
A strong whiteboard handoff does not pretend that an improvised sketch is a finished architecture diagram. It preserves the sketch faithfully, makes its important details easier to inspect, and clearly separates confirmed information from uncertain interpretation. That restraint is what turns a casual meeting-room photograph into a dependable technical record.